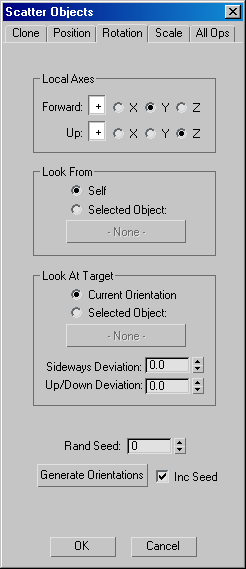
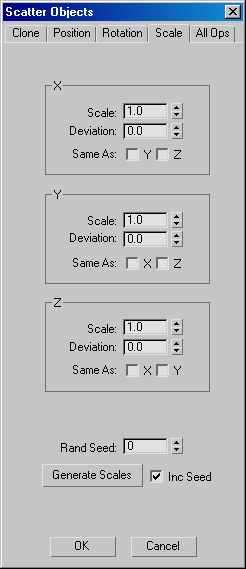
The Scatter Objects dialog of the Crowd helper object includes facilities for creating crowds by cloning objects, such as delegates. It also lets you distribute the clones and other objects within a radial area, along a shape, across a grid object or surface, or within a box or sphere. You can also specify various orientation and scaling options for scatter objects.

Contains the basic options for cloning an object.
Click this button to create the specified number of clones of the object whose name appears on the Object To Clone button.
Cloned objects are all created in the same location; to distribute them, you must set distribution options on the Position panel, and then click the Generate Locations button.
After you generate clones, the original object and its newly created clones are scatter objects; that is, they're selected
in the list in the All Ops panel (Select Objects To Transform), and are thus subject to subsequent operations on the Position,
Rotation, and Scale panels. You can change this selection via the All Ops panel  Select Objects to Transform function or by generating clones again.

Contains options for positioning objects using a reference (distribution) object. You can distribute objects randomly over the surface of a grid or other object, along a shape, or within the volume of a box or a sphere. You can choose only one option from the first two group boxes.
Placement Relative to Object group
Choose the appropriate item before selecting the reference object.
Click this button, and then select an object in the scene to be used as a reference object. Listed objects are limited to the chosen category.
Contains options for positioning scatter objects in a radial area, without using a reference object.
Specifies the minimum distance between scatter objects. The Spacing setting is multiplied by the size of the object's bounding sphere to determine how close objects can get. If Spacing is left at 1.0, the default, objects normally cannot be positioned within each others' bounding spheres. If Spacing is set to 2.0, objects are separated by a distance equal to or greater than the size of the bounding sphere.
Specifies a seed value for randomizing scatter objects' locations. If, for example, you use the same value for clones of a delegate and then a master object, each pair ends up in the same place. If a scene has more than one crowd, each should use a different seed to avoid having identical configurations.
Click this button to produce a set of locations for all scatter objects; that is, cloned objects or objects selected with the Select Objects to Transform button.

Contains options for orienting scatter objects. You can specify alternative forward and up axes, plus a target object toward which the objects will point. In addition, you can specify a source object; when using both source and target objects, the objects are rotated so they're parallel to the line between the two.
Use these settings to designate alternative forward and up axes. The default settings match the delegate axes.
Determines the direction from which the objects look. By default, each object looks from its own position (Self), so that when several objects are looking at a single target, each is oriented differently. To orient each object so that it's parallel to an imaginary line between two objects (the "from" object and the "to" object), choose Selected Object and specify the object with the (None) button.
Determines the direction toward which the scatter objects look. By default, each object retains its current orientation. To orient each scatter object so that it's parallel to an imaginary line between two objects (the "look from" object and the "look at target" object), choose Selected Object and specify the object with the (None) button.
Sets a maximum deviation angle in degrees for the objects' sideways orientation. If the scatter objects should look in an object's general direction but may look at a spot to either side of the target, use Sideways Deviation to set the maximum amount by which they can deviate from the calculated angle. The actual deviation amount for each object is calculated at random, based on the Deviation settings and the Rand Seed setting. Range=0.0 to 180.0.
Sets a maximum deviation angle in degrees for the objects' up/down orientation.
If scatter objects should look in an object's general direction but may look at a spot above or below the target, use Up/Down Deviation to set the maximum amount by which they can deviate from the calculated angle. The actual deviation amount for each scatter object is calculated at random, based on the Deviation settings and the Rand Seed setting. Range=0.0 to 180.0.
Specifies a seed value for randomizing the scatter objects' orientations, based on the Deviation settings.
If you use the same value for clones of a delegate and then a master object, each pair ends up with the same orientation. If a scene has more than one crowd, each should use a different seed to avoid having identical configurations.
Click this button to produce a set of orientations for all scatter objects; that is, cloned objects or objects selected with the Select Objects to Transform button.

Contains options for scaling scatter objects. You can apply uniform or non-uniform scaling, with optional per-axis deviation for scaling variation.
Each axis group has a "Same As" option that lets you scale that axis by the same amount as another. To prevent non-uniform scaling, set two axes to be the same as the third. For example, set scaling in the X group, and then in the Y and Z groups, turn on Same as X.
Click this button to scale all scatter objects; that is, cloned objects or objects selected with the Select Objects to Transform button.

This panel lets you perform various permutations of cloning and transform operations in a single step, with or without successive randomization.
Turn on to clone the object chosen with the Object to Clone button. When you click the Scatter button, the object is cloned, and then any specified transforms are applied to the clones.
Turning on Clones makes the Select Objects To Transform button unavailable. The object to clone and cloning parameters must be specified on the Clone panel.
Any options in this column that are turned on when you click the Scatter button cause the respective transforms to be applied to the current selection (see Select Objects To Transform, below) according to the settings in the Position panel, Rotation panel, and Scale panel.
Lets you designate objects to be affected by clicking the Scatter button.
Clicking this button opens a version of the Select dialog that's unique to Scatter Objects functionality. If you've performed one or more cloning operations during the current session, the results of the most recent cloning are selected by default, including the original cloned object. For example, if you created 10 clones, 11 objects are selected. You can use the Select dialog to alter or replace this selection.
This dialog appears when character studio encounters difficulty placing cloned objects without overlapping using the Scatter Objects dialog. The dialog text tells you how many attempts character studio has made to place a specific object, and asks you if you want to try again.