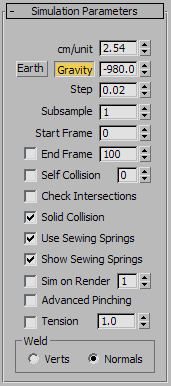
The Simulation Parameters rollout settings let you specify general properties of the simulation such as gravity, start and end frames, and sewing-spring options. These settings apply to the simulation on a global scale, that is, to all objects in the simulation.

Determines how many centimeters there are per 3ds Max system unit.
Cloth automatically sets cm/unit to the equivalent of 2.54 centimeters per inch (the default system unit in 3ds Max). For example, if you set the system unit to one foot, Cloth automatically sets cm/unit to 30.48 (12x2.54).
Size and scale are important when doing cloth simulation because a 10-foot curtain behaves much differently from a one-foot square handkerchief, even if they are made from the same fabric.
The maximum size of the time step the simulator takes.
This value is measured in seconds. The value must be less than the length of one frame (less than 0.033333 for 30 fps animation). A value of 0.02 is generally the largest value you want to use. Reducing this value causes the simulator to take longer to calculate, but will in general give better results. The simulator will automatically reduce its time steps as needed, but this is the maximum value that it will try. This value works in conjunction with the Subsample parameter: The actual maximum value=Step value divided by Subsampl value.
The number of times per frame that 3ds Max samples the position of solid objects. Default=1.
At the default value, Cloth samples the solid objects in the simulation once every frame. Increasing this value should help when objects are moving or rotating quickly, but be aware that the higher you set the value, the slower the simulation will be.
When on, detects cloth-to-cloth collisions. Leaving this off will speed up the simulator, but will allow cloth objects to interpenetrate.
The numeric setting specifies the extent to which Cloth tends to avoid self-colliding cloth objects, at the cost of simulation time. Range=0 to 10. Default=0.
This is a maximum limit. If Cloth needs fewer calculations to resolve all collisions, it will use fewer. In most cases, a value greater than 1 isn't necessary.
When on, uses the sewing springs created with Garment Maker to pull the fabric together.
This works only with objects that have been made with Garment Maker. Turn this option off once the garment has been pulled together. When off, Cloth will identify vertices that are sewn together and will always keep them coincident. When on, there is always a chance for the vertices to come apart if the sewing springs are not strong enough (actually, there will always be some slight gap between the vertices in this case).
When on, triggers the simulation at render time. Use this for generating a simulation with a network computer, which lets you continue to work on other aspects of your scene with your own computer. See a procedure here.
After the render is completed, Cloth writes a cache for each cloth object. You can specify this cache file on the Selected Object Rollout (Cloth) (which is available only when a single object is selected). If you do not specify a name, 3ds Max creates one.
The numeric value indicates the priority of the simulation; the simulations are run in ascending order. For modifiers with the same priority, the order is undefined.
Lets you visualize the compression/tension in the fabric by means of vertex coloring. Stretched cloth is indicated by red, compressed by blue, neutral by green. The numeric setting lets you change the range of tension/compression illustrated by a complete traversal from red to blue. The higher this value, the more gradual the shading. This works only for Garment Maker objects.
Controls how cloth is smoothed across a tear that you set up, before the cloth has been torn.
The difference between these two options is primarily in whether they are compatible with a Point Cache modifier. See Point Cache Modifier (Object Space).