While at the Editable Spline (Vertex) level, you can select single and multiple vertices and move them using standard methods.
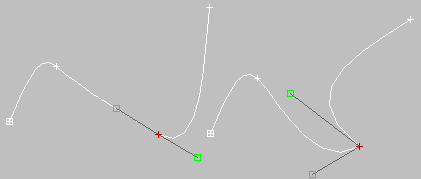
If the vertex is of the Bezier or Bezier Corner type, you can also move and rotate handles, thus affecting the shapes of any segments joined at the vertex. You can copy and paste the handles between vertices using tangent copy/paste. You can reset them or switch between types using the quad menu. The tangent types are always available on the quad menu when a vertex is selected; your cursor doesn't have to be directly over them in the viewport.

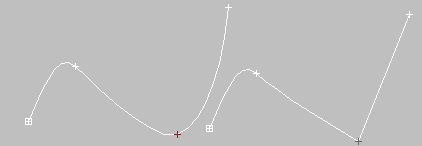
Smooth vertex (left) and Corner vertex (right)

To copy and paste vertex tangent handles:
 (Vertex), then
  select the vertex you want to copy from.
To reset vertex handle tangency:
It is easy to make the handles very small and coincident with the vertex, which makes them hard to select and edit. Reset the vertex handle tangency to redraw your handles
For information on the Soft Selection rollout settings, see Soft Selection Rollout.

The radio buttons in this group let you determine the tangency of the new vertices created when you Shift+Clone segments or splines. If you later use Connect Copy, vertices on the splines that connect the original segment or spline to the new one will have the type specified in this group.
This setting has no effect on the tangency of vertices created using tools such as the Create Line button, Refine, and so on.

Adds more splines to the selected object. These lines are separate spline sub-objects; create them in the same way as the line spline. To exit line creation, right-click or click to turn off Create Line.
Attaches another spline in the scene to the selected spline. Click the object you want to attach to the currently selected spline object. The object you're attaching must also be a spline.
For further details, see Attach.
Click this button to display the Attach Multiple dialog, which contains a list of all other shapes in the scene. Select the shapes you want to attach to the current editable spline, then click OK.
Creates a spline cage out of cross-sectional shapes. Click Cross Section, select one shape then a second shape, splines are created joining the first shape with the second. Continue clicking shapes to add them to the cage. This functionality is similar to the Cross Section modifier, but here you can determine the order of the cross sections. Spline cage tangency can be defined by choosing Linear, Bezier, Bezier Corner or Smooth in New Vertex Type group.

The Refine group includes a number of functions useful for building spline networks for use with the Surface modifier.
Lets you add vertices without altering the curvature values of the spline. Click Refine, and then select any number of spline segments to add a vertex each time you click (the mouse cursor changes to a "connect" symbol when over an eligible segment). To finish adding vertices, click Refine again, or right-click in the viewport.
You can also click existing vertices during a refine operation, in which case 3ds Max displays a dialog asking if you want to Refine or Connect Only to the vertex. If you choose Connect Only, 3ds Max will not create a vertex: it simply connects to the existing vertex.
The Refine operation creates a different type of vertex depending on the types of vertices on the endpoints of the segment being refined.
When on, creates a new spline sub-object by connecting the new vertices. When you finish adding vertices with Refine, Connect makes a separate copy of each new vertex and then connects all of the copies with a new spline.
After turning on Connect and before beginning the refinement process, turn on any combination of these options:

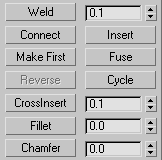
Converts two end vertices, or two adjacent vertices within the same spline, into a single vertex. Move either two end vertices or two adjacent vertices near each other, select both vertices, and then click Weld. If the vertices are within the unit distance set by the Weld Threshold spinner (to the right of the button), they're converted into a single vertex. You can weld a selection set of vertices, as long as each pair of vertices is within the threshold.
Inserts one or more vertices, creating additional segments. Click anywhere in a segment to insert a vertex and attach the mouse to the spline. Then optionally move the mouse and click to place the new vertex. Continue moving the mouse and clicking to add vertices. A single click inserts a corner vertex, while a drag creates a Bezier (smooth) vertex.
Right-click to complete the operation and release the mouse. At this point, you're still in Insert mode, and can begin inserting vertices in a different segment. Otherwise, right-click again or click Insert to exit Insert mode.
Specifies which vertex in the selected shape is the first vertex. The first vertex of a spline is indicated as a vertex with a small box around it. Select one vertex on each spline within the currently edited shape that you want to change and click the Make First button.
On open splines, the first vertex must be the endpoint that is not already the first vertex. On closed splines, it can be any point that isn't already the first vertex. Click the Make First button, and the first vertices will be set.
The first vertex on a spline has special significance. The following table defines how the first vertex is used.
| Shape Use | First Vertex Meaning |
|---|---|
| Loft Path | Start of the path. Level 0. |
| Loft Shape | Initial skin alignment. |
| Path Constraint | Start of the motion path. 0% location on the path. |
| Trajectory | First position key. |
Moves all selected vertices to their averaged center.
Fuse is useful for making vertices coincide when building a spline network for use with the Surface modifier.

Three selected vertices (left); fused vertices (right)
Selects successive coincident vertices. Select one of two or more vertices that share the exact same location in 3D space, and then click Cycle repeatedly until the vertex you want is selected.
Cycle is useful for selecting a specific vertex from a group of coincident vertices at a spline intersection when building a spline network for use with the Surface modifier.
Adds vertices at the intersection of two splines belonging to the same spline object. Click CrossInsert, and then click the point of intersection between the two splines. If the distance between the splines is within the unit distance set by the CrossInsert Threshold spinner (to the right of the button), the vertices are added to both splines.
You can continue using CrossInsert by clicking different spline intersections. To finish, right-click in the active viewport or click the CrossInsert button again.
CrossInsert is useful for creating vertices at spline intersections when building a spline network for use with the Surface modifier.
Lets you round corners where segments meet, adding new control vertices. You can apply this effect interactively (by dragging vertices) or numerically (using the Fillet spinner).Click the Fillet button, and then drag vertices in the active object. The Fillet spinner updates to indicate the fillet amount as you drag.

Original rectangle (left), after applying Fillet (top right), and after applying Chamfer (bottom right)
If you drag one or more selected vertices, all selected vertices are filleted identically. If you drag an unselected vertex, any selected vertices are first deselected.
You can continue using Fillet by dragging on different vertices. To finish, right-click in an active viewport or click the Fillet button again.
A fillet creates a new segment connecting new points on both segments leading to the original vertex. These new points are exactly <fillet amount> distance from the original vertex along both segments. New fillet segments are created with the material ID of one of the neighboring segments (picked at random).
For example, if you fillet one corner of a rectangle, the single corner vertex is replaced by two vertices moving along the two segments that lead to the corner, and a new rounded segment is created at the corner.
Lets you bevel shape corners using a chamfer function. You can apply this effect interactively (by dragging vertices) or numerically (using the Chamfer spinner). Click the Chamfer button, and then drag vertices in the active object. The Chamfer spinner updates to indicate the chamfer amount as you drag.
If you drag one or more selected vertices, all selected vertices are chamfered identically. If you drag an unselected vertex, any selected vertices are first deselected.
You can continue using Chamfer by dragging on different vertices. To finish, right-click in an active viewport or click the Chamfer button again.
A chamfer "chops off" the selected vertices, creating a new segment connecting new points on both segments leading to the original vertex. These new points are exactly <chamfer amount> distance from the original vertex along both segments. New chamfer segments are created with the material ID of one of the neighboring segments (picked at random).
For example, if you chamfer one corner of a rectangle, the single corner vertex is replaced by two vertices moving along the two segments that lead to the corner, and a new segment is created at the corner.

Lets you create bound vertices. Click Bind, and then drag from any end vertex in the current selection to any segment in the current selection except the one connected to the vertex. Before dragging, when the cursor is over an eligible vertex, it changes to a + cursor. While dragging, a dashed line connects the vertex and the current mouse position, and when the mouse cursor is over an eligible segment, it changes to a "connect" symbol. When you release over an eligible segment, the vertex jumps to the center of the segment and is bound to it.
Bind is useful for connecting splines when building a spline network for use with the Surface modifier.
Lets you disconnect bound vertices from the segments to which they're attached. Select one or more bound vertices, and the click the Unbind button.