Softimage には、パラメータと使用する 2 種類の F カーブがあります。 これらのタイプはいずれも、この SDK では FCurve または FCurve クラスで表されます(FCurve.DependsOnFrameRate または FCurve::GetDependsOnFrameRate を参照)。
アニメーション F カーブ: 時間の経過に沿ってパラメータを制御する F カーブです(F カーブの X 軸はシーンの時間を表します)。たとえば、posx パラメータにアニメーション キーを設定することで作成される、オブジェクトの X 位置を制御する F カーブ ソースなどがあります。
プロファイル F カーブ: X 軸の意味の任意性が高い(コンテキストによって X 軸が決まるような)F カーブです。たとえば、カスタム プロパティ セットに追加された F カーブ パラメータなどがあります。
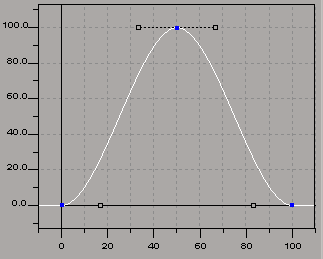
プロファイル F カーブは、F カーブ パラメータという特定タイプのパラメータを登録するのみです。 F カーブ パラメータは、通常はカスタム プロパティ セットでのみ使用され、CustomProperty.AddFCurveParameter または CustomProperty::AddFCurveParameter によって追加することができます。以下は、3 つのキーを持つ F カーブの簡単なインスタンスを追加し、釣鐘曲線を作成するものです。
	// Create a custom property with a profile curve
	var oCPSet, oFCurve, oFCParam, oFCKeys;
	oCPSet = ActiveSceneRoot.AddProperty(
			"CustomProperty", false, "NewPSet" );
	oFCParam = oCPSet.AddFCurveParameter("TestFCurve");

	// The Value of the Parameter is an FCurve object
	oFCurve = oFCParam.Value;
	LogMessage(
		"FCurve has " + oFCurve.GetNumKeys() + " keys."
	);

	// Print the value of each key
	oFCKeys = oFCurve.Keys;
	for (var i=0; i<oFCKeys.Count; i++) {
		LogMessage(
			"Key " + i + " = " + oFCKeys(i).Value
		);
	}

	//INFO : "FCurve has 3 keys."
	//INFO : "Key 0 = 0"
	//INFO : "Key 1 = 100"
	//INFO : "Key 2 = 0"
F カーブへのポインタを取得した後は、オブジェクト モデルを使ってこのポインタを操作できます。 たとえば、次のようにカーブを反転させることができます。
	// Inverse the curve by using an array of key,value
	// pairs with the FCurve.SetKeys method
	oFCurve.SetKeys( new Array(0,100, 1,0, 2,100) );

	/*
		You could also set each key value individually:

			oFCKeys(0).Value = 100;
			oFCKeys(1).Value = 0;
			oFCKeys(2).Value = 100;

		Alternatively, you could remove all the keys
			and then add each key manually:

			oFCurve.RemoveKeys();
			oFCurve.AddKey( 0, 100 );
			oFCurve.AddKey( 50, 0 );
			oFCurve.AddKey( 100, 100 );
	*/

	// Print the value of each key
	oFCKeys = oFCurve.Keys;
	for (var i=0; i<oFCKeys.Count; i++) {
		LogMessage( "Key " + i + " = " + oFCKeys(i).Value );
	}

	//INFO : "FCurve has 3 keys."
	//INFO : "Key 0 = 100"
	//INFO : "Key 1 = 0"
	//INFO : "Key 2 = 100"
アニメーション F カーブは、アニメート可能なパラメータの値をフレームごとに割り出すことで、これらのパラメータ値を制御します。 これらの値は F カーブの影響を受けるため、この F カーブはパラメータ値の「ソース」であると言えます。つまり、プロファイル F カーブはパラメータ値(F カーブのインスタンスとしてのパラメータ値)ですが、アニメーション F カーブは数値パラメータの値(倍精度浮動小数や単精度浮動小数などのパラメータ値)を制御するソースです。これが、プロファイルの F カーブとアニメーションの F カーブとの大きな違いです。
アニメートされたパラメータに Parameter.Value または Parameter::GetValue プロパティを使用した場合は、指定フレームにおける該当パラメータの数値を取得します。このパラメータをコントロールする F カーブを取得するには、アニメーション F カーブ オブジェクトを返す Parameter.Source または Parameter::GetSource プロパティを使用する必要があります。
次の例は、アニメーション F カーブを作成する方法、アニメートされたオブジェクトからこの F カーブを検索する方法、およびこの F カーブを直接操作する方法を示すことで、アニメーション F カーブを操作する方法を説明します。
このパートでは、次のような立方体の位置に、アニメーション F カーブを設定します。
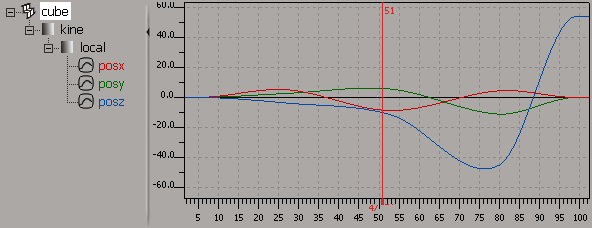
	var box = ActiveSceneRoot.AddGeometry( "Cube", "MeshSurface" );

	// Create one array for each position parameter (x,y,z)
	var keys_x = new Array(
							5,	0,
							27,	5.15951238934461,
							53,	-8.73436753361836,
							80,	4.47354844432886,
							99,	0
						)
	var keys_y = new Array(
							5,	0,
							27,	2.67822017156815,
							53,	5.56809635144552,
							80,	-11.1029681960437,
							99,	0
						)
	var keys_z = new Array(
							5,	0,
							27,	-3.76974943963522,
							53,	-11.5588639140921,
							80,	-44.9661083382855,
							99,	53.6825813319457
						)

	// Add each array as the values for the new fcurve source
	box.posx.AddFCurve2( keys_x );
	box.posy.AddFCurve2( keys_y );
	box.posz.AddFCurve2( keys_z );

	// Play the animation just to make sure it works
	FirstFrame();
	PlayForwardsFromStart();
	// Get the fcurve from the animated parameter using Parameter.Source
	var fcx = box.posx.Source;
	var fcy = box.posy.Source;
	var fcz = box.posz.Source;

	// Print some info about the curve
	PrintFCInfo( fcx );
	PrintFCInfo( fcy );
	PrintFCInfo( fcz );


	// --------------------------------------------------------------
	//	OUTPUT:
	//
	//INFO : "FCurve for parameter cube.kine.local.posx"
	//INFO : 	"Number of keys: 5"
	//INFO : 	"Is the fcurve being edited? ... false"
	//INFO : 		"Key[0] set at frame 5 = 0"
	//INFO : 		"Key[1] set at frame 27 = 5.15951238934461"
	//INFO : 		"Key[2] set at frame 53 = -8.73436753361836"
	//INFO : 		"Key[3] set at frame 80 = 4.47354844432886"
	//INFO : 		"Key[4] set at frame 99 = 0"
	//INFO : "-------------------------------"
	//INFO : "FCurve for parameter cube.kine.local.posy"
	//INFO : 	"Number of keys: 5"
	//INFO : 	"Is the fcurve being edited? ... false"
	//INFO : 		"Key[0] set at frame 5 = 0"
	//INFO : 		"Key[1] set at frame 27 = 2.67822017156815"
	//INFO : 		"Key[2] set at frame 53 = 5.56809635144552"
	//INFO : 		"Key[3] set at frame 80 = -11.1029681960437"
	//INFO : 		"Key[4] set at frame 99 = 0"
	//INFO : "-------------------------------"
	//INFO : "FCurve for parameter cube.kine.local.posz"
	//INFO : 	"Number of keys: 5"
	//INFO : 	"Is the fcurve being edited? ... false"
	//INFO : 		"Key[0] set at frame 5 = 0"
	//INFO : 		"Key[1] set at frame 27 = -3.76974943963522"
	//INFO : 		"Key[2] set at frame 53 = -11.5588639140921"
	//INFO : 		"Key[3] set at frame 80 = -44.9661083382855"
	//INFO : 		"Key[4] set at frame 99 = 53.6825813319457"
	//INFO : "-------------------------------"


	// --------------------------------------------------------------
	//	HELPER: This is just a convenience to print out
	//	information on the fcurve.
	//
	function PrintFCInfo( in_fc ) {
		// Make sure we have an fcurve before calling fcurve functions
		if ( ClassName(in_fc) == "FCurve" ) {
			// Print some general info about fcurve
			LogMessage( "FCurve for parameter " + in_fc.Parent );
			LogMessage( "\tNumber of keys: " + in_fc.GetNumKeys() );
			LogMessage( "\tIs the fcurve being edited? ... "
				+ in_fc.IsEditing() );

			// Print key info
			fckeys = in_fc.Keys;
			for ( var i=0; i<fckeys.Count; i++ ) {
				LogMessage( "\t\tKey[" + i + "] set at frame "
					+ fckeys(i).Time + " = " + fckeys(i).Value );
			}
		} else {
			LogMessage( "You passed me a(n) "
				+ ClassName(in_fc) + " instead of an FCurve." );
		}
		LogMessage( "-------------------------------" );
	}
	// Use fcurve editing mode in case we want to undo or discard
	// any edits
	LogMessage( "Starting editing.............................." );
	fcx.BeginEdit();
		fcx.RemoveKeyAtIndex(1);
		fcx.RemoveKeyAtIndex(3);
		PrintFCInfo( fcx );
		fcx.Resample(
			fcx.GetKeyAtIndex(0), 						/* first key */
			fcx.GetKeyAtIndex(fcx.GetNumKeys() - 1), 	/* last key */
			1, 											/* 1-frame steps */
			true 										/* keep keys */
		);
	fcx.EndEdit();
	LogMessage( "Done editing.................................." );

	// Print info about modified fcurve again:
	PrintFCInfo( fcx );


	// --------------------------------------------------------------
	//	OUTPUT:
	//
	//INFO : "Starting editing.............................."
	//INFO : "FCurve for parameter cube.kine.local.posx"
	//INFO : 	"Number of keys: 3"
	//INFO : 	"Is the fcurve being edited? ... true"
	//INFO : 		"Key[0] set at frame 5 = 0"
	//INFO : 		"Key[1] set at frame 53 = -8.73436753361836"
	//INFO : 		"Key[2] set at frame 80 = 4.47354844432886"
	//INFO : "-------------------------------"
	//INFO : "Done editing.................................."
	//INFO : "FCurve for parameter cube.kine.local.posx"
	//INFO : 	"Number of keys: 9"
	//INFO : 	"Is the fcurve being edited? ... false"
	//INFO : 		"Key[0] set at frame 0 = 0"
	//INFO : 		"Key[1] set at frame 1 = 0"
	//INFO : 		"Key[2] set at frame 2 = 0"
	//INFO : 		"Key[3] set at frame 3 = 0"
	//INFO : 		"Key[4] set at frame 4 = 0"
	//INFO : 		"Key[5] set at frame 4.47354844432886 = 0"
	//INFO : 		"Key[6] set at frame 5 = 0"
	//INFO : 		"Key[7] set at frame 53 = -8.73436753361836"
	//INFO : 		"Key[8] set at frame 80 = 4.47354844432886"
	//INFO : "-------------------------------"
1 つのオブジェクトから別のオブジェクトに F カーブ アニメーションを複製する作業は、2 段階の操作で達成できます。まずは、ソースのオブジェクトまたはパラメータからクリップボードにコピーし、その次に、クリップボートの中身をターゲットのオブジェクトまたはパラメータに貼り付けます。このとき、コピー操作には CopyAnimation コマンドまたは CopyAllAnimation2 コマンドを使用し、貼り付け操作には PasteAnimation コマンドまたは PasteAllAnimation コマンドを使用します。
これらのコマンド間の違いは、CopyAnimation と PasteAnimation はマーク パラメータを使用するので、ソースとターゲットを密接に制御できる一方、CopyAllAnimation2 と PasteAllAnimation は入力にオブジェクトを使用するので、特定のソース タイプ(F カーブやエクスプレッションなど)に一致するアニメーションをすべて上書きでコピーできることです。
この例は、CopyAnimation コマンドでアニメーションのスケーリングをコピーしてから、PasteAnimation コマンドで別のオブジェクトに貼り付ける方法を示します。
また、CopyAllAnimation2 と PasteAllAnimation コマンドを併用すると、1 つのオブジェクトにあるすべてのアニメーションをすばやく別のオブジェクトに移行できます。この例で前述のコマンドを使用するには、以下に続くコードの太文字部分を次の 2 行のコードに置き換えます。
app.CopyAllAnimation2( disc1, c.siAnySource, c.siScl )app.PasteAllAnimation( disc2, 1 )
from win32com.client import constants as c
app = Application
app.NewScene( "", 0 )

# Create a disc and animate its scaling in X
disc1 = app.CreatePrim( "Disc", "MeshSurface" )
akeys = [ 2, 1.4, 47, 2, 84, 0.15 ]
disc1.sclx.AddFCurve2( akeys )

# Create another disc onto which we will paste this animation
disc2 = app.CreatePrim( "Disc", "MeshSurface" )

# Copy the animation from disc1 to disc2 (scaling parameters only)
app.CopyAnimation( disc1.sclx, 1, 0 )app.PasteAnimation( disc2.sclx, 1 )

# Now delete disc1 just to prove that the animation you see is
# really on disc2, then start the playback
app.DeleteObj( disc1 )
app.PlayForwardsFromStart()

# You will see that the disc still scales up and down, even though the
# original disc has been deleted.


