The Toon shader paint attributes are divided into several different regions which are painted, one over the other, to create an object's surface shading. Each Toon-shaded object starts with a base color. You can then add highlights and rimlights in different combinations to create myriad surface shading effects. Each paint region creates a different shading effect that adds to the object's overall painted appearance.
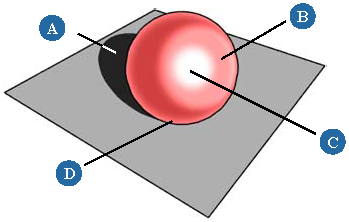
Shadow (A), Diffuse Highlight (B), Glossy Highlight (C), and Rimlight (D).
You shade an object using some or all of these paint regions by applying the Toon Paint and Host material shader. Alternatively, you can use the Toon Paint utility shaders, described Toon Utility Shaders to shade the object by painting a single one of these regions over a base color.
Select the objects to be rendered with cartoon style surface shading.
From the Render toolbar's Get  Material menu, choose one of the following shaders:
Toon applies the Toon Paint and Host shader to the selection. This shader allows you to control the full range of paint and local ink attributes for the selected objects.
Simple Toon Paint applies the Toon Paint shader to the selection. This shader allows you to control only the paint attributes for the selected objects.
Any of the other simple Toon shaders (Toon Paint Ambient, Toon Paint Rounded, and so on). Though these are considered utility shaders, you can use them to give selected objects a single Toon Paint attribute and base color.
As you add different paint layers to an object, they are painted one over the other. The highlights are painted over the base color, the rimlights over the highlights, and so on. The compositing mode determines how the two layers are combined.
The following modes are available:
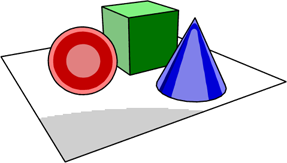
Every toon-shaded object has a base color. Subsequent layers, like highlights, rimlights, or ink, are painted over this base layer.
The objects' base colors have been set.

Activating the ambience alters the objects' colors using the scene's ambience value. In this case, the scene ambience is set to the default RGB values of 0.2, 0.2, 0.2.
Ambience has been activated for shadows only, which means that the ambience only affects areas that are hidden from all of the scene's light sources.
Although the following procedure assumes that the object has a Toon Paint and Host material shader applied to it, the same highlight controls exist in both the Toon Paint and Toon Paint Highlight shaders.
Select the toon-shaded object whose highlights you want to create.
From the Render toolbar, choose Modify Shader to edit the object's Toon material shader. The Toon Paint and Host shader's property editor opens.
From the Base tab, set a base color. This is the color over which other paint attributes, like highlights and rimlights, are painted.
If necessary, activate the Ambience to adjust the base color using the scene ambience.
Adjust the ambience parameters as necessary:
Amount: Controls the degree to which the scene ambience influences the base color.
Compositing: Specifies how the ambience color is combined with the base surface color. Select one of the transfer modes described Compositing (Transfer) Modes.
Shadows Only: When enabled, ambience is applied only to those regions of a surface that are hidden from all light sources.
If you haven't already, activate the render region tool (press Q) and draw a region an any viewport to see how the base color looks.
You can add two types of highlights to toon-shaded objects: diffuse and glossy.
Diffuse highlights are regions of color painted over an object's base color using any one of the toon shaders' compositing (transfer) modes. The highlights placement is determined by the lighting affecting the object.
Glossy highlights are painted over the diffuse highlights and/or the base color depending on where they are placed. Glossy highlight placement depends on both lighting and the angle from which you are viewing the object. They are useful for simulating an object's specular highlights.
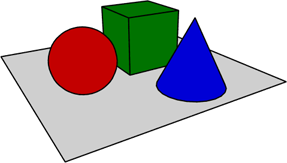
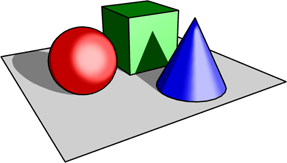
Original image, showing base colors only. Ambience is activated for the shadows to give them some definition.
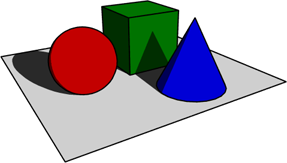
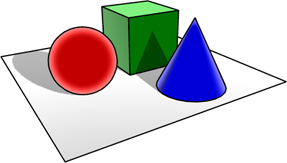
White diffuse highlights are painted over the objects' respective base colors, creating bright spots where the light hits the objects.

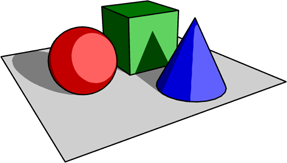
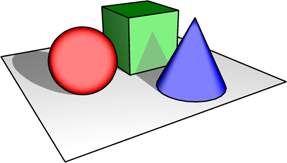
White glossy highlights were added in this image, creating smaller, brighter, specular-type highlights painted over the diffuse highlights.
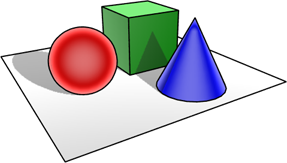
Both the diffuse and glossy highlights are softened to blend them more smoothly with the objects' base colors.
Although the following procedure assumes that the object has a Toon Paint and Host material shader applied to it, the same highlight controls exist in both the Toon Paint and Toon Paint Highlight shaders.
Select the toon shaded object whose highlights you want to create.
From the Render toolbar, choose Modify Shader to edit the object's Toon material shader. The Toon Paint and Host shader's property editor opens.
From the Highlights tab, enable Diffuse and/or Glossy highlights.
For either (or both) type(s) of highlight(s), adjust the following parameters, as necessary:
Color: Controls the highlights color, which is painted over the base color. The alpha value specifies the extent to which the highlight contributes to the surface color.
Illuminance: Specifies whether the highlight color is influenced by the light color on the object's surface in areas where the highlight is applied. Disabling this parameter means that the light color will not affect the highlight color.
Compositing: Specifies how the highlight color is combined with the underlying surface color. Select one of the transfer modes described Compositing (Transfer) Modes.
Coverage: Controls the extent to which the highlight covers the base color.
Softness: Softens the highlight's edge. A setting of 1 results in a highlight that is totally blurred.
If you haven't already, activate the render region tool (press Q) and draw a region an any viewport to see how the highlights look.
Rimlights are areas of color that are painted over a toon-shaded object's base color (rather like highlights). Rimlights' location on the surface has nothing to do with the lighting in the scene. Instead, is determined based on the surface's relation to an incident vector.
Original image showing base colors only. Ambience is activated for the shadows to give them some definition.
White rimlights are painted over the objects' respective base colors, creating bright spots at the objects' edges. The rimlights are calculated based on the default (camera) incident vector.
When the Invert option is off, the rimlights are painted over the objects' middles rather than at the edges.
The second set of rimlights is activated and they are painted over the objects' middles.
Like highlights, rimlights' softness is adjustable. By default, rimlights are somewhat softened, but in this case, both rimlights' softness is set to 0, resulting in rimlights with well defined edges and no falloff.
Although the following procedure assumes that the object has a Toon Paint and Host material shader applied to it, the same highlight controls exist in both the Toon Paint and Toon Paint Rimlight shaders.
Select the toon-shaded object whose highlights you want to create.
From the Render toolbar, choose Modify Shader to edit the object's Toon material shader. The Toon Paint and Host shader's property editor opens.
For the rimlights, adjust the following parameters, as necessary:
Order: Specifies whether the rimlights are painted over or under the highlights.
Color: The rimlight color that is painted over the base color and highlights. The alpha value specifies the extent to which the rimlight contributes to the surface color.
Compositing: Specifies how the rimlight color is combined with the underlying surface color. Select one of the transfer modes described Compositing (Transfer) Modes.
Coverage: The extent to which the rimlight covers the base color. A value of 0 results in no rimlight being painted, while a value of 1 results in a rimlight that covers the entire direction hemisphere.
Softness: Soften the rimlight's edge. A setting of 1 results in a rimlight that is totally blurred.
Invert: Inverts the rimlight's falloff profile. By default, the first rimlight is inverted and the second is not.
If the rimlight is calculated based on the camera incident vector (default), the first set colors the object's edges, while the second set colors its middle.
Vector: The rimlight effect relies on an incident vector pointed towards the surface in question.
Usually this is the camera direction itself but, alternatively, a user-specified vector or one of a variety of presets may be used.
Space: The coordinate space (World | Camera | Object) used for specifying the incident vector.
Selecting camera coordinates compute incident direction relative to the camera ("Upper Right" remaining in the upper-right of the rendered image regardless of camera position or orientation, for example).
Using world coordinates locks the effect to the direction of a surface regardless of its global orientation, while using object coordinates rotates the effect along with the surface.
Custom Vector: A three-dimensional (X, Y, Z) vector. The vector is automatically normalized internally.
If you haven't already, activate the render region tool (press Q) and draw a region an any viewport to see how the highlights look.
 Except where otherwise noted, this work is licensed under a Creative Commons Attribution-NonCommercial-ShareAlike 3.0 Unported License


