Before opening the texture editor, you must apply a material, a 2D texture, and a texture projection to your object. If you're working with a complex object, chances are that the texture won't correspond to it perfectly and you'll need to adjust it.
That's where the texture editor comes in. Typically, adjusting a 2D texture on a complex object will involve some, if not all, of the following tasks:
You can select and transform (scale, rotate and translate) selections of sample points to position them more precisely. Selecting sample points is described Moving Selections. Moving sample points is described Moving Selections.
You can also create clusters on the object to help you select and transform specific groups of sample points more quickly. This is described Creating Clusters.
You can apply quick transformations to selections of sample points using tools like Mirror and Rotate, which are described Mirroring and Rotating Points.
On polygon objects, you can use the Flip and Cycle tools to perform mirror and rotate type transformations to each polygon in a selection. Flip and Cycle are described Flipping and Cycling Polygons.
You can select groups of sample points and use subprojections to reproject the texture onto the corresponding part of the object, using a more appropriate projection type.
This is helpful for "unfolding" complex geometry over a texture while maintaining a single set of UV coordinates. Creating subprojections is described Creating Subprojections.
You can heal the "unfolded" sections of the object together to create smooth transitions at the seams, as described Healing Separated Points.
You can match the UV coordinates of sections of the geometry that are symmetrical and will be placed on the same area of the texture. Matching sample points is described Stamping UV Meshes.
If you're starting "from scratch," you'll want to apply the projection that best suits your object. For example, if you're going to texture a billboard, you will use a planar projection; for a planet, a spherical projection; and if you want to texture a complex object with several curves, you might use a UV projection.
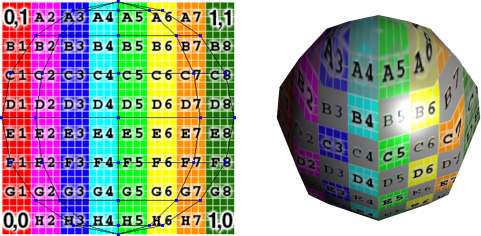
In the planar projection above, the texture is applied flatly onto the sphere without considering the sphere's poles or its stretched points at its equator. Each polygon is given the same amount of texture.
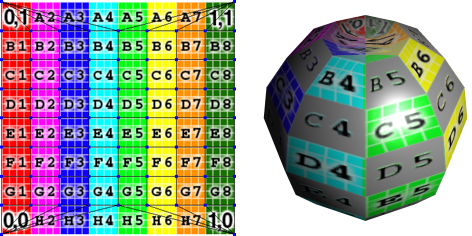
In the spherical projection above, the sample points are adjusted to compensate for a spherical projection. As a result, the polygons near the poles are more pinched in order to give the texture a spherical appearance. Each polygon is allotted a portion of the texture in order to fit it all around the sphere as evenly as possible.
Choosing a projection that suits your object or model will go a long way in helping you edit the texture with the Texture Editor.
You can use the Texture editor to quickly create clusters on your object. You can the access these cluster quickly, using the texture editor's cluster selection filter (see Cluster Selection).
By creating a cluster of, for example, 40 points, you can quickly select the entire cluster by clicking on one point rather than selecting each of the 40 points every time you wish to edit that portion of the object.
Clusters that you create in the texture editor are sample point clusters, which are different from, say, polygon clusters that you created in a 3D view.
Texturing operators, like modeling operators, are displayed in an operator stack that you can view in the explorer. The texturing operator stack shows you the history of all texturing operations that have been applied to each of the selected object's texture projections using the texture editor.
In the explorer, the texture operator stack is located under each texture projection's node. As with modeling operators, texturing operators propagate their effects upwards through the stack, so the history of texturing operations should be read top-to-bottom.
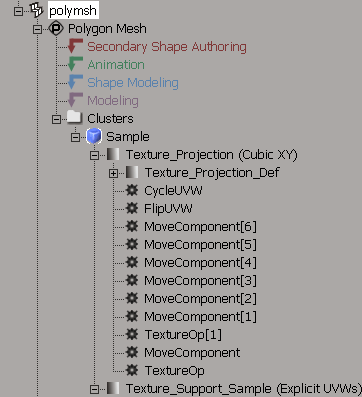
Each texture projection's operator stack is located under the Texture Projection node, along with the Texture_Projection_Def node.
The first TextureOp node (at the bottom of the stack) appears when you first apply the texture. Additional nodes are created when you modify the texture in the texture editor.
 Except where otherwise noted, this work is licensed under a Creative Commons Attribution-NonCommercial-ShareAlike 3.0 Unported License


 Create Cluster