You may need to resize individual bones, chains, or a whole skeleton to achieve the exact structure you are trying to create. For instance, you may find that your character's forearms are too long for their envelope.
You can scale bones individually or scale a skeleton in branch mode as you would any other object using the Scale commands on the Transform panel. However, there are two tools designed for scaling chains that are easy to use and give you greater control:
The Move Joint tool as described in Resizing Bones by Moving Chain Elements.
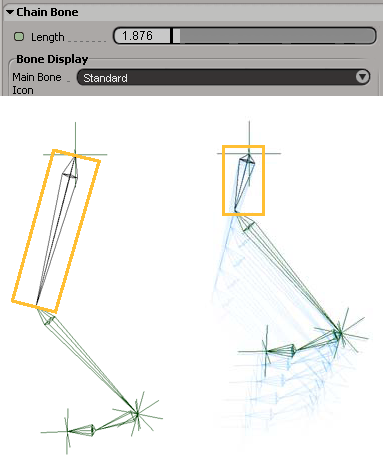
The bone's Length parameter as described in Resizing (Scaling) Chains.
While it's preferable to set the bone's length before you add the envelope to the skeleton (so as to not ruin the envelope's weighting), you can also do this after the envelope is on. You can have the new bone length affect the envelope's deformation or not:
When you simply change the size of a bone or chain (the deformer), the envelope deforms with it.
To change the length of the bones without deforming the envelope, the process is the same as setting a new reference pose as described in Changing Reference Poses.
This involves muting the envelope's operator, scaling the bones and adjusting the envelope's weights, setting the new reference pose, and then unmuting the envelope operator.
Using the Move Joint tool, you can interactively resize bones by moving any chain element (root, joint, bone, or effector) in a chain to a new location. The bones that are immediately connected to that chain element are resized and rotated to fit the chain element's new location.
This tool makes it easy to resize bones to do such things as:
Match an existing skeleton's proportions to a new character by quickly moving its bones into position.
Make the current angle of a joint the new preferred angle of rotation. Because the Move Joint tool acts as an FK manipulator, you can simply click on a joint to update the preferred angle to the current orientation without resizing the bones (see Changing the Joint's Preferred Angle for more information).
You cannot move a chain element with the Move Joint tool if its position or orientation is affected by keys, constraints, or other controlling animation (expressions, scripted operators, or actions in the mixer).
If you have an up vector or preferred axis constraint on the chain, the Move Joint tool limits the chain's movement to the resolution plane. You may notice this if you're trying to snap the chain to points as you resize it. In the chain's Kinematic Joint property editor, change the Resolution Plane behavior to Default, and then you can move the joint (see Constraining the Up Vector without an Object).
Choose Create  Skeleton Move Joint/Branch or press Ctrl+J to activate the Move Joint tool.
Move the mouse pointer over any chain element (which is highlighted in white), then click+drag it with the left or middle mouse button.
Only chain elements are "pickable" when the Move Joint tool is active: all other scene elements are ignored.
The type of chain element and the mouse button you click determines which bones in the chain are resized:
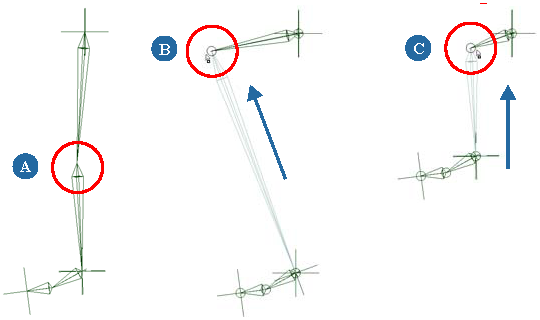
If you left-click+drag (Move Joint) a joint, only the joint is moved and the bones directly connected to it are resized to fit the new position.
If you left-click+drag (Move Joint) a bone, the bone and its joint are moved, and the bones connected to it are resized to fit the new position. The selected bone is not resized.
If you middle-click (Move Branch) any chain element, it is moved in branch mode, and only the adjacent bone "above" that element is resized to fit the new position. The selected element and its children are moved as a group but are not resized.
To constrain the movement to the X axis, press Shift while you drag with either mouse button.
You can use snapping to align chain elements to the grid or another target. See Snapping for information.
You can continue to select and manipulate any chain element until you deactivate the Move Joint tool by right-clicking or pressing Esc.
For example, activate the Move Joint tool and use it to resize a chain. Make sure the effector is highlighted, then press V to translate the effector (keeping the key pressed) to test how the revised chain will work in IK. When you're done, release the V key and continue to use the Move Joint tool to tweak the chain.
Like other objects in hierarchies, bones try to obey the same rules of transformation inheritance. As a result, when you animate the transformation (in this case, scaling) of a parent object, its animation is propagated to its children. This is usually desirable except in the cases where you want a child object to have its own animation.
You can key the values for the Length parameter to animate a bone changing length. However, if the bone is part of a skeleton and you want this animation to be respected, you probably want to prevent it from inheriting the scaling from its parent.
Select the bone whose length you have animated and open its Local Transform property editor (press Ctrl+K).
For more information on this, see Animating Transformations in Hierarchies.
 Except where otherwise noted, this work is licensed under a Creative Commons Attribution-NonCommercial-ShareAlike 3.0 Unported License