Using a special up-vector constraint designed only for IK chains, you can constrain the orientation of a chain to prevent it from flipping. This constraint provides full and precise control of the general orientation of your chain's resolution plane and helps you control where flipping problems will occur. You add up-vector constraints to the first bone of a chain because that is the bone that determines the chain's resolution plane. If you set an up-vector constraint for a bone that is not the first bone in the chain, a subchain is created starting at that bone's joint.
Using the chain's up-vector constraint forces the Y axis of a chain or subchain's first joint to point to a constraining object. The location of the chain's effector determines the X axis of the resolution plane and the Z axis is perpendicular to the plane defined by the X and Y axes.
The up-vector constraint specifies the third point of the resolution plane of the chain, while the first two points are the positions of the first joint and the effector.

| A |
First point (joint 1) |
| B |
Second point (effector) |
| C |
Third point (Up-vector constraint) |
| D |
Resolution plane (triangle) |
To view the up-vector constraint in the viewport, select Chain Critical Zone on the Attributes page in the viewport's Camera Visibility property editor (see Displaying Critical Zones for IK Chains).
To see how up vector controls work in a rig, create a default rig for a character and then translate the pyramid-shaped controls behind the elbows and knees. See Creating Biped Rigs.
The chain's up-vector constraint is different from a "regular" constraint (as found in the Constrain menu) because it's not a constraint per se: it is actually a property of the chain's joint. This means that the up-vector can be duplicated as part of a chain, but removing this constraint cannot be done as for normal constraints (see Removing Up Vector Constraints for how to remove the up-vector constraint).
For more information on other constraints, see Animating with Constraints [Animation].
If you perform any action that controls the bone's orientation (key the rotation, use an orientation constraint, or use an expression on the rotation), it takes precedence over the up-vector constraint.
If you have both a preferred axis and up-vector constraints on a chain, the last one applied takes precedence.
If a bone is not moving with the up-vector constraint, it may be that its rotation is animated (FK) which overrides the constraint.
You can set the up-vector constraint using either a menu command or from the Kinematic Joint property editor, depending on whether you are using a separate constraining object or not.
Create a constraining (control) object (such as a null) and position it as close as possible to the chain's root. If you place it too far from the root, you may get undesirable results.
Select the first bone of the chain and choose Create  Skeleton Chain Up Vector from the Animate toolbar, or choose Constrain Chain Up Vector from the Constrain panel.
You always add up-vector constraints to the first bone of a chain because that is the bone that determines the chain's resolution plane.
You will see the position in the Up Vector XYZ settings on the Resolution Plane page (see next page) but you won't be able to move the object using those settings: they only indicate the position of the control object.
While it is common to constrain a bone's up vector to a control object, you can simply make the up vector always point in a certain direction using the controls on the Resolution page in the bone's Kinematic Joint property editor. This is known as a static up vector.
Select the first bone of the chain and open its Kinematic Joint property editor.
You always add up-vector constraints to the first bone of a chain because that is the bone that determines the chain's resolution plane.
On the Resolution Plane page, select Up Vector from the Res. Plane list.
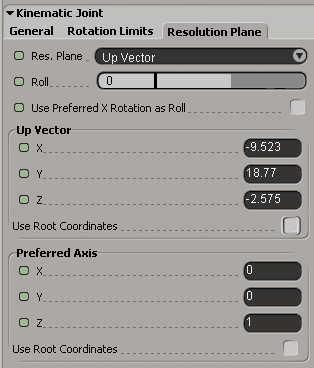
Define the up-vector position values in global space using the Up Vector X, Y, and Z settings. This is the spot to which the up vector of the bone will point.
Select Use Root Coordinates to specify a static up vector using the chain root's coordinates instead of global coordinates. There are two main implications of using the chain root's coordinates:
The static up vector moves with the chain. Global static up vectors aren't always useful because the up vector doesn't move with the chain (such as when a character walks). This is a good alternative to using an up-vector control object when you know the up vector won't change relative to the root. And without an extra up-vector control object, you can have a simpler character rig setup.
You can override the default resolution plane behavior. When the Res. Plane is set to Default, Softimage uses the chain root's Z axis as the preferred axis. Selecting Use Root Coordinates with a static up vector is the same as overriding this default behavior, such as when you want the chain root to have zero rotation.
Getting the up-vector constraint to work as expected depends on which side of the root you draw the chain: the Y axis of the first bone will be pointing either inward or outward.
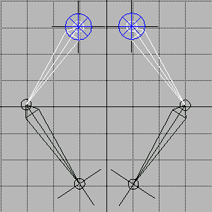
If you set an up vector on the chain on the right, it works perfectly. However, if you do this for the left chain (with the left sphere), it flips because the up vector makes the first bone's Y axis point toward the sphere. To correct this, you can set the joint's Roll to 180 (see Rolling an IK Bone for more information).
Because the chain's up vector isn't a real constraint, this means that you can't use offsets as you do when compensating typical constraints. To compensate on the position of an up-vector constraining object (such as if it's in front of an arm or leg instead of behind it), set the Roll on the bone where the up vector is applied.
When you choose the Chain Up Vector command (see Constraining the Up Vector to an Object), a skeleton up-vector operator is created. To remove the up-vector constraint, you must delete both the operator and reset the resolution plane.
In the explorer, delete the SkeletonUpVectorOp operator under the bone's Kinematic Joint property. This disconnects the constraining object from the up vector.
On the Kinematic Joint > Resolution Plan property page, set the Res. Plane back to Default.
For information on subchains, see Creating Subchains for Independent Movement.
 Except where otherwise noted, this work is licensed under a Creative Commons Attribution-NonCommercial-ShareAlike 3.0 Unported License


