As you would expect, the selection tools let you select and deselect elements. The different selection tools determine how you select in the 3D views. Each tool has a slightly different interaction. The choice of selection tool is partly a matter of personal preference, and partly a matter of what is easiest or best to use in a particular situation.
As an alternative to setting the selection tool and filter manually, you can use a selection mode that automatically sets both the selection tool and filter — see Object Selection Modes and Component Selection Modes.
The sections that follow describe the different tools and their interaction. The specific mouse buttons and modifier keys that you use to perform different actions — like selecting, adding to the selection, toggling, and deselecting — depend on the selection interaction model.
For more complete details, see Selecting Objects Using the Different Interaction Models and Selecting Components Using the Different Interaction Models.
Rectangle selection (F7) is sometimes called marquee selection. You select elements by dragging diagonally to define a rectangle that encompasses the desired elements.
The behavior of the Rectangle select tool depends on Raycast in Shaded Mode under Rectangle Select: Options in your Tools > Select preferences.
If it is on, the Rectangle tool ignores elements that are occluded (hidden behind other elements) in Hidden Line Removal, Constant, Shaded, Textured, and Textured Decal display modes.
In this mode, the Rectangle tool is actually the same as the Rectangle-Raycast tool.
If it is off, the Rectangle tool uses a faster and simpler algorithm that does not consider whether an element is occluded. As a result, you may select elements that you cannot see because they are obscured by others in the views.
This option is also used by the Move Point tool. It is ignored if Override Object Properties is off in the Display Mode menu of a 3D view.
Click and drag the mouse pointer diagonally in the 3D view to define a rectangle around any set of elements in the scene.
When selecting objects in Wireframe views, you must enclose at least part of the "wires."
When selecting polygon or edge components, the behavior is controlled by the Surround Polygons and Surround Edges options under Rectangle Select Options in your Tools > Select preferences. If this option is off, the tool selects all components that are wholly or partly enclosed; if it is on, the tool selects only those components that are wholly enclosed.
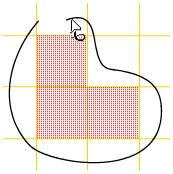
The Lasso tool (F8) lets you select one or more elements by drawing a free-form shape around them. This is especially useful for selecting irregularly shaped sets of components.

Selecting polygons with the Lasso tool.
The Lasso tool does not select elements that are occluded by others. However, you can still select components on the "other side" of the active objects in Hidden Line Removal, Constant, Shaded, and Textured viewing modes if Show Transparent Selected Wireframe is on (to set this and other Camera Display options, see Setting Other Display Options [Basics]). However even with this option, the Lasso tool still selects only the topmost component when two or more components are directly on top of each other.
Click and drag the mouse pointer to draw a shape around any set of elements in the scene. You do not need to close the shape: Softimage automatically connects the endpoints when you release the mouse button.
When selecting objects in Wireframe views, you must enclose at least part of the "wires."
When selecting polygon or edge components, the behavior is controlled by the Surround Polygons and Surround Edges options under Rectangle Select Options in your Tools > Select preferences. If this option is off, the tool selects all components that are wholly or partly enclosed; if it is on, the tool selects only those components that are wholly enclosed.
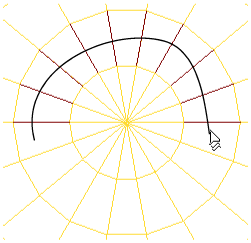
The Freeform tool (F9) lets you select elements by drawing a line across them. This is particularly useful for selecting a series of edges when modeling with polygon meshes, or for selecting a series of curves in order for lofting or creating hair from curves, as well as in many other situations.

Selecting edges with the Freeform tool.
The Freeform selection tool never selects elements that are occluded, even if they are partially visible through other objects when Show Transparent Selected Wireframe is on in the Camera Display options.
The Raycast tool (F10) casts rays from under the mouse pointer into the scene — elements that get hit by these rays are affected. Like the Freeform tool, Raycast never selects elements that are occluded, even if they are partially visible through other objects when Show Transparent Selected Wireframe is on in the Camera Display options. Unlike Freeform, elements are highlighted while the mouse button is held down.
The Rectangle-Raycast selection tool (Shift+F10) behaves like a mixture of the Rectangle and the Raycast tools. You select by dragging a rectangle around or across the desired elements, just like the Rectangle tool. Elements that are occluded behind others in Hidden Line Removal, Constant, Shaded, Textured, and Textured Decal display modes are ignored, just like the Raycast tool.
The Paint selection tool (F11) lets you use a brush to select components. It is limited to selecting points (on polygons meshes and NURBS), edges, and polygons. By modifying the paint tool's brush size, you affect the way in which components are selected.
The brush's radius controls the size of the area selected by each stroke, which you can adjust interactively or by using the Brush Properties editor. The brush's surface coverage controls how much the brush wraps around the active object, allowing you to select components around corners. You can set the surface coverage in the Brush Properties editor.
The Paint selection tool ignores the Extended Component Selection option. The function of the mouse buttons are similar to other paint tools in Softimage:
Click and drag to define a paint stroke across the active object. The affected components are highlighted as you drag.
To change the brush radius, press R and drag to the left or right. For additional ways to set the radius, see Changing the Brush Radius [Commands and Tools].
To open the Brush Properties Property Editor [Properties Reference]. press Ctrl+W. Only the Radius and the Surface Coverage parameters have any effect when using the Paint selection tool.
 Except where otherwise noted, this work is licensed under a Creative Commons Attribution-NonCommercial-ShareAlike 3.0 Unported License