mi archives can be exported in two flavors: the standard render archives (*.mi2 files) and object render archives (*.mia files) that can be used for optimizing and assembling large scenes.
You can export a scene (the current pass, the selected passes, or all passes) to render archives for further manipulation or to be rendered in an alternative way. When exporting a Softimage scene, you can specify several export options, such as whether or not to embed textures and how the scene's polygons will be approximated. See Exporting Scenes to Render Archives.
You can also export an object (and any children objects in its hierarchy) to object render archives to be used as a stand-in. Stand-ins provide a method of offloading assets such that they can be loaded and unloaded, on-demand, at render time. The stand-in workflow is composed of two parts: export an object to object render archives and then load the archives into your scene as stand-in geometry. See Exporting Objects to Object Render Archives for Use as Stand-ins.
Open the Render Pass Property Editor for the pass that you want to export. Do one of the following:
The Render Manager > (select a pass)
Set the current pass and choose Render > Render > Pass Options or Pass > Edit > Edit Current Pass from the Render toolbar.
Click the Archive tab and set the output path and file name for the render archives.
The Filename setting allows you to set the file name for exported render archives. The file name is appended to the scene output path to produce a fully resolved output path for archives. See Setting the Output Directory.
Checking the Export all frames to a single archive box does as advertised. If this option is deactivated, each frame is exported to a separate archive.
You now need to define how the pass is saved to the .mi format by setting options on the mi Archives tab of the mental ray Render Options Property Editor.
Note that these options can be set globally for the scene or locally for each render pass that contains its own set of mental ray rendering options. For more information, see Setting Global or Local Render Options.
Set the mental ray .mi File Generation options as needed:
Write all cameras in archive — When on, all scene cameras are exported, rather than just the pass camera.
Write triangulated polygon surfaces — When on, tessellated polygons are exported intead of the original geometry.
Write triangulated NURBS surfaces — When on, tessellated faces are exported instead of the original surfaces.
Write ASCII data — When on, vectors appear in the MI2 file as text. When off, they appear as binary data.
Embed textures in archive — When on, textures defined by a path are echoed as binary texture data. When off, they are echoed as paths.
If necessary, deactivate the Subdivision geometry shaders option.
When this option is on, only the unsubdivided meshes of subdivision surface objects are exported. A geometry shader is attached to each mesh to subdivide it at render time using Softimage's system of split objects and render callbacks (see Mesh Splitting). This helps lower the size of the exported MI file.
When this option is off, subdivision surfaces are exported at their fully tessellated level.
Normally, this option should be left on unless you are rendering using the mental ray standalone on an operating system other than Windows or Linux, since other operating systems do not support this option.
Once you have defined a path and set your options for each render pass that you want to export, choose Render ExportCurrent Pass/Selected Passes/All Passes from the render toolbar.
When your mi archives have been generated, you can render them using mental ray Standalone. For more information about rendering mi archives, see mental ray Standalone Rendering.
Object render archives (also known as "assemblies") provide a method of offloading assets such that they can be loaded and unloaded, on-demand, at render time. In the scene, the assets are represented by primitives known as "stand-ins". The object render archives are loaded into the render as an encapsulated "sub-scene" which can be unloaded automatically if mental ray starts to run low on physical memory. This reduces memory consumption and allows for faster rendering times.
Stand-ins are particularly useful for assembling cumulatively large and detailed scenes such as cityscapes, dense forests of trees, crowds of animated characters, and ICE particle instanced objects.
The basic workflow is composed of two parts:
Export an object to object render archives. The archive stores the object, all children objects in its hierarchy and any other related elements, including instances, groups, textures, userdata, shaders, geoshaders, materials, and animation.
Load the object render archives into your scene as stand-ins. A stand-in is a primitive that acts as a proxy for object render archives. The stand-in consists of a bounding box that represents the bounding area of the exported geometry, and, if needed, a time control that allows you to modify the flow of the animation sequence. If the archives are exported with display proxies then those images will be shown on the stand-in when the viewports are set to the Textured or Textured Decal display modes.
Click the mi Archives tab and set the options as needed:
Write triangulated NURBS surfaces — When on, tessellated faces are exported instead of the original surfaces.
Write ASCII data — When on, vectors appear in the MIA file as text. When off, they appear as binary data.
Embed textures in archive — When on, textures defined by a path are echoed as binary texture data. When off, they are echoed as paths.
The other mi archive options on this property page are ignored when exporting to object render archives.
Consider the following before exporting:
Select a single object: Only a single object can be selected when exporting object render archives. Object render archives store the selected object and all of the children objects in its hierarchy for a specified set of frames. This includes instances, groups, textures, materials, shaders, userdata and any other elements associated to the selected object.
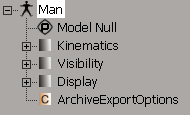
To export multiple objects use hierarchies and models: To make sure that multiple objects that belong together are exported properly (for example when working with a character), put all objects under a single hierarchy or make them a model. You can then select the top-most node for export and all of the children objects will be contained in the archives. For more information about working with hierarchies and models, see Selection and Hierarchies [Scene Elements] and Creating Local Models [Data Exchange].
To export pre-positioned objects and retain animated transforms: Each object has a set of transformation controls found in its Kinematics node. This is also true for every object in a hierarchy and model structure. When exporting object render archives, the Kinematics node of the selected object is ignored. If you want to retain the values set in the object's Kinematics node, select the object (branch-select in the case of a hierarchy or model) and parent everything under another null. This null should not have any scaling or rotation, and it should be positioned a the center of the world (0,0,0). You can then select the null for export and only its Kinematics node will be ignored, while preserving the transforms on all other objects in the hierarchy.
To export motion blur: Enable motion blur for your current render pass so that the motion blur settings are baked into the object render archives on export. Make sure that the pass with the motion blur enabled is the current pass or else the settings will be ignored. Also, the motion blur Speed (MotionBlurShutterSpeed), Offset (MotionBlurShutterOffset) and on-frame (MotionBlurShutterType) options in the object render archives must match those in the main scene where you are loading your stand-in. Mismatched options may generate unexpected motion blur results.
Cameras and lights: Cameras and lights defined in object render archives are ignored. All elements defined in object render archives should reference cameras and lights defined in the main scene only.
The Export Object Render Archive Dialog Box opens where you can set the path and filename for the exported archives, and specify if you want to export the current frame or a sequence of frames, and whether or not you want to generate display proxies for the stand-in.
Click OK to export the selected object to object render archives (*.mia files).
At the end of the export process a custom property is added to the object that you exported. This property stores the archive export options that you set and they are read back into the Export Object Render Archive Dialog Box if the same object is exported again (just to save you some time if you're doing iterative work on the stand-ins).
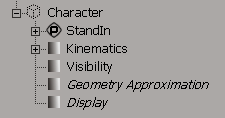
A stand-in is a special primitive that acts as a proxy for object render archives. Assuming that you have already exported object render archives (as described in the previous procedure), you can load those archives as stand-ins within your main scene.
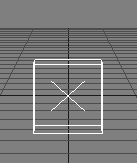
A standin primitive is created in your scene and positioned at the center of the world (0,0,0). Its scaling is set to (1,1,1) and its rotation is set to (0,0,0). The initial standin primitive is displayed as a cube with an "x" at its center which indicates that the stand-in is empty. It will remain like that until you load object render archives for it.
In the Standin Property Editor that opens, click the StandIn tab.
Click the browse button (...) button next to the StandIn textbox. The browser opens automatically to the Render_Archives folder of your current project. Locate and select the object render archives (*.mia) that you want to load as a stand-in.
You can control how the frames of the object render archives are loaded into the scene by setting the options in the Time Control Property Editor [Properties Reference].
For single-frame archives, the frame is loaded in at the first frame of the scene's global frame range (default behavior). The contents of the stand-in is held for all remaining frames in the scene.
For archives representing animated sequences, all frames in the sequence are loaded sequentially starting at the first frame of the scene's global frame range (default behavior). If the stand-in contains a sequence of frames that is shorter than the frame range in the main scene:
When an offset is defined, the first frame of the stand-in sequence (Time Control > Source Clipping > In) is held for all frames in the scene that occur prior to the frame offset (Time Control > Time Reference > Start Offset).
The last frame of the stand-in sequence (Time Control > Source Clipping > Out) is held for all remaining frames in the scene.
You can further control the stand-in once it is loaded into your scene, see Notes on Working with Stand-ins.
Click OK to load the object render archives into your scene as a stand-in.
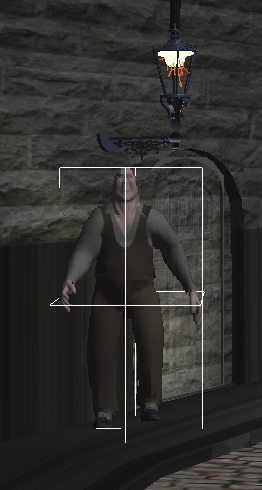
A bounding box representation of the exported object is displayed in the viewports.
If you generated display proxies when exporting the object render archives, you can view them on the stand-in by setting the viewport display mode to Textured or Textured Decal.
To manipulate a stand-in: The stand-in object is very similar to an instance, and as such, it behaves and can be manipulated like any other instance in Softimage. This means that, for example, you cannot modify the geometry nor change materials. However, you can transform the stand-in as well as change its visibility, display, and other properties.
To animate a stand-in's visibility: If you don't want the stand-in to be visible or rendered for held frames, you can animate its Visibility property to be off. For information on how to do this, see the Visibility Property Editor and Keying Parameters in Property Editors [Animation].
Stand-ins and Pass Partitions: When stand-ins are created, they are automatically added to the Background_Objects_Partition of the current pass. As such, you can conveniently treat all the background objects together. For example, you can turn off the visibility of all objects in the Background Objects partition so that they are excluded from the rendering process. For more information, see Defining Partitions [Rendering].
To delete a stand-in: Open an explorer and set its scope to Scene Root, then select the stand-in primitive node and press the Delete key. You can also select the stand-in's bounding box directly in a viewport at any frame and press the Delete key.
 Except where otherwise noted, this work is licensed under a Creative Commons Attribution-NonCommercial-ShareAlike 3.0 Unported License


