You can create text in Softimage, as well as import it from RTF (rich text format) files. Text is not a type of geometric object in Softimage; instead, text information is immediately converted to curves. After that, the curves can be optionally converted to planar or extruded polygon meshes.
Here is a quick overview of creating text. More detail is provided in the sections that follow.
Make sure that Immed (immediate mode) is off on the Edit panel.
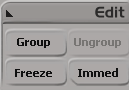
In immediate mode, each operation is frozen as soon as it is applied, so you wouldn't be able to type any text after creating the text object.
Choose one of the following commands from the Model toolbar:
Create  Text Curves creates a Text primitive and converts it to a curve object.
Create Text Planar Mesh creates a Text primitive, converts it to a curve object, and then finally converts the curve to a polygon mesh with the Extrusion
Length set to 0. The curve object is automatically hidden.
Create Text Solid Mesh creates a Text primitive, converts it to a curve object, and then finally converts the curve to a polygon mesh with the Extrusion
Length set to 0.5 by default. Once again, the curve object is automatically hidden.
In each case, a property editor with the following pages is displayed:
Convert curves to polygon meshes (optional — appears only when creating planar or solid mesh text).
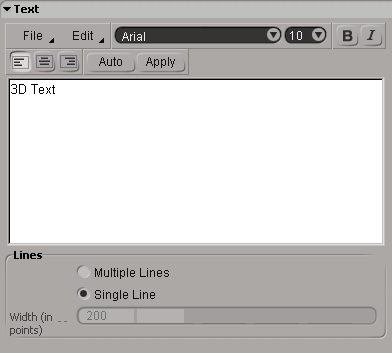
You can type text into the editing pane of the Text property page in the same way as you would type text in any simple word processor. Use the items on the Edit menu to undo, cut, copy, paste, or clear.
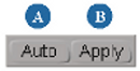
As you type, the text in the scene may update automatically depending on whether Auto is on or off:
If Auto is on, the 3D views update automatically as you type. Note that there is a small delay before the scene updates, to make sure that you have finished typing.
If Auto is off, the 3D views do not update automatically; instead, click Apply to see the result of your changes.
By leaving Auto off, you avoid delays that may occur as Softimage tries to update heavy geometry as you work, particularly when there are extrusions and bevels.
Font attributes include the typeface, size, weight (bold or regular), and angle (italic or roman). As with most word processors, you can change the attributes for selected characters or for new characters. New characters use the formatting of the previous character unless you change the font attributes explicitly.
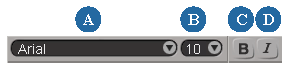
| A |
Typeface. Select any TrueType or OpenType font installed on your computer. |
| B |
Point Size |
| C |
Bold |
| D |
Italic |
Softimage uses the fonts installed in your $MWHOME/fonts directory. To install a TrueType or OpenType font, simply copy the TTF file to this location. If there is a corresponding BDF file, copy it to the same location for a "what you see is what you get" display in the editing pane of the Text property editor.
You can control how lines are aligned, as well as how multiple lines are treated.
The line alignment options control how the subcurves are aligned with the 3D object's center.
If Multiple Lines is on, you can set these options on individual lines. The first line determines how the curves are aligned with the 3D object's center. The relative position of the other lines is determined by the Width.
The Lines options determine how multiple text lines are treated:
If Single Line is on, curves are created on a single line in Softimage. Word-wrapping in the editing pane is ignored. Any text after a line break or paragraph return is also ignored (and is not displayed in the editing pane). Pressing Enter is equivalent to clicking Apply.
If Multiple Lines is on, curves are created on multiple lines according to the line breaks, paragraph returns, and word-wrapping shown in the editing pane.
You can specify a Width in points for word-wrapping and line alignment; the corresponding width in the scene is controlled by the Text vs Font Size options in the Text to Curve Converter — see Controlling Curve Size.
You can import text saved as an RTF (rich text format) file. After you import an RTF file, you can still modify the text in the editing pane. Softimage does not reference the RTF file; modifying the original RTF with a word processor does not affect the scene.
You can save the contents of the editing pane as an RTF file to use in another application or import into a different scene.
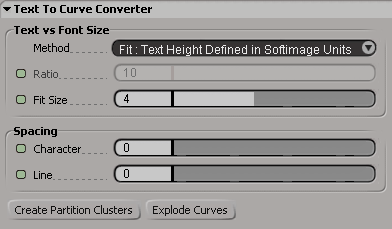
The parameters in the Text to Curve Converter property page control the size and the spacing of the curves. In addition, you can create partition clusters for each character.
There are two methods for controlling the size of curves:
Fit: Text Height Defined in Softimage Units scales the entire text block (including multiple lines) to the height specified by Fit Size. The relative size of characters is preserved.
Ratio: Points per Softimage Unit sets the size of individual curves based on the point size of the corresponding characters. Use the Ratio parameter to adjust the number of points per Softimage unit.
The options in the Spacing box allow you to compress or expand the spacing between characters and lines.
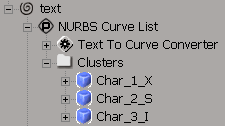
You can automatically create one subcurve cluster per character. This makes it easier, for example, to select subcurve clusters
and extract new curve objects using Create Curve Extract from Subcurves to make separate curve objects for each character.
The clusters are automatically named based on the character position and the character itself, as shown in the illustration below:
If you change the text after creating partition clusters, they are not updated automatically. You must re-create the partition clusters again.
When converting text to curves, you can create a hierarchy of separate curve objects. There is one new object for each character, and all objects are parented under a common null.
Each character is automatically extracted and parented under a new null object. The null object is selected in branch mode.
A modeling relation exists between the unexploded curve and the extracted objects, so modifying the options like Spacing on the Text to Curve Converter property editor affects the extracted objects as well.
However if you change the text after exploding the curves, you should re-explode them.
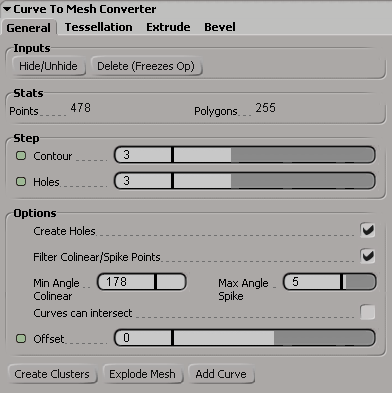
The options for controlling how text is converted to planar or solid polygon meshes are exactly the same as for converting any curve to a polygon mesh. This procedure is described in full detail in Converting Curves to Polygon Meshes [Modeling].
 Except where otherwise noted, this work is licensed under a Creative Commons Attribution-NonCommercial-ShareAlike 3.0 Unported License


