You can import motion capture information into Softimage using either the Acclaim or Biovision file formats. Both of these file formats contain motion information captured with optical technology.
Once you have imported the mocap files into Softimage, you can constrain the mocap rigs to your own rig, plot the mocap data, then transfer the resulting action sources from the mocap rig to your rig. See Transferring the Mocap Animation Data to Your Rig for more information.
You can import a file saved in the Acclaim Skeleton (.asf) format with an accompanying Acclaim Motion Capture (.amc) file. You can import an ASF file along with one compatible AMC file.
Acclaim Skeleton files (ASF) contain information about the hierarchy and base pose of the skeleton. This information is used to create a skeleton hierarchy (nulls or bones) when imported into Softimage. The animation for this skeleton is saved in an accompanying Acclaim Motion Capture (AMC) file.
ASF files are imported into Softimage as models placed under the Scene_Root node. The model's name is the same as the skeleton's name. The model contains a hierarchy of nulls or bones that reflect the skeleton hierarchy described in the ASF file. The model also contains a base pose action in which the model is initially posed.
Acclaim Motion Capture (AMC) files contain keyframed animation (motion capture data) that can be applied to the skeleton hierarchy in a compatible ASF file.
AMC files are imported into Softimage as an action with the AMC file's name. You can choose to have this action automatically applied as an action clip in the animation mixer (see Import Options [Properties Reference]).
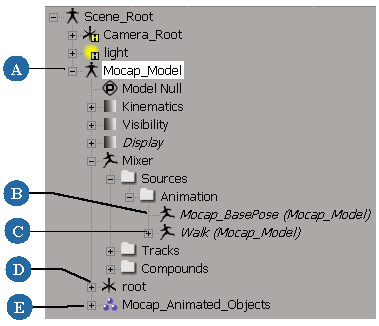
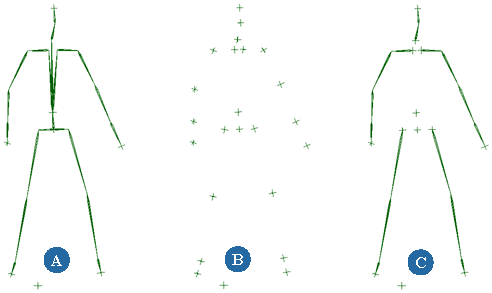
Structure of Acclaim file elements after importing.
Choose File  Import Acclaim File from the main menu. The Acclaim Import dialog box appears.
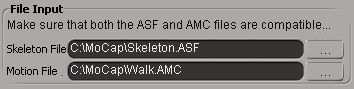
In the Skeleton File text box, specify the ASF file to be imported.
In the Motion File text box, specify the accompanying AMC file to be imported. This AMC file must be compatible with the ASF file you're importing.
Select how you want to import the skeleton hierarchy — see Setting Up the Skeleton.
Select the other import options — see Import Options [Properties Reference].
Biovision (BVH) files contain information about the hierarchy of the skeleton. This information is used to create a skeleton hierarchy (you can choose between nulls or bones) when imported into Softimage.
BVH files also contain two actions: the base pose action and the motion action. The skeleton uses the base pose by default unless you choose to have the motion action automatically applied as an action clip in the animation mixer (see Bones Skeleton Options [Properties Reference]).
Biovision files are imported into Softimage as models and placed under the Scene_Root node. The model's name is the same as the BVH file name.
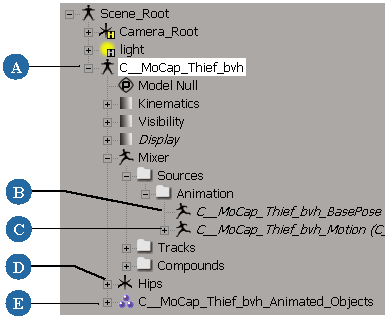
Structure of Biovision file elements after importing.
Choose File Import Biovision File from the main menu. The Biovision Import dialog box appears.
In the File Name text box, specify the BVH file to be imported.
Select how you want to import the skeleton hierarchy — see Setting Up the Skeleton.
Select the other import options — see Bones Skeleton Options [Properties Reference].
You can choose how you want the skeleton hierarchy to be created when you import it into Softimage using the following options.
These options are the same for importing either Acclaim or Biovision files.
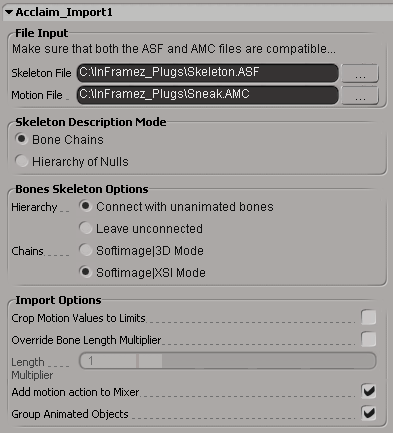
Select either of the Skeleton Description Mode options:
Hierarchy of Nulls creates a skeleton hierarchy of nulls.
You must then constrain the bones of an existing skeleton or parts of an existing rig to these nulls.
Bone Chains creates a standard skeleton hierarchy made of bones.
You can then set the Bones Skeleton Options to define the skeleton setup (see next page).
If you selected the Bone Chains option as the Skeleton Description Mode, you can decide how you want the skeleton to be set up in Softimage.
Select how you want the skeleton bone connections with the Hierarchy options:
Select which structure you want for the resulting skeleton hierarchy with the Chains options:
SI|3D Mode creates chains whose effectors are children of the last bone in the chain (see Drawing a Chain).
XSI Mode creates default-style chains whose effectors are children of the chain root (see D: Effectors).
 Except where otherwise noted, this work is licensed under a Creative Commons Attribution-NonCommercial-ShareAlike 3.0 Unported License


