When you're styling, you always work with the guide hairs: these are the styling hairs that are similar to and behave like segmented skeleton chains. In fact, the most intuitive way to style hair is to grab a tip and position it the same way you would the end effector on an IK (inverse kinematics) chain.
Guide hairs are curves (geometrical objects), which means that you can perform many of the standard Softimage operations on them as you can with any other geometry (such as transforming or deforming). Guide hairs are composed of 15 segments, regardless of their length. Even when you "cut" the guide hairs (see Cutting the Hairs), the hairs are actually scaled and keep the same number of segments.
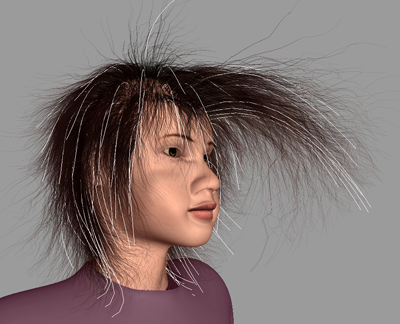
Guide hairs (in white) are coiffed into a style of sorts.
Each styling tool is an operator that gets added to the hair object's stack, as displayed in the explorer. This includes the Scale, Rotate, and Translate operators on the Transform panel (indicated by a MoveComponent node). When you select and use a styling tool, it is combined "on top of" the previous results.
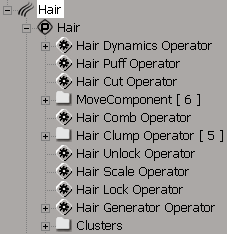
Hair stack with styling operators.
As with other operators in Softimage, you can mute them, delete and undo operations, as well as freeze the hair's operator stack (see Progressive Styling by Freezing the Stack). In fact, to work more efficiently, you will probably want to freeze the hair's stack frequently after styling.
When you use a styling tool, its property editor is added as a page to the Hair property editor — you won't see the editor automatically appear on its own as with many Softimage operators. The parameters in these property editors let you mute the operator, as well as further refine some of the operations. Of course, you can also open the operator's property editor by clicking on the operator's icon in the explorer.
Dynamics allows the hair to be affected by the movement of the hair emitter object and natural forces. You can also use dynamics as a styling tool by freezing the hair when it's at a state that you like. For example, apply dynamics, apply some wind to the hair, then freeze the hair when it has the right wind-swept look.
If you have applied dynamics to the hair, you cannot use the style operators on the hair unless you mute the dynamics operator, as described in Muting the Dynamics Operator for Styling.
If you have animated the parameters of certain styling operators (Comb, Clump, Puff, Rotate, and Scale), you cannot then use dynamics on the hair.
Because guide hairs are actual geometry, you can use all of the standard Deform operators on them (select all, specific strands, tips, or specific points along the strand) to come up with some groovy hairdos!
Lattices, envelopes, deform by cluster center, randomize, and deform by volume usually produce the most favorable results. However, if you animate the deformations, you cannot then use dynamics on the hair.
As well, you can use obstacle collisions (with or without having dynamics active) to mold the hair around the obstacle to style it. See Setting Up Hair Collisions for more information.
When using a scripted operator on hair geometry, you can change point positions but you cannot change the distance between points on a strand or scale a strand. The condition that successive points on a strand are equidistant takes precedence over any manipulations you perform in the scripted operator.
 Except where otherwise noted, this work is licensed under a Creative Commons Attribution-NonCommercial-ShareAlike 3.0 Unported License


