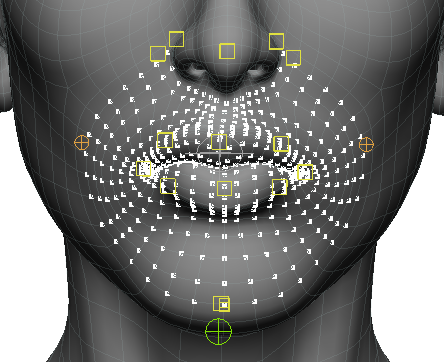
Where you place the point for the mouth corner while picking the landmarks in Stage 3: Landmarks can also determine how successfully the mouth reacts to animation and deformation. When you pick the mouth corner point, be very careful that it is exactly in line with the crease that runs inward to form the lip division.
If the landmarks are not in the correct place, you may want to return to a model saved at Stage 3 (before fitting) and reposition the landmarks, or start from a fresh scene and repick all landmarks.

An important thing to do before you start sculpting and tuning the face too much is to make sure that the mouth area deforms well. See Adjusting the Points in the Mouth Cluster below for information.
While you're tuning the mouth, you may need to check that the correct points are included in the mouth region's cluster, especially the points around the nostrils or around the chin. The points that are included in the mouth cluster are affected by the accuracy of how the nose, mouth, and chin landmarks were picked in Stage 3: Landmarks.
You can add or remove points from the mouth cluster to get the best results for the deformation of the mouth area.
After you've adjusted the points in the mouth's cluster, you can regenerate the mouth. Regenerating the mouth recomputes the mouth solver and reforms the mouth, taking into account any changes you've made to the geometry of the mouth region.
After the mouth has been regenerated, you can sculpt and tune the mouth region as you need to for making any other adjustments.
Click the Face > Mouth tab on the Tune panel, then select Tune Mouth.
In the Options area, click the Mouth Clusters  Select Mouth button. The whole mouth cluster's points are selected on the face in the viewport.
You can also find the cluster in the explorer: expand the Face > Actor > Head > Polygon Mesh > Clusters folder and click the MouthRegion cluster.

Add points to or remove points from the mouth cluster:
Test out the new mouth region by reapplying the animation and seeing how the mouth deforms. You can repeat this process until the mouth is deforming perfectly.
You may also need to readjust the points that define the lips.
Click the Face > Mouth tab on the Tune panel, then select Tune Mouth.
In the Options area, click the Mouth Clusters  Select Lips button. The lip cluster's points are selected on the face in the viewport.
You can also find the cluster in the explorer: expand the Face > Actor > Head > Polygon Mesh > Clusters folder and click the MouthLipRegion cluster.
Add points to or remove points from the lip cluster:
Test out the new lip region by reapplying the animation and seeing how the lip deforms. You can repeat this process until the lip is deforming perfectly.
If you have a model with a tongue mesh included, some points of the tongue mesh may get included in the MouthRegion cluster when the head goes through the solving stage. You will probably want to keep the tongue separate from the mouth region cluster because it will be animated in a different way, such as with lip-sync animation.
In Point selection mode (click the Point button at the top of the main command panel), select the points that you want to be included as part of the tongue and create a cluster (click the Cluster button at the bottom of the main command panel).
After any change you make, put the face back into a zero (neutral) pose.
 Except where otherwise noted, this work is licensed under a Creative Commons Attribution-NonCommercial-ShareAlike 3.0 Unported License