Before adding keyframed or motion-captured animation to your head in Face Robot, it is always good to tune the eyelids first. Tuning lets you edit how the eyelids deform according to the shape and location of the eyeball.
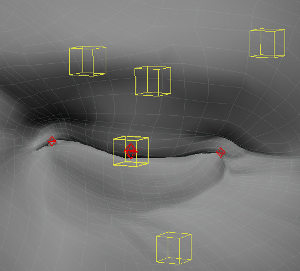
The eyeball is not completely spherical: at the cornea (the portion of the eye where the iris is visible), there is a noticeable outward bulge. As the eyes move around to look at objects, the corneal bulge deforms the eyelid around the iris and pushes it outward. In REM sleep, where the eyes move around under closed eyelids, the traveling corneal bulge is also visible. Using the Tune Eyes tools, you can decide which part of the lids is deformed or not, and set the intensity of the lid deformation created from the corneal bulge.
Follow the steps in this section to ensure that the deformation of the eyelids' geometry will be synchronized with retargeting and/or the blink animation. You can determine how the eyelids deform by using different weight maps and function curves that control the action of the animation controls for the eyes.
Basically, whether the lids are closed, resting, or open wide, tuning the eyelids guarantees that the intent of the applied motion is conveyed correctly. Later on, you can offset or scale the intensity of the deformation coming from the animation in order to get perfect results.
After Face Robot has solved your face's geometry, the local position of each controller is set to zero. In general, at this stage, the zero position of the eyelids is at the rest position. By moving all the lid controllers on their local Y axis to 1, the eyes are closed. Setting them to a value of -1 makes them wide open.
|
|
You can also quickly set those positions by accessing the Blink Animation parameters in the Blink Properties editor (choose Tools  Blink on the Act panel). In the Animation Curves section of the property editor, there are four sliders: set them all to 1 to close
the eyelids.
Blink on the Act panel). In the Animation Curves section of the property editor, there are four sliders: set them all to 1 to close
the eyelids.
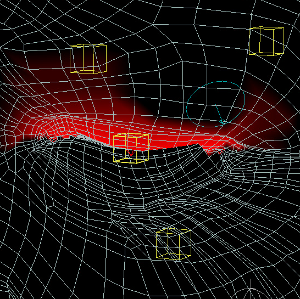
As you can see, even if Face Robot does a great job at setting the lids deformation, the eyes are not properly closed and too many vertices are pulled by the controllers. You should first make sure that only the desired vertices are influence by the controllers.
When you edit the eyelid edge map, you can define the area in which the eyelid should close.
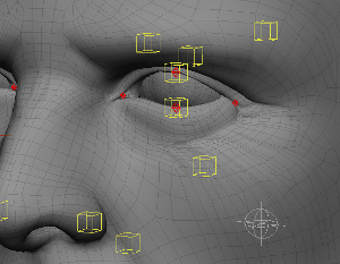
On the Tune panel, choose Tools Tune Eyes so that the Eye Properties panel appears.
Click one of the eyelid tabs (such as LEyelidUpper) in the Options area, then click the Eyelid Influence Maps Edge button to display a weight map.
You are now in paint mode and an influence map is shown in the viewport.
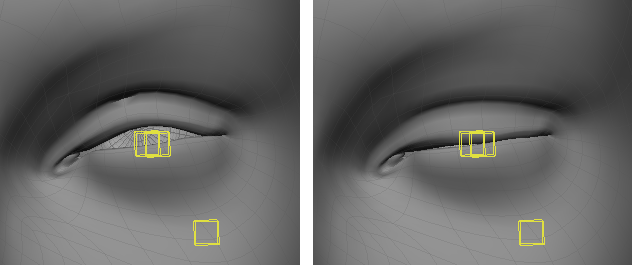
Paint on the weight map to adjust the weight values. A weight of 1 causes the eyelid to close completely, while a weight of 0 causes no deformation.
In the Paint Tools, select Abs with an opacity of 20 and paint the vertices you don't want to be included in the deformation. You can also use Erase to exclude vertices entirely and Smooth to refine your results.
Press W to toggle between paint mode and your previous display mode.
See Painting Weight Maps for information on painting.
Now set your brush's Abs opacity to 100 and paint the vertices located at the leading edge of the lid to ensure that they are set to the maximum deformation.
It is important to also verify that no vertices beyond the corners of the eyelids are affected - make the proper adjustments as necessary. You can also see the behavior of the deformation by sliding the controller in the Blink Properties panel back and forth.
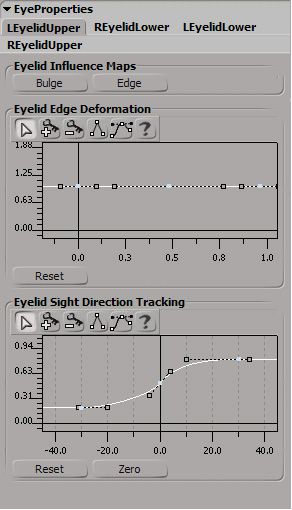
Now that you have set the vertices deformation, you can edit the eyelid edge deformation curves. These curves let you control how tightly the eyelid closes, as well as the shape of the eyelid as it closes.
Face Robot assumes that the eyelid is a smooth parabola: if it's not, the eyelid may not close completely when the eyelid control is set to 1 (closed). A few portions of the eyelids may still have small gaps or polygons that are intersecting each other, or you may not have picked the eyelid landmark points very closely in Stage 3: Landmarks.
Whatever the problem is, you can correct it by moving points on the Eyelid Edge Deformation curve so that the values are above 1.
On the Tune panel, choose Tools Tune Eyes so that the Eye Properties panel appears.
In the Eye Properties panel, click one of the eyelid tabs (such as LEyelidUpper).
Adjust the points on the curves in the Eyelid Edge Deformation graph to change the shape of the eyelid edge and how open it is. By default, eyelids closed is in a straight line:
Press M or click the arrow button to move the curve's points and handles. This lets you refine the final profile of the closed eyelid position.
Use the key+ or key- buttons to add or remove points for even more precise profiling.
To remove your curve alterations and get back to the original default curve, click the Reset button below the curve editor.
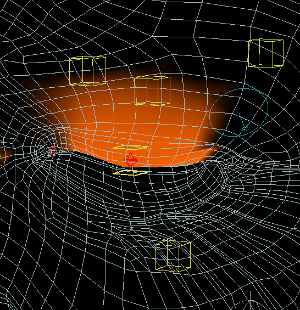
When the eyeballs turn and look in any direction, the corneas create a subtle but distinct deformation on the lids. Face Robot automatically builds this influence into the lids with the help of the eyelid bulge map.
To appreciate this behavior, simply select the LookAt controller and change its position (press F6 to open the Act panel synoptic view and click the LookAt button to select the controller). Pay attention to the eyelids as the eyeballs follow the LookAt position.
With the same techniques that you used to paint the Edge Map (Erase, Abs, Add and Smooth), you can adjust the area of deformation created by the corneal bulge. In this case, it is important to greatly taper the corners of the eyes since, in reality, the corneas have little influence.
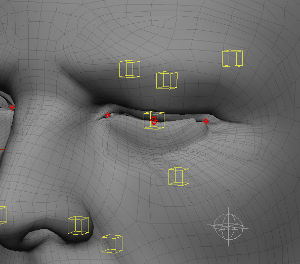
On the Tune panel, choose Tools Tune Eyes so that the Eye Properties panel appears.
Click one of the eyelid tabs (such as LEyelidUpper) in the Options area, then click the Eyelid Influence Maps Bulge button to display a weight map.
You are now in paint mode and a bulge map is shown in the viewport.
Paint on the weight map to adjust the weight values as you did for the Edge Influence map. See Painting Weight Maps for information on painting.
A weight of 1 causes the eyelid to bulge exactly with the eyeball beneath it, while a weight of 0 causes no bulging. The strength and range of this weight map may depend on the thickness of your model's eyelids.
Repeat the same steps for the three remaining eyelids.
The Eye Lids Sight Direction Tracking adds another layer of deformation on the lids. As the eyes look up or down, you will notice that the lids follow the orientation of the eyeballs. The eyelids automatically move out of the way of the pupil as to provide an unobstructed view. You can verify the effect of this feature by moving the LookAt controller vertically. Also notice that the lid reaches a maximum or minimum of influence as the eyes point to extreme positions.

Also notice the rate of the deformation: the eyelids track the pupil's location but lag behind it a bit. When the eyeball starts to rotate from its rest position, the lid follows at a faster pace than when the eyeball reaches the "looking up" position.
This behavior can be modified or even completely eliminated with the help of the EyeLid Sight Direction Tracking Curve Editor. The eyelid tracking profile curves control how closely the eyelid edge adheres to the direction of the gaze.
On the Tune panel, choose Tools Tune Eyes so that the Eye Properties panel appears.
Click one of the eyelid tabs (such as LEyelidUpper) in the Options area.
Click on the Zero button below the Eyelid Sight Direction Tracking curve. Notice that the curve is now flat and that eliminates this specific influence as you move the LookAt controller. Bring back the curve to its original and default profile by clicking the Reset button.
The tracking curves represent a graph of the vertical angle of gaze (X axis of the curve) over the tracking percentage (Y axis):
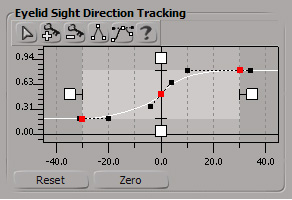
The X axis represents the degrees of rotation of the eye ball. This axis goes from -30 to +30, with -30 representing when you look down, and 30 being when you look up. If the curve is flat (zero), the eyelids will not respond to the location of the pupils; if you set it to 1, the eyelids follow the pupil's gaze exactly.
The Y axis is the relative value of deformation. This axis is the percentage by which the eyelid edge tracks the eyeball. The percentage of tracking changes whether the eye looks up (positive values) or down (negative values).
The default curve simply describes the eyeball reaching a -30 degree orientation, with the lid being affected at a minimum deformation of -0.5. As it gradually comes to 0 degrees, the rate of the deformation is superior; then as the eyeball passes 30 degrees, the lid stops being deformed with a maximum value of 0.5.
Adjust the points on the curves in the Eyelid Sight Direction Tracking graph to change how the eyelid tracks the gaze.
Press M to move the selected points around as you like them, or press Q to use the region tool to edit a group of points.
You may want to start by scaling the curve on the X axis to lower or increase the orientation influence.
 Except where otherwise noted, this work is licensed under a Creative Commons Attribution-NonCommercial-ShareAlike 3.0 Unported License


