A wrinkle map is a weight map that covers the whole face (global) and is affected by all the deformers. The wrinkle map values are the opposite of the Strength values you set for the region deformers. The Strength values make the regions bulge out, while the wrinkle map prevents bulging and instead creates creases (wrinkles).
Before you paint a wrinkle map, you should make sure that the face has sufficient geometry in the wrinkle areas so that the deformation can occur convincingly there. See Wrinkles for more information on modeling wrinkles in the geometry.
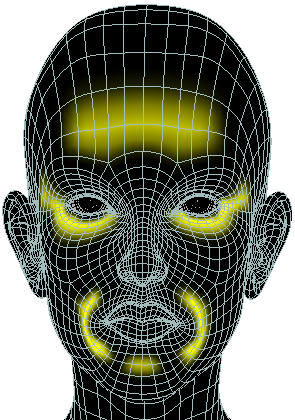
As you're painting the wrinkle map, you may want to have a reference of the expressions that you want your character to have so that the wrinkle map complements the face's geometry appropriately. Here's a map of the most common areas on the face where wrinkles occur.

Brow wrinkles occur as the frontalis, a muscle sheet covering the entire forehead, contracts and causes horizontal folds across the forehead. These are important in communicating expressions like concern, terror, or surprise.
Vertical frowning folds happen when the corrugator muscle, located just above the nose between the eyes, contracts.
"Crow's feet" are the wrinkles that radiate out from the corners of the eyes, generated when the surrounding skin area is compressed. This happens when the character smiles, sneers, or squints. In older characters, the crow's feet are permanently etched into the skin, in which case you'll want to have them modeled directly into the geometry and then emphasized using the wrinkle map.
The nostrils can flare outward and upward as the face pulls into a sneer, or through voluntary muscle contraction.
Nose ridge folds can also happen during a sneer. Some characters develop folds that run horizontally or diagonally across the upper portion of the nose ridge and/or along the sides of the nose.
Choose Wrinkle Paint from the Face > Maps tab on the Tune panel.
Move the cursor over the head and it turns into the weight paint tool. When you paint, the yellow areas show where the weight value is increased (100% is pure yellow), which causes a crease.
For example, if you paint a yellow area under the eyes (eye bag area), the effect of the wrinkle map is opposite to the Strength value that you set for the eye bag region deformer. The lower the Strength value, the deeper the wrinkle (crease).
Try painting out an entire area in yellow, such as the mouth or forehead, then start sculpting that area to pull the vertices back out.
Press Esc or the space bar to exit from weight painting mode.
 Except where otherwise noted, this work is licensed under a Creative Commons Attribution-NonCommercial-ShareAlike 3.0 Unported License


