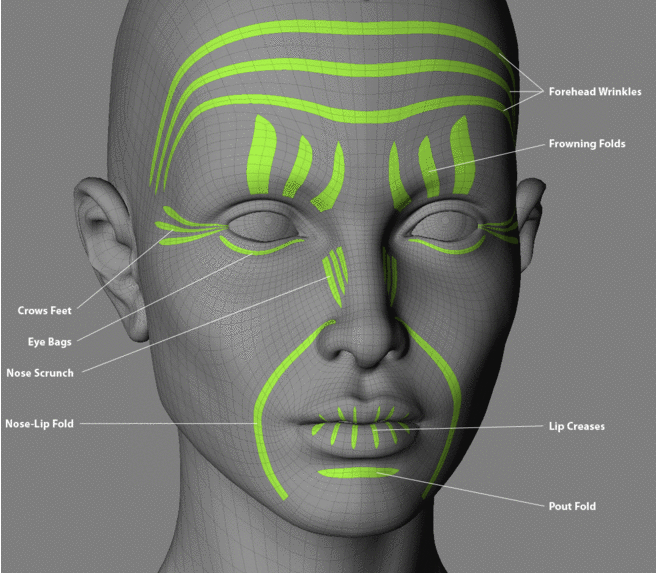
Face Robot cannot wrinkle any area of the face that doesn't have wrinkles already modeled into the mesh's geometry. The goal is to model the skin in its relaxed position and make sure to add sufficient geometry in the wrinkle areas so that the deformation can convincingly occur there.
A good starting point is to look over the expressions that you want your character to have and model the wrinkles into the geometry with these expressions in mind. You may want to use a textured wrinkle map as a reference while you're modeling the wrinkles.
Edge Loops: To support wrinkle deformation, edge loops should follow large wrinkles as closely as possible. Rather than using even-distance parameterization, edge loops should be placed closely together in areas of wrinkles to enhance the wrinkle effect.
Variation: Keep in mind that wrinkles can vary a great deal between characters, especially in areas like the nose scrunch and crows' feet.
Depth: You want to model the wrinkles with the face in a neutral/relaxed state (that is, flat and not creased). Carefully consider the distance between the wrinkles in the mesh: if they are too far apart, you will need a lot of sliding motion in the animation to bring them together which could look over-stretched. But if they are too close together, they will wrinkle very sharply and look bad in the final result. Only add depth to the wrinkles if they are permanently carved into the face in the neutral pose, such as with older characters.
For rendered projects, try to make the primary wrinkles in the mesh and use stress maps to drive bump and displacement for fine wrinkles.
The following diagram shows the main wrinkles on a typical Face Robot character. See Painting Wrinkle Maps for more information.

 Except where otherwise noted, this work is licensed under a Creative Commons Attribution-NonCommercial-ShareAlike 3.0 Unported License