The dopesheet displays a series of animation tracks — one for each parameter — for the selected objects. A track consists of a series of rectangular boxes, each representing one frame.
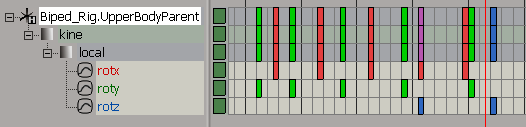
When you open the dopesheet, the parameter names in the animation explorer are aligned with their tracks in the dopesheet. This makes it easy to see which parameter is associated with which track. When you scroll in either the explorer or track view, the other one scrolls accordingly so that the parameters and their tracks remain aligned.
You can also choose to display the tracks in an unaligned mode by deselecting the View Align Tracks with Tree View command.
You can set a preference to have the tracks aligned or not by default (see Setting the Default Colors for the Dopesheet).
For information on displaying tracks, including tracks for unanimated parameters, see Controlling What's Displayed in the Dopesheet.
To select a track, click on the parameter or object name in the animation explorer. The name and track are both highlighted.
To deselect tracks, do either of the following:
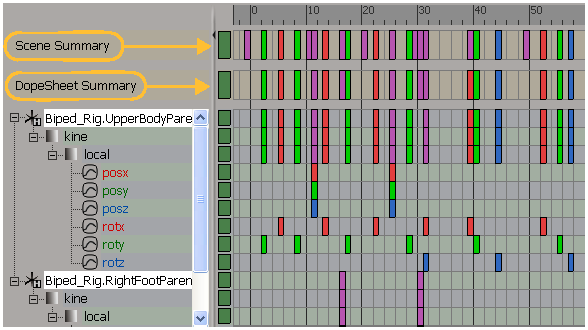
At the top of the dopesheet, there are two summary tracks that you can display: the Dopesheet Summary track and the Scene Summary track.
The Dopesheet Summary track is displayed by default, and displays all keys for all objects displayed in the dopesheet. This track makes it easy to branch-select a whole character to display the keys on all animated parts, then retime or offset the animation for only that character.
To toggle the display of this track, choose ViewDisplay Dopesheet Summary Track. You can set the default display in the dopesheet preferences (see Setting the Default Colors for the Dopesheet).
The Scene Summary track displays all keys for all objects in the scene, making it easy to retime a scene's entire animation. Displaying it as well as the Dopesheet Summary track lets you quickly see the differences between objects selected in the dopesheet and all animated objects in the scene.
To toggle the display of this track, choose ViewDisplay Scene Summary Track. You can set the default display in the dopesheet preferences (see Setting the Default Colors for the Dopesheet).
These summary tracks are a special type of collapsed track. As with other collapsed tracks, purple keys represent overlapping keys, and RGB keys represent the XYZ keys for the transformation parameters. Unlike other collapsed tracks, however, you cannot expand the summary tracks.
You can display frame numbers above the summary tracks by choosing either the All Frames or Only In/Out option for the Summary TracksKey Frame Labels parameter in the dopesheet preferences (see Setting the Default Colors for the Dopesheet).
If both summary tracks are visible, only the top one (Scene Summary) displays the frame numbers above it.

Keyframe numbers are displayed above the summary tracks when they are both visible.
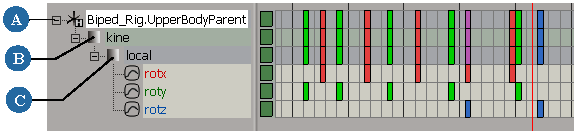
The object's track is a summary track of all its parameters. The kine track is a summary track of all the kinematic parameters beneath it, which could be a mixture of local and global kinematics parameters.
These summary tracks make it easy to copy animation between objects, or to scale and offset all the animation for an object. See Copying Animation between Objects and Scaling Regions of Keys for information.
You can expand and collapse tracks whether tracks are aligned with the parameters in the animation explorer or not. When tracks are collapsed, their parameters in the animation explorer are also collapsed.
The tracks for each animated parameter of the selected object are collapsed by default. If you add any new objects, the tracks for those new objects are also collapsed. When tracks are not aligned with the animation explorer, the name of the animated parameter is displayed above its track.
When a track is collapsed, it shows all of the keys it finds for all the parameters that are collapsed, as if the tracks were transparent and drawn on top of each other. Any overlapping keys are shown in purple and any manipulation you do on this track is actually done on each of the "underlying" tracks.

Collapsed track shows purple keys where keys from underlying parameters overlap.
The tracks for the selected object are collapsed by default to make it easier to focus on only the tracks you want to edit and to save vertical space. However, you can expand them to see the track for each animated parameter of the selected object.
If no tracks are selected and you choose an Expand command, all tracks are expanded by groups.
To expand tracks, select one or more tracks and then use one of these methods:
Choose ExplorerExpand All to expand all parameters in the animation explorer, which also expands all their tracks.
Click on the name above the collapsed track to expand each group. This applies only to tracks in the unaligned mode.
For example, clicking on an object's kine.local track expands to the three transformation tracks (pos, rot, and scl). Then clicking on one of these tracks (such as kine.local.pos) expands to show its X, Y, and Z parameter tracks (shown with red, green, and blue keys, as below).
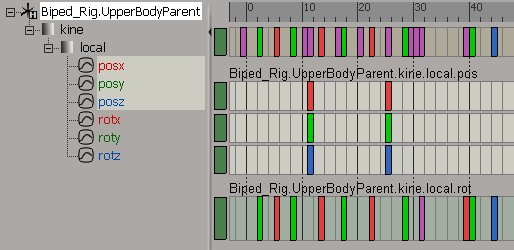
Tracks such as X, Y, Z are compressed together and show the object and parameter names for that group only above the top track.
You can collapse the tracks at different levels so that you see different groupings. For example, you could collapse all the Rotation tracks into one track or collapse all the Local Transform tracks into one track.
If no tracks are selected and you choose a Collapse command, all tracks are collapsed into groups.
To collapse tracks, select one or more tracks and then use one of these methods to collapse them:
Select two or more expanded tracks, right-click on one of them, and choose Collapse.
Choose EditCollapse All Tracks to collapse all tracks into one.
Choose ExplorerCollapse All to collapse all parameters in the animation explorer into the root object, which also collapses all their tracks.
Middle-click on an expanded track name (branch collapsing), if tracks are not aligned with the parameters in the animation explorer. For example, if you middle-click on any of the Rotation X, Y, and Z tracks, they collapse into one Rotation track.
Choose EditCollapse Objects Individually to group and collapse the tracks according to their path name (separates pos tracks from rot tracks, for example).
You can hide and redisplay tracks only in unaligned mode (when ViewAlign Tracks with Tree View is not active).
To display or hide tracks, use one of these methods:
Select a parameter in the animation explorer to display its tracks. If a track is hidden, selecting its parameter unhides the track.
Choose ViewHide Track, press the H key, or right-click on a track and choose Hide to hide the selected track.
Choose ViewUnhide All Tracks, press Shift+H, or right-click the dopesheet background and choose this command to display all hidden tracks.
Choose ViewClear All Tracks to clear all tracks from the dopesheet (this does not delete the animation). This effectively hides all the tracks and switches
to View > Selected Parameters. Click the parameters in the animation explorer (on the left) to view the tracks again.
 Except where otherwise noted, this work is licensed under a Creative Commons Attribution-NonCommercial-ShareAlike 3.0 Unported License


