By default, an operator's effect is applied to all of its input images. You can limit the area of the input image to which an operator is applied by drawing garbage mattes which, by default, define the areas of the image that are protected from the operator's effects. You can draw garbage mattes using any of four shape types — freehand shapes, polygon shapes, Bézier shapes, and B-spline shapes.
Of course, you can invert garbage matte shapes to limit the operator's effect to the regions defined by the shapes. You can also animate garbage matte shapes to alter the shape of the protected area as the image changes over time.
For example, if you use a garbage matte to protect a Jack-in-the-box from a color correct operator, you can change the garbage matte shape to accommodate Jack as he comes out of the box.
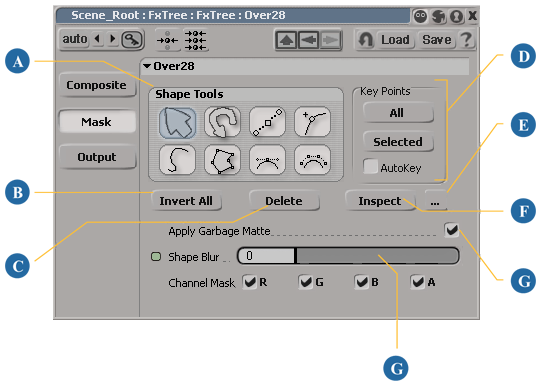
You create garbage mattes using the tools located in the Mask page of the operator's property editor. You can draw any number of shapes for any individual operator.
For more information, see The Mask Shapes Operator.
Garbage matte shapes are children of the operator for which they were created and appear in that operator's hierarchy in the explorer.
Under the FxTree node, each operator has a Shapes Lists folder that contains the Garbage Matte node. The Garbage Matte node, in turn, contains a Shapes folder, which contains all of the operator's garbage matte shapes.

Garbage matte shapes are visible in the Fx Viewer as long as these two conditions are met:
So long as you are inspecting the operator's Mask properties, any matte shapes attached to the operator will appear in the Fx Viewer, regardless of which operator you are currently previewing. This allows you, for example, to properly animate garbage matte shapes to account for image elements that are introduced later in the FxTree.
There are four tools available for drawing garbage matte shapes, one for each shape type.
In the FxTree, double-click the operator to which you want to apply the garbage matte. Its property editor opens and is displayed in the Fx Viewer.
From the operator's property editor, click the Mask button to display the operator's Mask page.
Draw a shape by doing one of the following:
Click the Draw Freehand button  to activate the freehand tool.
In the Fx Viewer, click and drag the mouse pointer around the image to define the matte area.
Release the mouse button to stop drawing and close the shape.
Control points are automatically distributed at appropriate places on the line and connected by a Bézier curve.
Click the Draw Polygon button  to activate the polygon tool.
In the Fx Viewer, click intermittently around the image to define the matte area.
The first click creates an initial control point. Subsequent clicks create additional control points, each connected to the previous point by a straight line.
Click the Draw Bézier button  to activate the Bézier tool.
In the Fx Viewer, click intermittently around the image to define the matte area.
The first click creates an initial control point. Subsequent clicks create additional control points, each connected to the previous point by a Bézier curve.
At each click around the matte area, you can modify the Bézier curve by doing one of the following:
Click the Draw B-Spline button  to activate the B-spline tool.
In the Fx Viewer, click intermittently around the image to define the matte area.
The first click creates an initial control point. Subsequent clicks create additional control points, each connected to the previous point by a B-spline.
The rough outline of the matte area is defined by straight lines between control points, while interpolated curves between points define the actual matte area.
Toggle the Apply Garbage Matte option to activate or deactivate the garbage matte.
Click the Invert All button to invert the garbage matte. Once inverted, the matte defines the area in which the effect is applied rather than the area protected from the effect.
To blur the edges of the garbage matte, adjust the Shape Blur value.
As you increase the value, the transition between protected and unprotected parts of the image becomes smoother.
Once you've drawn your garbage matte shapes, as described in the previous section, you can transform them to position them more accurately. You can do this interactively in the Fx Viewer, or by adjusting the values in each shape's property editor.
From the operator's Mask page, click the Select Shapes button  to activate the selection tool.
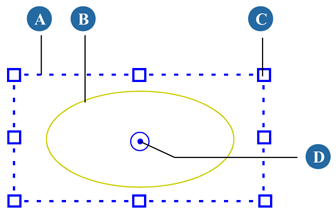
In the Fx Viewer, click a matte shape outline to select it. The shape is surrounded by a bounding box and any previously selected shapes are deselected.
To add more shapes to the selection, press Shift and click them.
Select one or more matte shapes, using the Select Shapes tool .
Press Ctrl and drag any part of the matte's shape outline or one of its bounding box handles.
Select one or more matte shapes, using the Rotate Shapes tool  .
.
Drag any part of the matte's shape outline or one of its bounding box handles.
The matte shape rotates about its pin marker. If you rotate multiple mattes at once, each of them rotates about its own pin marker.
Besides editing shapes interactively, you can also edit them from their property editors. A shape's property editor contains controls that let you translate, scale, and rotate the shape, as well as move its center of rotation by repositioning its pin marker. You can also invert the shape's color as described Inverting Garbage Matte Shapes.
Once you've created a garbage matte shape, you can add points to it, remove points from it, and edit its points to change the shape.
You can add and delete control points from any kind of matte shape.
Click the Edit Points button  and then click a matte outline to select it. The outline's control points are displayed.
Press Shift and click anywhere on the matte outline to add a control point.
Click the Add Points button  and then click a matte outline to select it. The outline's control points are displayed.
Editing points on polygon and B-spline shapes is a matter of simply selecting points and dragging them to a new location.
Editing points on Bézier/freehand shapes is a bit more involved because each point has a set of handles that you can use to adjust the shape's curve at that point.
In the Fx Viewer, click a matte shape outline to select it. Its control points are displayed.
Click a control point to select it. Press Shift and click additional points to add them to the selection.
When a control point is selected, its two handles are displayed with lines joining them to the control point.
Where the outline passes through a control point, it is always parallel to the line joining the control point to its handles.
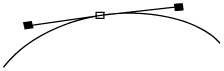
If the two handle lines are at an angle, then the outline also has a sharp corner at this point, with the same angle.

The shorter the handle line, the tighter the curve of the outline as it passes through the control point.
Drag the control points or the handles to create the desired shape.
As you drag the handle of a control point, its other handle simultaneously pivots to keep the angle between the two handle lines constant.
Do any of the following when editing a control points or handles:
Press Ctrl and drag a control point.
The outline is smoothed by forcing the control handle lines to be in line with each other and at the same length. It then lengthens the lines as the outline is stretched, or shortens them as the outline is contracted.
The control point's other handle remains stationary as you move the selected handle. This creates a sharp corner at the control point.
Press Shift and drag a handle.
The length of the line changes but the angle at the control point remains the same.
By default, an operator affects the entire input image and the garbage matte defines the area protected from the effect. However, you can invert individual garbage matte shapes to have them display the operator's effect rather than protect the image from it.
You can also invert all of an operator's garbage matte shapes at once to have the effect displayed only within the matte shapes. By placing one shape within another and inverting the middle shape, you can create "donut" type regions where the effect is displayed.
From the operator's Mask page, click the Select Shapes button to activate the selection tool.
In the Fx Viewer, click a matte shape outline to select it. The shape is surrounded by a bounding box and any previously selected shapes are deselected.
Press Enter or click the Inspect button on the Mask page to open the shape's property editor.
From the shape property editor, click the Invert Color button.
If the shape was displaying the effect, it now protects the image from the effect, and vice-versa.
The Shape Blur option allows you to blur garbage matte shapes to soften the transition between protected and unprotected areas. Adjusting the Shape Blur for a given operator affects all of that operator's garbage matte shapes.
If the areas protected by your garbage matte shapes move, you can animate the shapes to follow them. You do this by setting keyframes for the positions of the shapes' points. You can set these keyframes directly from the Mask page of the operator's property editor.
Rather than setting keyframes manually, you can activate the AutoKey function from the operator's Mask page. When AutoKey is activated, keyframes are automatically set whenever a shape's points change position.
When you activate AutoKey from the Mask page, keyframes are set only for garbage matte shapes' points rather than for any changed parameters.
 Except where otherwise noted, this work is licensed under a Creative Commons Attribution-NonCommercial-ShareAlike 3.0 Unported License


