Softimage includes facial animation tools for creating control splines that you can attach to the rig for your character's body.
Control splines are used for facial setups where you want to simulate skin sliding by using a network of curves to simulate where the flow lines of deformation are on your character's face. Some areas are typically aligned with muscles, like the cheeks or forehead, while others align with boundaries, like eyelids and mouths.
Control splines help you animate different parts of the character's face (envelope) to deform it, such as for lip synching. For example, you could create control splines for eyelids, eyebrows, and the mouth. For information on shape animation for lip synching, see Animating Shapes [Shape Animation].
Create one or more curves (splines) drawn over your character's geometry.
You can use surface snapping to keep the lines close to the surface (it doesn't need to be exact). If multiple curves are snapped to meet at a point of the face (such as the corner of an eye), they will be attached by a single controller.
Select one or more curves and choose Create  Skeleton Create Control Splines from the Animate toolbar.
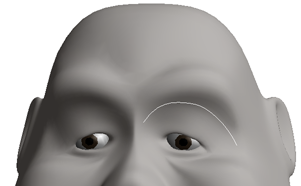
A selected curve that will become a control spline for the eyebrow.
In the Controller Setup dialog box, set these options and then click OK:
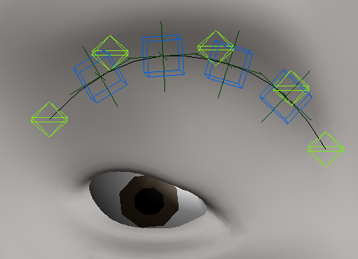
Set the Divisions, which is the number of controls to be created per control spline.
Select one or more Control Types. Each of these control types can be set with no controller, or with nulls, cubes, squares, pyramids, or diamonds:
Point Type control objects move the points of the curve and smoothly interpolate without skin stretching.
Path Type controls are path-constrained to the splines at length percentages.
Offset Type controls are used for the translation (for pinching of wrinkles and facial expressions) and rotation (twisting along the curve) of the splines for areas like the lips.
Set the color for each type of control for easy identification.
Control splines place the objects to be enveloped (the Offset controls) in a group called envelope_group under the scene root. Typically, you would add the objects from this group to the envelope_group for your entire rig.
After applying control splines, select the Path control objects and set the up-vector object for their path constraints. For a facial setup, that is usually the head bone or end vertebra.
To animate the control splines, set keys on the position and rotation of the Point and Offset controls.
 Except where otherwise noted, this work is licensed under a Creative Commons Attribution-NonCommercial-ShareAlike 3.0 Unported License


