You can animate the transformations of a camera, including any of its rig elements such as the camera interest. If you are animating the camera rig, there are some special considerations for rotation. However, you can disconnect the camera from its rig elements and animate the camera object free of any constraints. Note that animating the scaling of the camera has no effect.
When working with a "free" camera (not using the default camera rig), you can select a camera and animate its transformations as you would any other object in Softimage. As long as the camera is selected, you can also have Softimage automatically set keys (autokey) as you transform the camera. For more information, see Animating Transformations and Setting Keys Automatically [Animation].
By default, navigating the camera while autokeying does not set keys on the camera parameters. This is because the camera is typically not selected and the corresponding parameters are not marked during navigation. However, you can set up specific cameras and spotlights so that their parameters do get keyed automatically during navigation. For details, see Autokeying Camera Navigation [Basics].
When using The Camera Rig, you can animate a camera's interest to make the camera follow a path or object. Animating a camera's interest is the easiest way to keep any action in the scene in frame. The two most basic ways to do this are to set the interest on a path or to constrain it to an object in the scene.
Draw a curve in your scene using the Create  Curve command on the Model or Animate toolbar.
Select the camera's interest or click the camera icon on a viewport menu and choose Select Interest.
From the Animate toolbar, choose Create  Path
Path  Set Path. When prompted to select a path, click the curve you created.
For more information on how to set paths, see Animating along Paths and Trajectories [Animation].
Select the camera's interest or click the camera icon on a viewport menu and choose Select Interest.
From the Constrain panel, choose Constrain  Position. When prompted to select an object, click on the object to which you would like the camera interest to remained constrained.
For more information on how to define constraints, see Animating with Constraints [Animation].
When using The Camera Rig, you can rotate the camera itself, but the camera rotation in the X and Y axes cannot be keyed because the camera is constrained to point at the camera interest. However, you can animate a camera's Z rotation by either deactivating its up-vector constraint or modifying its Roll parameter.
Although you can use the L key to roll a camera, you cannot mark it for animation as you would the scaling, rotation, or translation options. Instead, you must open the camera's constraint property editor and mark the Roll parameter from there.
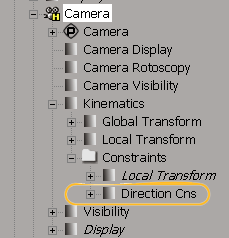
In an explorer, make sure that you have selected Show All Nodes and expand the Camera icon (and not the Camera Root or Camera
Interest). Expand it until you find the Camera  Kinematics
  Constraints
  Direction Cns icon.

Click the Direction Cns icon to open the camera's Direction Constraint Property Editor.
On the Up Vector tab, activate the Up Vector and use the Roll parameter to control how much you want the camera to roll. A negative value makes the camera roll to the left and a positive value makes the camera roll to the right.
You can adjust the Roll slider and key the parameter by clicking the parameter's animation icon (little green box).
The parameter's animation icon indicates how the parameter has been marked or keyed:
If you wish to further edit the roll of your camera, you can edit the Roll parameter's function curve. To do this, right-click on the animation icon and choose Animation Editor. The function curve for the Roll parameter appear in the editor and you can animate to your heart's content.
To remove all animation from the Roll parameter, right-click the animation icon and choose Remove Animation.
 Except where otherwise noted, this work is licensed under a Creative Commons Attribution-NonCommercial-ShareAlike 3.0 Unported License