


In the animation mixer, choose View  Update From Selected from the command bar or press the U key.
Add an audio track by choosing Tracks Add Audio Track on the command bar or pressing Shift+U.
You cannot add audio tracks inside compound action or shape clips.
Right-click the audio track and choose Load Source from File.
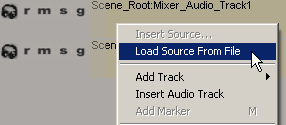
In the browser that opens, select a sound file. For example, you may want to keep all sound files in the Audio folder in your current project.
Click OK and an audio clip appears on the audio track.

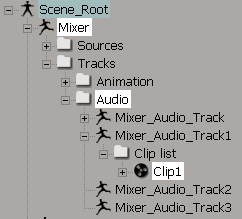
The audio clip is stored in the model's Mixer Tracks Audio Mixer Audio_Trackn Clip List folder.
Once you have an audio clip in the mixer, you can move it along the track, copy it, scale it, add markers to it, mute, and solo it. For more information on doing most of the standard tasks with clips and tracks, see The Animation Mixer.
You cannot extrapolate (bounce or cycle), warp, or mix audio clips. As well, you cannot put them in compound clips.
You can rename an audio clip using the explorer — see Renaming Clips.
To delete an audio clip, see Deleting Clips.
You can interactively move an audio clip by dragging it on the track, but you can also set its starting frame using the Start Offset value.
Select one or more audio clips and press Ctrl+T to open the Time Control property editor. You can also right-click an audio clip and choose Time Properties.
On the General page, set the Start Offset to the frame where you want the clip to start.
For example, to move one or more clips to frame 200, set the Start Offset to 200. You can also move a certain number of frames to the right (forward in time) or left (back in time) by adding the + or - signs to the value (such as 20- moves all the clips to the left by 20 frames).
When you load an audio source into the mixer, the resulting audio clip that is created from it uses the whole length of the source. You can trim (or clip) the audio source so that only part of it is used in the audio clip; for example, if the audio source has some trailing noise at the end of it, you can trim off the last 20 frames so that you don't have that noise in the audio clip. Trimming does not affect the audio source itself: it is simply a way of choosing which frames from the source are used in the clip.
You can trim an audio clip as you would any other type of clip using the Trim commands or the Time Control property editor — see Trimming (Cropping) Clips for more information.
 Except where otherwise noted, this work is licensed under a Creative Commons Attribution-NonCommercial-ShareAlike 3.0 Unported License