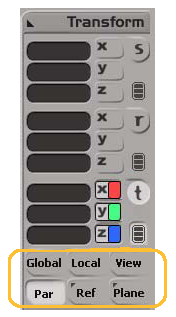
When you transform interactively in a 3D view, you do so using one of several modes. These modes determine which coordinate system is used for manipulation. The manipulation mode affects the interaction only, the resulting values of which you see in the text boxes in the Transform panel.

Manipulation modes for current transformation (in this case, translation).
This is important to know, particularly for understanding the Local manipulation mode: the values shown in the Transform panel while using a transformation tool are not necessarily the same as the local transformation values that are stored for the object (the values that you can animate).
The Local manipulation mode refers to transformations of an object relative to its own local axes (a self reference); however, local animation refers to animating transformations of an object relative to its parent. (You cannot animate relative to one's own axes). If an object has no parent, the stored local value is relative to the scene root (which is represented by the world origin).
The Global manipulation mode and global animation both refer to transformation relative to the origin of the scene's global coordinate system, so there's no confusion here.
So, how do you manipulate an object so that the values on the Transform panel are the same as the stored values for local animation?
When you translate, use the Par (parent) mode, which controls the object's translations relative to its parent, as does local animation. This is the only translation manipulation mode where the axes of interaction correspond exactly to the coordinates of the object's local position for the purpose of animation. When you activate individual axes on the Transform panel, the corresponding local position parameters are automatically marked.
When you rotate, use the Add (additive) mode, which controls the object's rotations relative to its parent, as does local animation. This is the only rotation manipulation mode where the axes of interaction correspond exactly to the coordinates of the object's local orientation for the purpose of animation. When you activate individual axes on the Transform panel, the corresponding local orientation parameters are automatically marked. This mode is especially useful when animating bones and other objects in hierarchies.
Of course, you can set and animate the values as you like directly in either the Local or Global Transform property editor.
 Except where otherwise noted, this work is licensed under a Creative Commons Attribution-NonCommercial-ShareAlike 3.0 Unported License