Animation sources are signals that vary over time, just like audio signals. To filter these audio signals, you use an audio equalizer. It lets you change the gain/level of different frequency bands (bass to treble) that exist in the signal. Changing the level of a given frequency band results in a change in the audio signal you hear.
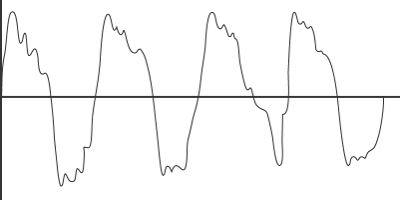
Audio signal with overall low frequencies (big curves) and areas of high frequencies (small curves).
An animation equalizer basically does the same thing except for animation: the signals can be filtered ("broken down") to isolate their bands of frequencies.
The low frequencies correspond to slow variations of the signal, gathering the overall animation. Those low variations convey a lot of the signal energy — without them, the result is lifeless. The high frequencies correspond to fast variations of the signal, gathering subtle details and noise. These frequencies are important to give character to animation but don't usually convey a lot of the signal's overall energy.
Select one or more action clips you want to break down into frequencies.
If you equalize multiple clips, one compound clip is created, spanning the same time interval as the original clips.
Choose the Clip  Equalize command on the mixer's command bar and wait for it to process the clip.
A new compound clip is created on a new track directly below (over the same number of frames) the original clip. The compound clip contains the subclips that represent each frequency. The number of frequencies created depends on your animation. For example, a simple action without much variation may have only 3 to 5 frequency bands.
The original clip is muted (gray) so that its action doesn't interfere with the new equalized compound clip.
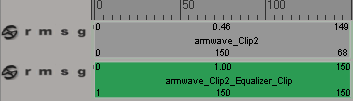
Original clip on top is muted (gray). The resulting equalized compound clip is on a separate track below.
In the Motion Equalizer property editor that opens, you can modify the Gain value for each frequency. Each Gain slider corresponds to each frequency "subclip" in the compound clip: the higher the number, the higher the frequency. The Gain 0 slider affects all frequencies in the clip.
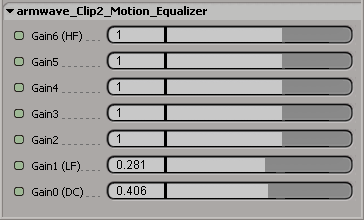
The sliders are all set to 1 which means that every frequency they represent is "added" together give you the original fcurve.
When you change a frequency, you are not changing a particular element (such as rotation or scaling) of the animation — you are changing a level of the overall animation. (You can also change the frequency using the weight sliders at the end of each subclip's track — see step 5). For example, you can alter the frequency of a leg's motion to exaggerate certain movements in a walk cycle or add just a little more "oomph" to a punch.
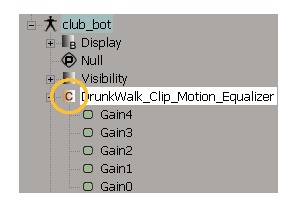
You can find the custom parameter set for the Equalizer in the explorer:
You can then modify the gain of each frequency by using the weight sliders at the right end of each clip's track, just as you would when you're mixing the weights of clips.

You can also key these weights. For more information on this, see Mixing and Weighting Clips.
 Except where otherwise noted, this work is licensed under a Creative Commons Attribution-NonCommercial-ShareAlike 3.0 Unported License


