In a State compound, a trigger is something that causes an effect to happen when its value is reached, such as when the particle reaches a certain size (trigger), it disappears (effect), like blowing bubble gum and having it pop when it gets too big.
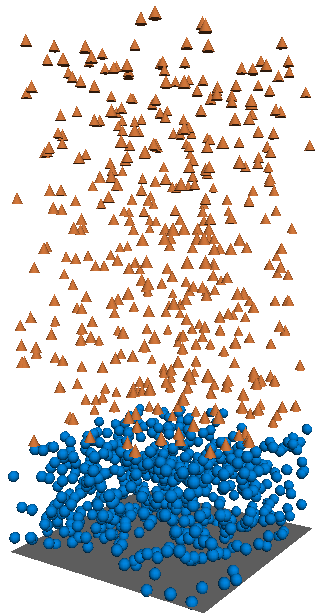
In this example, the trigger is the age limit of the particles, which is 2 seconds. At that point, they change shape to cones.
When this compound's value is reached, the effect that is defined with another compound is executed. This effect compound can be plugged into the same State compound or it can be plugged into another State compound to which you transition when the trigger value is reached.
Particle effects can be triggered using many different criteria, such as a particle's age, every nth particle or frame, a particle's position (in XYZ), a particle's speed, a particle's collision with an obstacle, and so on.
Most of the compounds that can be used as triggers are found in the Conditionals group on the Particles tab. However, you can also use any other node or compound that you create, as long as it can be plugged into a State compound's Trigger port (it needs to be a Boolean value).
Create a particle emission — see Creating a Basic Particle Emission for information.
Set up the states you want to use as described in Setting Up States.
Choose one or the Trigger commands from the Particles  After Emission State Machine menu on the ICE toolbar (see Types of Triggers for a list of possibilities).
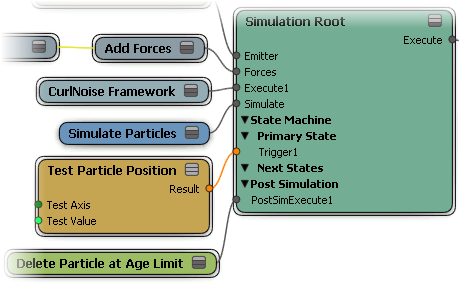
You need to first define the trigger in the Primary State so that it can switch to the next state:
If there is a State compound already plugged into the Simulation Root node, you are prompted to select to which state you want to add this Test compound. Select Initial State to plug the Trigger compound into the Primary State's Trigger port of the Simulation Root node.
If there is no State compound plugged into the Simulation Root node, the appropriate Test compound is plugged directly into the Primary State's Trigger port since this is the only state that is defined for the particles (State 0) in the Emit compound.
You can have only one trigger for the Primary State, so if you choose another Trigger command, its compound replaces the one that is currently plugged in.
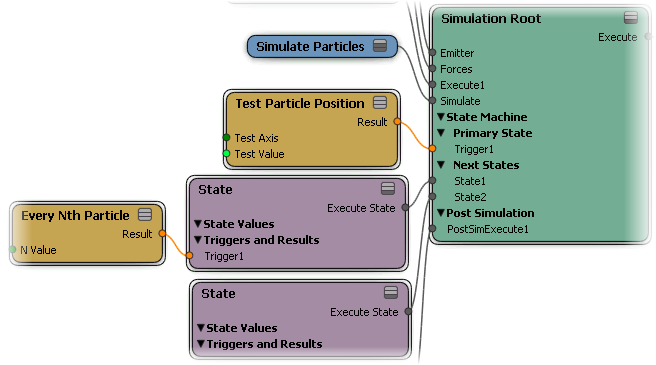
Once you have the primary state trigger defined, each next state can also have a trigger, as you like. Choose one or the Trigger commands from the Particles After Emission State Machine menu and select to which state you want to add this Test compound. The compound is then plugged into the appropriate Trigger
port.
In the trigger compound's property editor, set the value that you want to use as the trigger.
For example, if you're using the Test Particle Reached Age Limit as the trigger compound, you need to have a Set Particle Age Limit compound plugged into the Emit compound. Then in the Set Particle Age Limit property editor, you must specify the age limit, which is the trigger value. If you define 3 as the particle's age limit, the effect compound that you have defined is executed when the particle reaches the age of 3.
If you want to change states upon reaching the trigger value, select the state ID of the state to which the particles will transition by selecting it from the Change State on Trigger list. See Setting the Particle's State ID for information.
You can define a new behavior/effect in this new state. The particle stays in this new state until it is forced to change to another state using the Change State on Trigger option in that State compound.
Set up the effect you want to happen when the trigger value is reached, as described in Defining the Effect That Is Triggered.
There are different ways in which you can set up triggers:
You can use the Trigger commands on the Particles After Emission State Machine menu of the ICE toolbar (see below) to quickly connect trigger compounds in your ICE tree using the State Machine that is
built into the Simulation Root compound. These commands use the compounds in the Conditionals group in the preset manager.
You can use any of the many trigger compounds directly from the Conditionals group on the Particles tab in the preset manager.
You can use any other node or compound that can be used as a condition, as long as its output is a Boolean value that can be plugged into a Trigger port.
The Trigger commands on the Particles After Emission State Machine menu of the ICE toolbar let you quickly set up trigger compounds in your ICE tree using the State Machine that is built into
the Simulation Root node.
| Trigger Command |
Does this ... |
|---|---|
| Particle Age Trigger |
This command adds the Test Particle Age compound to the ICE tree, plugging it into the Trigger port of the Simulation Root compound. |
| Particle Reached Age Limit Trigger |
This command adds the Test Particle Reached Age Limit compound to the ICE tree, plugging it into the Trigger port of the Simulation Root compound. You must set the age limit of the particles so that the state knows what the particle's age limit is. You can use the Set Particle Age Limit compound to do this: plug it into the Emit compound's Execute on Emit port, then define the limit you want to use as the trigger. |
| Particle Velocity Trigger |
This command adds the Test Particle Velocity compound to the ICE tree, plugging it into the Trigger port of the Simulation Root compound. |
| Particle Position Trigger |
This command adds the Test Particle Position compound to the ICE tree, plugging it into the Trigger port of the Simulation Root compound. |
| Every Nth Particle Trigger |
This command adds the Every Nth Particle compound to the ICE tree, plugging it into the Trigger port of the Simulation Root compound. |
| Random Probability Trigger |
This command adds the Test Random Probability compound to the ICE tree, plugging it into the Trigger port of the Simulation Root compound. |
| Particle ID Trigger |
This command adds the Test Particle ID compound to the ICE tree, plugging it into the Trigger port of the Simulation Root compound. |
| Distance to Surface Trigger |
This command adds the Test Distance to Surface compound to the ICE tree, plugging it into the Trigger port of the Simulation Root compound. You must pick the geometry to use as the surface object after choosing this command. This object's Get data node is then plugged into the Surface port of the Test Distance to Surface compound. |
| Inside Geometry Trigger |
This command adds the Test Inside Geometry compound to the ICE tree, plugging it into the Trigger port of the Simulation Root compound. You must pick the geometry to use as the volume object after choosing this command. This object's Get data node is then plugged into the Geometry port of the Test Inside Geometry compound. |
| Visibility from Camera Trigger |
This command adds the Test Visibility From Camera compound to the ICE tree, plugging it into the Trigger port of the Simulation Root compound. It also adds the default camera's Get data node to the ICE tree, plugging into the Camera Name port of the Test Visibility from Camera compound. If you want to use another camera, open the camera's Get Data node and click the Explorer button to select another Camera object from the list that appears. You can also click the Pick button and pick the Camera object from the scene. |
| Weightmap Value Trigger |
This command adds the Test Weightmap Value compound to the ICE tree, plugging it into the Trigger port of the Simulation Root compound. In this compound's property editor, you must select the appropriate weight map on the appropriate object. |
 Except where otherwise noted, this work is licensed under a Creative Commons Attribution-NonCommercial-ShareAlike 3.0 Unported License


