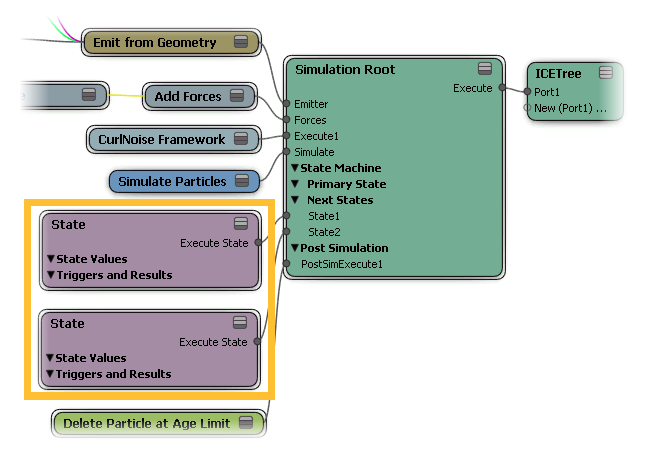
A particle state system is based on two main sections: the State Machine ports and one or more State (or Simple State) compounds that are plugged into the Simulation Root compound.
The State Machine parameters in the Simulation Root node (or the State Machine compound, if you're working without the Simulation Root node) act as the central processor for all the State compounds that define particle behavior. At every frame, the State Machine executes the values from all the State compounds that are plugged into it. The states are executed in the order in which they're plugged in to the Simulation Root (or State Machine) node, from top to bottom.
You can define the number of iterations per frame that the State compounds are evaluated per frame. Keep this value low to reduce processing times, but you may need to set this higher for particles that move quickly from frame to frame.
Each State compound lets you define a particle behavior that is used with the State Machine. Each behavior is a combination of a "trigger" compound and an "effect" compound, such as particles spawning new particles when they collide with an obstacle. You can have effect compounds be evaluated only once upon entering the state, or have them evaluated every frame for a continuous effect.
You can have multiple State compounds all linked together consecutively, working as part of a larger effect. The particles can transition from one state to the next as you specify with its unique State ID. Particles stay in one state until a trigger is "pulled" and a new state is used.
You can also plug a State compound into a Primary State port on the Simulation Root node if you want that state to be the initial state for the particles.
Create a particle emission — see Creating a Basic Particle Emission for information.
Choose Particles  After Emission State Machine Add State from the ICE toolbar. This adds a State compound to the ICE tree, plugging it into a State port of the Simulation Root compound.
You can also drag a State compound from the ICE preset manager and plug it into the State port.
If you're not using the Simulation Root compound, you must plug the State compound into a State port on the State Machine node.
If the particles are rigid bodies, you can use the Simple State compound instead of the State compound. The Simple State compound is the same as the State compound except that it doesn't contain the Simulate Particles node, so you can use either the Simulate Bullet Rigid Bodies or Simulate Rigid Bodies node with it.
Create either a particle or rigid body particle emission — see Creating an ICE Rigid Body Particle Emission.
Get a Simple State compound from the ICE preset manager and plug it into a State port of the Simulation Root compound.
If you're not using the Simulation Root compound, you must plug it into a State port on the State Machine node.
Plug a Simulate Bullet Rigid Bodies or Simulate Rigid Bodies node into the Simple State's Simulate port.
Continue setting up the state system as usual.

You can set the primary state for particles in the Simulation Root node (or the Emit compound), which determines the state when the particles are born. State 0 is the default primary state ID into which particles are born. And unless you use a State compound to define State 0 to be something else, this is what is set for the particle for the duration of its lifetime. Particles always stay in a certain state unless you switch them to another state using a State compound.
It's important that you give each state its own unique state ID as soon as you create it, otherwise it may not get evaluated. If there are two states that have the same ID in the same state system, only the state that is plugged in higher up on the State Machine gets evaluated.
Open each State compound's property editor and give each state a State ID number to uniquely identify it. This sets the State_ID attribute.
Select this state in another State compound's Change State on Trigger list to switch to it.
For example, in the property editor for the State 1 compound, you could select State 2 in the Change State on Trigger1 list as the state to which the particles will transition when the Trigger value is reached.

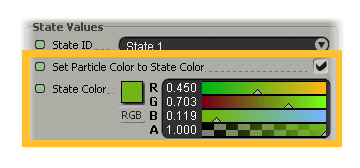
For each State compound, you should select a State Color to identify the particles in this state as you're working. This color is used just for working/viewing, so you can change it when you're ready to do your final effect.
If you want to see this color on the particles in the viewport, select the Set Particle Color to State Color option.
You can select this option for when you're setting up the states, then turn it off when you're finished setting up the states so that all particles are displayed with their usual particle color again.
 Except where otherwise noted, this work is licensed under a Creative Commons Attribution-NonCommercial-ShareAlike 3.0 Unported License


