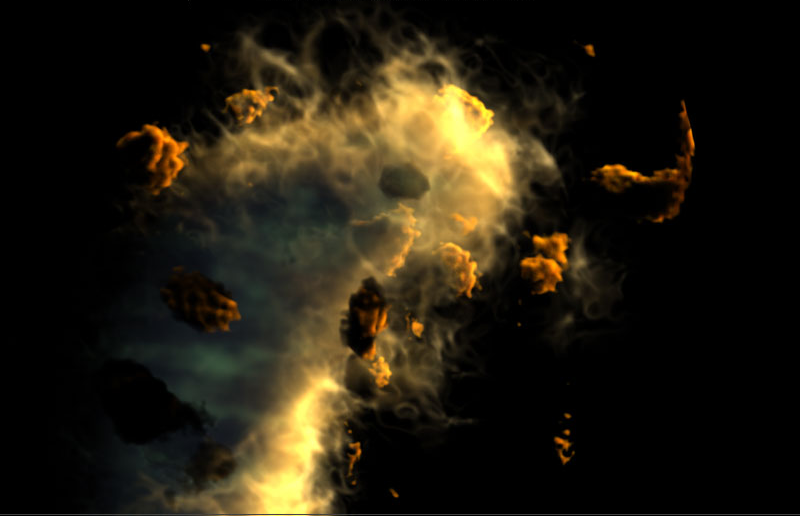
The Particle Volume Cloud shader renders the point cloud's bounding box as a volume. Unlike rendering solid objects with well-defined boundaries, volumetric shading determines how light passes through an object, not just how it bounces off the object.
You can replace each particle's geometry in a point cloud with a volume to create effects such as smoke, fog, or fire. Each particle's volume melds seamlessly with those of its neighbors to create an effect that can look like the real thing.
Rendering volumes and raytraced shadows can be time-consuming, so the Particle Volume Cloud shader uses a lookup table to store the shadows and other volume data of adjacent voxel, which are points in 3D space. You can define the voxel size by setting the cell size in the shader's lookup table. Smaller cell sizes create a better look and nice shadows, but more memory is required; larger cell size is faster, but gives little interpolation, so the look is not as good or detailed.
Because the Particle Volume Cloud shader has many options to set, you can start out with the Particle Renderer or Particle Shaper shader compound to render a volume quickly. Both of these compounds contain the Particle Volume Cloud shader, the Particle Density shader, plus some other shaders to help you set up for basic volume effects. Parameters values have been set up for you, and fewer parameters of these shaders are exposed so they're simpler to use.
See ICE Particle Shader Compounds for more information on shader compounds.
Open a render tree in a viewport or press 7 to open one in a floating window.
Click the Update icon or press F6 to display the render tree for the selected point cloud.

In the render tree, drag the Particle Volume Cloud shader from the Particles group in the preset manager on the left, or choose the Nodes  Particles Particle Volume Cloud shader from the toolbar.
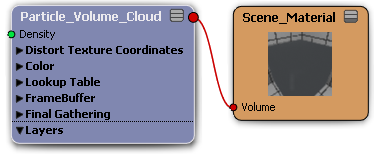
Plug the Volume output from this shader into the Volume port of the point cloud's Material node.
Because you're only rendering the volume of the particle, you don't need the Surface, Shadow, or Photon ports defined by a surface shader (such as Phong, Lambert, etc.).
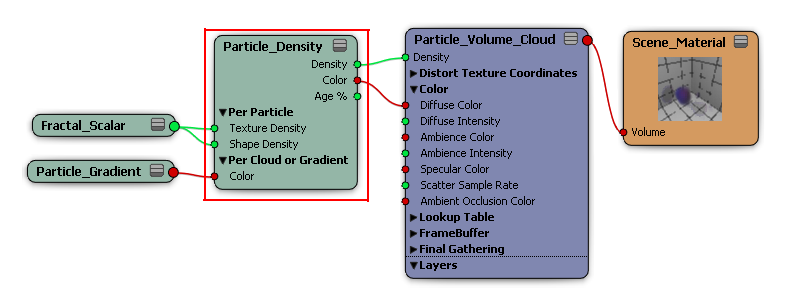
Plug the Particle Density shader into the Density port of the Particle Volume Cloud shader. This shader defines each particle within the volume so that the point cloud doesn't look like a single volumetric mass.
You can then plug the Fractal Scalar and/or Cell Scalar shaders into the Particle Density shader to add noise to the density. For more realistic or complicated smoke effects, you may want to use two Fractal Scalar shaders.
Finally, you can plug the Particle Gradient shader into the Particle Density shader to use a gradient on the particle color and/or density.
For details on each parameter in the Particle Volume Cloud property editor, as well as a general workflow overview, see Particle Volume Cloud.
 Except where otherwise noted, this work is licensed under a Creative Commons Attribution-NonCommercial-ShareAlike 3.0 Unported License


