No matter what type of animation you're doing, you'll probably need to change its timing at some point. Using the Retime Keys tool, you can do this directly on the function curves themselves: you create markers on the segment of the curves that you want to retime, then drag those markers to lengthen or shorten the animation in that segment. This is also known as timewarping.
For example, using the Retime Keys tool you can rough out the timing of the main poses for a character's animation, do minor timing adjustments to get just the right movement, or match an audio track's phonemes with a character's mouth movements.
You can retime the animation for any number of objects' fcurves at a time, such as for a whole character.
You can also retime the animation on fcurves with any type of interpolation: spline, linear, or stepped.
For other ways of retiming animation in Softimage, see Scaling Function Curves Keys and Regions, Shaping High-Density Fcurves (HLE), Scaling Regions of Keys in the dopesheet, Scaling Offsetting or Retiming Fcurve Animation, and Changing Time Relationships (Timewarps) in the animation mixer.
The first step to retiming the animation is to create the retime markers.
Select or branch-select one or more objects so that their fcurves appear in the fcurve editor. For example, to retime the fcurves for a whole character, branch-select the parent object to display all its children's fcurves.
In the animation editor's explorer, select the parameters whose fcurves that you want to retime.
If no curves are selected, all curves that are currently visible in the graph will be affected by the Retime Keys tool.
Choose Edit  Transformation Tools Retime Keys Tool or click the Retime Keys icon on the fcurve editor toolbar to activate the Retime Keys tool.
Double-click in the graph at the frames where you want to create the retime markers. A yellow retime marker is added each time you double-click.
If you don't double-click exactly on a frame, the new retime marker snaps to the closest frame. If there is already a retime marker on that frame, no marker is added.
If you double-click and hold the mouse down after the second click, you can move the marker exactly where you want without retiming the keys.
To exit the Retime Keys tool, press the Esc key, select any other tool, or select the Retime Keys icon or command again.
After you exit the tool, the retime markers are removed from the graph, and their positions are not kept in memory.
However, if you want to keep this data for the next time you activate the Retime Keys tool, deselect the Clear Retime Markers when Exiting Retime Tool option on the Retime Tool tab in the Fcurve Editor Preferences.
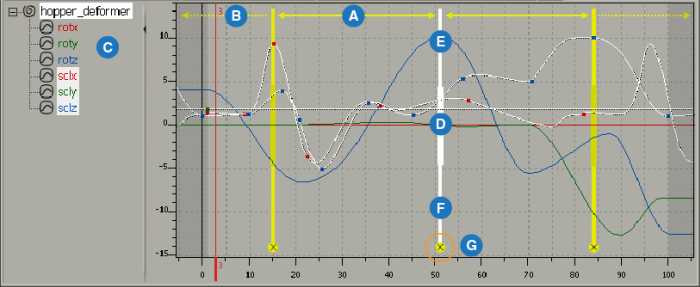
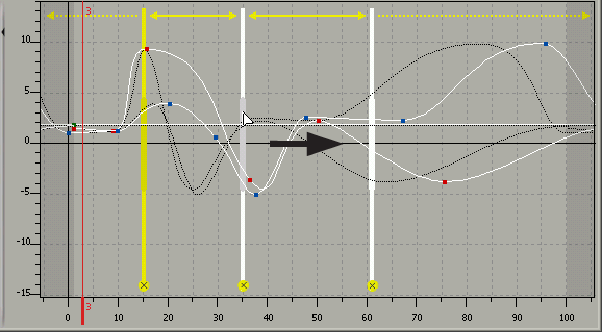
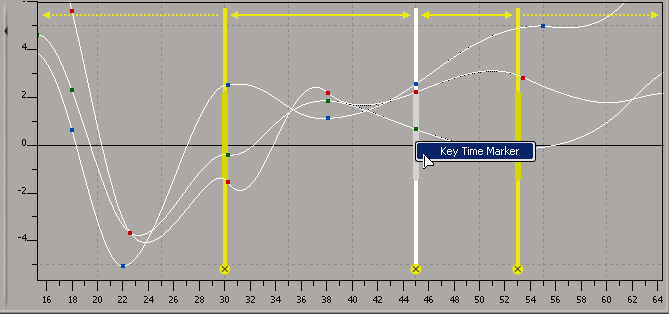
| A |
The solid span indicates that dragging either retime marker will scale the animation between this marker and the next. |
| B |
A dotted line indicates that the animation in this segment will be rippled outward in time as you adjust the retime markers. |
| C |
To add curves to, or remove curves from, the selection in the graph, select the parameter names in the explorer. You cannot select or deselect the curves directly in the graph when the Retime Keys tool is active. Curves that are added will be affected by the retime markers the next time you move them. |
| D |
To scale the animation between the retime markers, drag the thick middle of the retime marker - see Retiming the Animation between the Retime Markers below. |
| E |
To move the retime markers without adjusting the timing, drag the thin upper or lower part of the marker. You can also press the Ctrl+Right Arrow and Ctrl+Left Arrow keys to move the selected markers forward and backward one frame. |
| F |
To select a marker, click anywhere on it. Press Shift while clicking to select multiple markers, or press Ctrl while clicking to toggle the selection. |
| G |
To delete a retime marker, double-click on it or click the delete icon (x) at the bottom of the marker. |
When you create or drag a retime marker, it snaps to the closest frame.
To temporarily override the snapping, press the Shift key while you drag a retime marker.
To set the default snapping behavior, toggle the Snap Retime Markers on Frame option in the Fcurve Editor Preferences.
Once you have marked a segment of animation with the retime markers, you can retime (scale) that segment by dragging the thicker middle part of any of the retime markers to the left or right.
As you drag a retime marker, the keys on any of the selected curves (or on all curves, if nothing is selected) under the marker are also dragged in time. The retiming of the curves in done in a linear manner so that there's no ease-in or ease-out added. If the curves are spline type, their slopes are automatically recalculated to retain the proper interpolation.
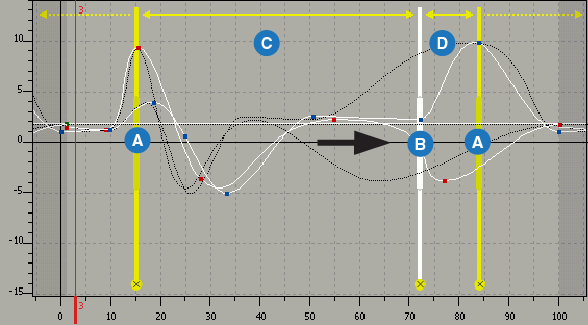
In the image below, two retime markers (A) are set on "anchor keys" so that the retiming is contained within this area, and doesn't shift the animation outside of it. Of course, you can create any number of retime markers and position them as you like.
To slow down the animation between the markers, drag the markers further apart. In the image below, the fcurve segments in C are stretched because the selected marker (B) is dragged to the right.
To speed up the animation between the markers, drag the markers closer together. In the image below, the fcurve segments in D are squashed as the selected marker (B) is dragged to the right.
You can also use the Retime Keys tool to easily shift animation without scaling it. For example, you can shift the animation for a whole character, or even a scene, all at once.
To shift all animation from a single point without scaling, create a single marker and drag in either direction.
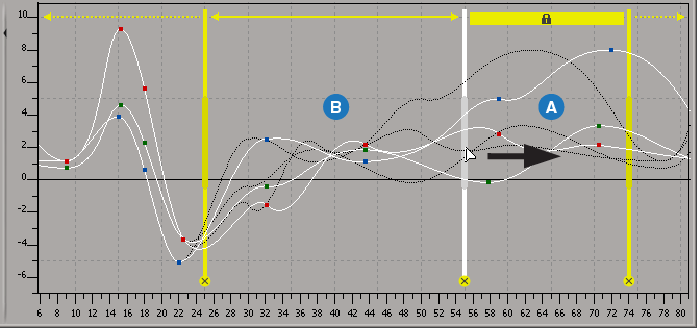
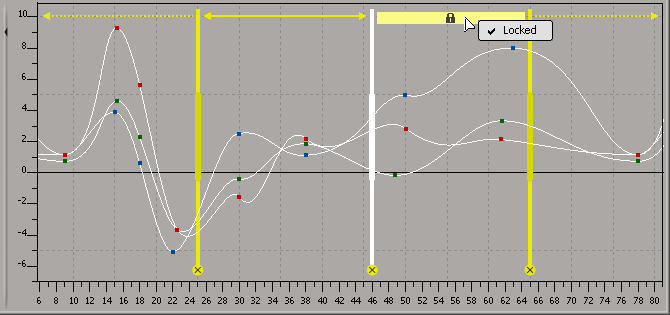
To shift the animation that's between the retime markers without scaling it, lock the time span (see Locking the Animation between the Retime Markers below), then drag the markers in the direction you want. The fcurve segments in the locked span (A) are shifted, while the fcurve segments in the unlocked span (B) are scaled.
To shift animation in a similar way to a locked time span, press Shift to select multiple markers, then move one marker to move all of them as a unit. Note that the selected retime markers don't need to be in consecutive order.
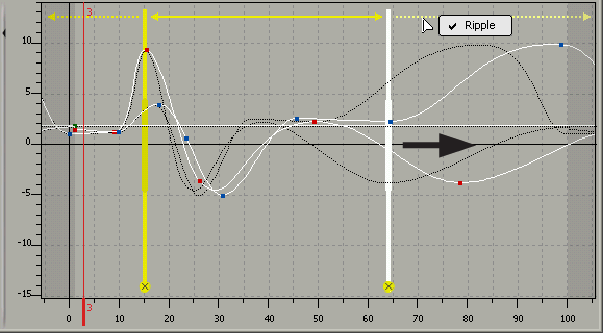
By default, rippling is active when you drag the retime markers. Rippling allows the animation outside of the retime markers to be shifted forward or backwards in time without scaling it.
Be aware that retiming with rippling on can push the animation outside of the start and end frames of the scene's timeline. When this happens, the animation that's outside the timeline's range is displayed in a dark gray area at either end of the fcurve editor, but is not played. You need to increase the scene's frame range if you want to include this part of the animation.
Right-click on a dotted line outside the retime markers and deselect the Ripple option. This turns rippling off for both sides of the retime markers.
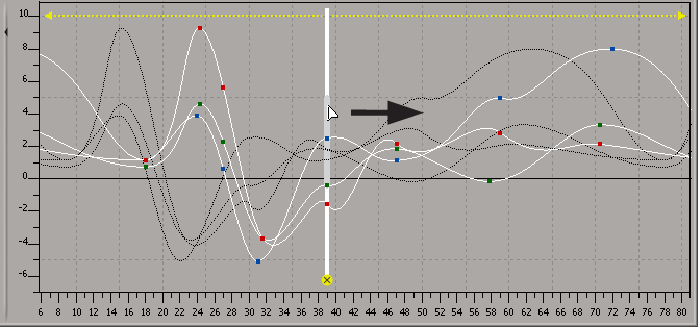
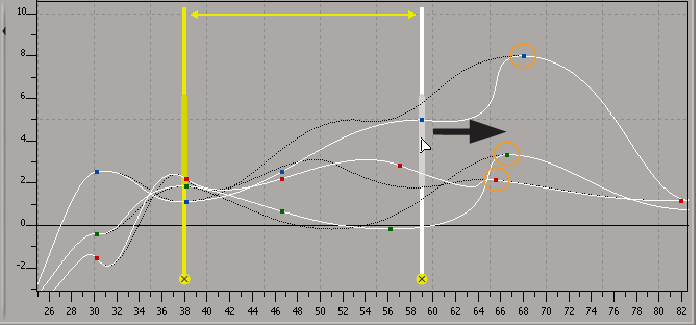
When you drag the retime markers with rippling off, the fcurve segment between the retime marker and the next or previous key on the curve is scaled.
In this image, the fcurve segments to the right of the retime marker are squashed up to their next keys as the marker is moved to the right.
Choose Edit Ripple or click the Ripple icon in the fcurve editor toolbar.
When you lock a time span, you can drag the retime markers to move the fcurve segments within that span without scaling them. Locking time spans allows you to retime a certain segment of your animation while preserving other segments that you don't want to change. You can also use locked segments for easily shifting around poses, such as if you're doing pose-to-pose animation.
To lock a time span, right-click on it and select the Locked option. A lock icon is displayed on that span.
To unlock the segment, right-click and deselect the Locked option.
If you want to anchor the retiming changes with a key, you can easily add one at the location of a retime marker. Adding a key may change the shape of the curve at that point, so the behavior of the retiming is changed.
To insert a key, right-click on a retime marker and select Key at Marker.
A key is inserted for each selected fcurve at the frame where the retime marker is located.
If no curves are selected, a key is inserted at this frame for all curves that are currently visible in the graph.
 Except where otherwise noted, this work is licensed under a Creative Commons Attribution-NonCommercial-ShareAlike 3.0 Unported License