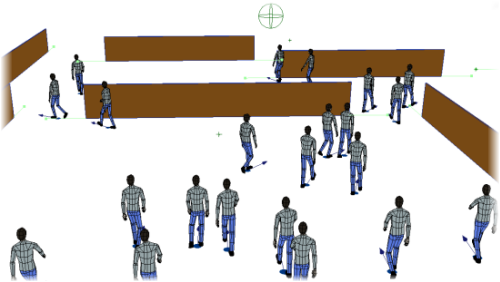
Obstacles in crowd simulations are known as walls, which are polygon mesh objects with specific ICE data that CrowdFX understands.
You must draw the walls using the Draw Wall command described below - you can't use any other objects as walls. However, you can use walls as proxy objects to represent the real geometry for an obstacle object you want to use in the scene. You can group several walls together to reflect the general shape of the real obstacle's geometry.

To create a wall and add it to the current crowd simulation:
Make sure the Crowd model you want to use is the current crowd — see Setting and Selecting the Current Crowd.
Choose the CrowdFX  Crowd
Crowd  Create
  Draw Wall command from the ICE toolbar.
Draw a wall where you want it in the viewport. It stays on the XZ plane by default.
Press the Shift key while you're drawing the wall to interactively change its height.
Set the parameters in the Set Wall Data property editor that appears. This is the Set Wall Data compound in the ICE tree that is created for the wall object.
You now can move and rotate each wall as you would a normal polygon object, and animate its transformations if you like. To resize the wall, see the next section below.
If there is an uneven terrain, you may want to move the walls down in Y so that there's no spaces between them and the terrain.
The wall objects you create are added under the Walls_Root node and referenced in the Walls group in the Crowd model - see Anatomy of a Crowd Simulation.
If you duplicate a wall object, its copy is automatically added under the Walls_Root node and referenced in the Walls group. You can then position it as you like and edit its properties in the Set Wall Data property editor.
To toggle the display of all walls in the Walls group, choose the CrowdFX  Crowd
Crowd  Edit
Edit  Show/Hide Walls command from the ICE toolbar. You can also select the Walls group and press the H key.
You can control the size of the wall with the three Dimensions parameters in the Set Wall Data compound. The exit points are placed at the ends of the wall along either the X or Z axes, whichever one is the longest.
Changing the wall's size with the normal Scale transform tool doesn't change the Dimensions values. As a result, the position of the exit points is not updated to reflect the wall's new size so the collision avoidance will be inaccurate.
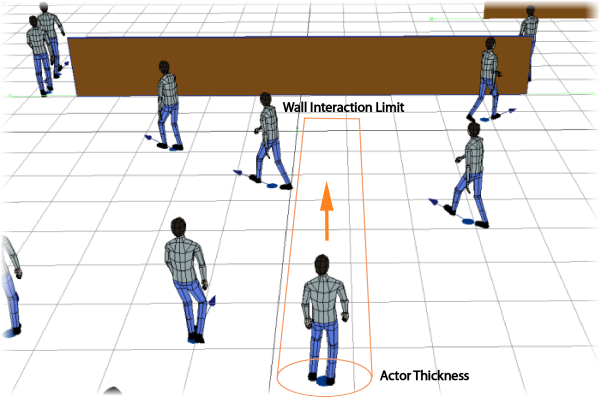
Actors use a simple collision detection process to avoid collisions with walls. A "seeing" ray is cast from the location of the actor's knee or shin area, which is determined by the height of the character. The range of the seeing ray is determined by the Wall Interaction Limit distance value in the Initialize Collision Avoidance compound. If a wall is within this limit, the actor considers it for potential collision and starts heading toward the closest exit point on the wall (left, right, or both sides).
You usually want to set the Wall Interaction Limit value fairly high so that actors have plenty of time to move toward an exit point. For example, if you see a wall far ahead of you, you don't wait until you're at the wall to turn and walk around it!
You can also add "thickness" around the actor to prevent it from getting too close to the wall (and other actors) — see Creating a Buffer Around the Actors.

Remember that if you have a goal defined (see Moving Toward Goals), the actors are ultimately trying to make their way to that goal. The exit point of any wall that's in the way is a "temporary" goal: once they get past the wall, they will continue on to their real goal.
The seeing ray is set low on the body by default so that shorter walls can be detected, but you can set it to the height you want. For example, if the wall is raised above the ground, you can raise the seeing ray so that it can detect objects that are higher.
To do this, open the Initialize Collision Avoidance compound for editing. Then change the Scalar value that's used to multiply the actor's size. For example, if you want the seeing ray to be at approximately waist height, use a value of 0.5 (half the actor's height).

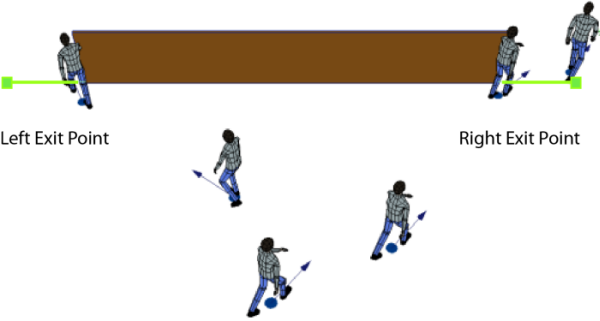
Exit points define where you want the actors to go to get around a wall: left, right, or either side of the wall. These are displayed as green lines protruding from the longest wall sides. Each wall must have at least one exit point.
You can define the wall's exit points in its Set Wall Data compound:
The exit points are placed at the ends of the wall along either the X or Z axes, whichever one is the longest.
Select whether the Exit Points are on the left, right, or both sides of the wall.
Left and right sides are determined by the direction of the actor in relation to the wall; that is, selecting Left for the wall here is the actor's left side.
If both sides are selected, the actor will move toward the exit point that is closest to it.

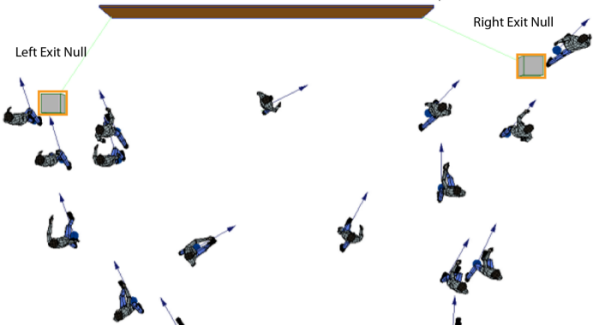
You can also create nulls and link them to the wall for the exit points, which lets you create custom wall setups, including a room that has only one exit point. You can move the null to any position you like to create a custom exit point. The null's size and shape don't make a difference for collision detection - the actors simply head toward the null's center.
Create the nulls and position them around the walls where you want them to be used.
In the wall's Set Wall Data compound, do either of the following:
Click the Explorer button beside Exit Left/Right Null and select the null from the list.
Left and right sides are determined by the direction of the actor in relation to the wall; that is, selecting a null for the Exit Left Null is the actor's left side.
Click the Pick button and select the appropriate null in the viewport. Right-click to end picking mode.
The null is linked to the exit point, and you can position the null where you like.

 Except where otherwise noted, this work is licensed under a Creative Commons Attribution-NonCommercial-ShareAlike 3.0 Unported License