You can use the Custom Primitive Wizard to generate the basic code for a self-installing plug-in that contains a custom primitive
object.
To generate the code for the plug-in using the Custom Primitive Wizard:
- Click .
The Plug-in Manager appears.
- Perform one of the following:
- To create the plug-in in the User location – Select .
- To create the plug-in in a different location (such as a workgroup or an Add-on directory) – Expand the location in the Plug-in
Tree, right-click the folder and select .
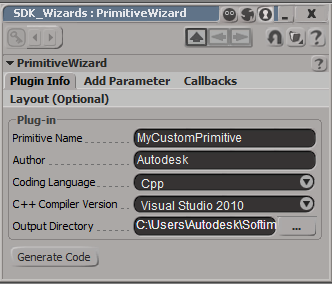
The Custom Primitive Wizard appears.
- Select the tab, and type a name for the custom primitive object in the text box.
The first character in the name must be a letter. Subsequent characters can be letters, numbers, or underscore (_). The wizard
automatically replaces spaces in a name with underscores.
- Type the name of the plug-in author, for example, your name or the organization name in the text box.
- Select the correct version of the compiler in the list box. In the list box, C++ is selected as the coding language.
NoteOnly C++ is currently supported as the coding language for the custom primitive object.
- Make sure that the location of the generated files as shown in the box is correct.
- Select the tab to add parameters or buttons to the property page for the custom primitive object. You can define each parameter using
the options in the group, and click to add the parameter to the property page. See the Adding Parameters section for more information about the tab.
TipTo remove a parameter, click on the corresponding row handle (the first dark column in the group), and then click .
- Select the tab to specify which callbacks must be generated for the plug-in. To select a callback, select the corresponding checkbox.
- Select the tab to define the layout of the property page. You can do the following:
- Prevent parameters from appearing on the property page.
- Assign a parameter to a tab on a property page.
- Assign a parameter to a group on a property page.
- Assign a parameter to a row on a property page.
- Change the parameters's order of appearance in the property page.
See the Property Page Layout section for more information about the tab.
The wizard creates the basic layout, but you can tweak the property page further using the DefineLayout callback. For more information on the kinds of controls you can add and customize, see Interacting with the User.
- Click to generate the code for the custom primitive plug-in.
The generated plug-in is automatically loaded and executed, and the code is loaded into the script editor.
NoteAny change that you make manually to the code is overwritten if you regenerate the code using the wizard. It is a good practice
to make sure that you are ready to begin coding before you click .
Adding Parameters
The tab enables you to define the parameters for the Custom Primitive. The wizard uses these settings to determine what code
to generate. You can customize the code further and add extra functionality as desired. The following table defines the settings
in the tab.
| Control |
Description |
|
|
Specifies the data type for the parameter. Most of these types correspond to actual data types (integer, string, boolean,
and others). However, the option just adds a button and is not a parameter type.
Depending on the value you choose in this control, some of the other settings in the tab might not be available. For example, value range settings such as and appear only for parameters with a numerical data type.
|
|
|
Specifies the name for the parameter.
|
|
|
Specifies whether you can write to the parameter.
|
|
|
Specifies whether the parameter can be animated.
|
|
|
Specifies whether the parameter is keyable or not.
|
|
|
Specifies the default value to use for the parameter. This setting appears as a text box for the text (string) type, a checkbox
for the boolean type, a slider for numeric types, and a color box for the color type. It is not available for FCurves, grid
controls, and buttons.
|
|
|
Specifies the lower limit of the parameter. This setting is only available for parameters of numeric type.
|
|
|
Specifies the upper limit of the parameter. This setting is only available for parameters of numeric type.
|
|
|
Toggles the availability of the and settings that allow you to define the range of values on the parameter's slider bar when the property page is displayed.
This option is only available for parameters of numeric type.
|
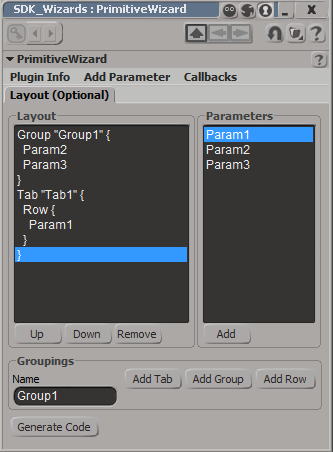
Property Page Layout
The tab defines the layout of the property page.
The list in the tab represents the set of parameters that appear in the property page. You can click and to change the order in which parameters are arranged in the list (and eventually in the property page). The list represents the groupings as blocks delimited by labeled brackets inside which the parameters can appear as shown in
the following figure.
The list displays all parameters defined for the custom primitive object. By default, all parameters appear in the property page.
However, if you add some parameters to the list, then only these parameters are visible in the property page.
To add a parameter to the list:
-
Click the parameter in the list
-
Click under the list.
Notice that adding parameters to the Layout list does not remove them from the Parameters list.
You can click to remove either groupings or parameters from the group.
To remove a parameter from the list:
-
Click the parameter in the list.
-
Click . The parameter disappears from the list (but remains in the list).
To remove a grouping from the list:
-
Click either bracket of the group that you want to remove.
-
Click . The grouping is removed from the list leaving the parameters. The parameters are now nested under the next highest control. For example, if the parameters
are nested inside a Row on a Tab and you remove the row, the parameters now appear inside the Tab.
The area enables you to add tabs, groups and rows to the property page. Each tab or group must be identified by a label which
you can specify in the text box. You can click the button corresponding to the type of control such as , , or , and the control brackets appear in the list.
 Except where otherwise noted, this work is licensed under a Creative Commons Attribution-NonCommercial-ShareAlike 3.0 Unported License


 Plug-in Manager.