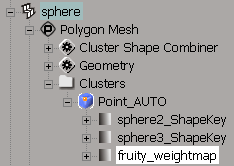
You can paint shapes using the weight maps and the mixer. This means you can use the Paint tool to apply a shape on top of another shape.
For example, you could have two shape keys of a face: one happy and one sad. In the mixer, overlap their shape clips, then paint the parts of the face that you want to reveal: you could paint one half of the happy face to reveal the sad one.
Store shape keys for a cluster as described in Building a Library of Stored Shapes.
Create a weight map for that cluster by selecting the cluster and choosing Get  Property
  Weight Map. The weight map property editor opens.
For more information about weight maps and painting in general, see Parameter Maps [Scene Elements].
With the shape-animated object selected, click the Clusters button on the Select panel and choose the cluster corresponding to the shape key.
In an explorer, expand the object's operator stack, expand its Clusters folder and the cluster corresponding to the shape key. Select the shape key.
Choose Deform  Shape
Shape  Modulate Shape Key with Weight Map from the Animate toolbar.
Pick the weight map in the explorer. It should be listed under the cluster corresponding to the shape key.

Open the animation mixer and create a shape track, then load a shape key as a clip as described in Adding Shape Clips to the Mixer. Place the shape clips on different tracks and overlap them in time.
Select the weight map and press W to activate the paint tool (press Ctrl+W to adjust the brush's settings). You can now paint weights in the geometry views:
If the shape clip overlaps other clips on other tracks, the clip is mixed with them in the overlapping portions according to the weights you paint.
If there are no overlapping clips, the shape clip is mixed with the cluster's base shape.
For more information about painting, see Using Brush-based Tools [Commands and Tools].
 Except where otherwise noted, this work is licensed under a Creative Commons Attribution-NonCommercial-ShareAlike 3.0 Unported License