You will most likely want to create more passes as your scene grows in size and complexity. You can select from and modify
a variety of preset render passes. From the Render toolbar, choose Pass  Edit New Pass and select a type of pass preset. Your choices are as follows:
| Pass |
Description |
|---|---|
| RGBA Matte |
Matte pass of the selected objects. This type of pass is regularly used to composite overlapping objects. Background objects and lights are not rendered but matte objects are rendered with their original RGB settings. See The Matte Pass. |
| White Matte |
Matte pass with a constant white RGBA channel of selected objects. This type of pass is regularly used to composite overlapping objects. The white matte pass renders matte objects in white, while background objects and lights are rendered black. See The Matte Pass. |
| Isolate Matte |
Matte pass of the selected objects. Each matte object is isolated from non-matte objects, meaning that a matte is generated for areas of matte objects that are overlapped by non-matte objects. See The Matte Pass. |
| Depth |
Pass of the entire scene's depth information. Also called a Z-depth pass, this type of pass contains depth information for objects based on the distance from the camera. See The Depth Pass. |
| Shadow |
Shadow pass of the entire scene. Rendering a shadow on its own and being able to composite it back in the final render allows you to edit a shadow's blur, intensity, and color without any additional rendering. See The Shadow Passes. |
| Selective Shadow |
Shadow pass that includes only shadows projected on the selected objects. See The Shadow Passes. |
| Reflection |
Pass containing every selected object's reflections. |
| Refraction |
Pass containing every selected object's refractions. |
| Ambient |
Pass containing all of a scene's ambient color. |
| Ambient/Diffuse |
Pass containing all of a scene's ambient and diffuse information. |
| Diffuse |
Pass containing all of a scene's diffuse color. |
| Highlight (or Specular) |
Pass containing the highlight of the entire scene. A highlight pass (sometimes called specular) contains all of a scene's specular highlights or hotspots. |
| Image Based Lighting (HDRI) |
Pass that lights the scene using a High Dynamic Range Image (HDRI) compatible environment shader and final gathering. For more information about creating an HDRI pass, see Using Environment Maps to Light a Scene [Image-Based Lighting]. |
| Caustics |
Pass of all of the scene's caustic effects. |
| Global illumination |
Pass of all of the scene's global illumination effects. |
| Glow |
Pass of every selected objects' glow property. |
| Lens flare |
Flare pass for the selected camera or light. A lens flare partition is created for the light(s) that create the flare. Flare properties are applied to the partition and the render pass camera. |
| Volumic |
Volume pass for each selected object in your scene. |
| Toon |
Pass in which scene objects are rendered using the Toon Paint and Host material shader. If additional inking is needed, you can apply the Toon Ink Lens shader to the camera. |
| More... |
Opens a browser offering more pass presets. |
When you start Softimage, the default pass in place is a complete pass that includes everything in the scene. It contains all the elements for the imported scene to be fully rendered in a single "beauty pass." You can render the beauty pass as is — with its default settings — or you can customize the pass by renaming it, setting new options, or adding partitions.
When you first create a scene, the default beauty pass is the current pass. Any pass commands that you apply, such as setting the pass camera or adding a partition, affects the current pass (see Setting the Current Pass).
The default pass includes the following partitions, nodes, and settings:
Background Objects Partition — automatically includes all objects in the scene.
Background Lights Partition — automatically includes all lights in the scene.
Environment, Volume, and Output shaders — each new pass you create has its own list of output, environment, and volume shaders; therefore, you can add a specific shader to a specific pass. For imported scenes, all global shaders are applied to the default pass.
Pass Camera — automatically set to the active camera. For imported scenes, the defined camera for the imported scene is the active camera.
Render Options — each pass has its own set of render options that can be set independently of each other.
Rendering a shadow on its own and being able to composite it back in the final render allows you to edit a shadow's blur, intensity, and color without having to re-render the entire scene. This can be a great asset when production time is limited. Shadow presets create an alpha matte of the shadows cast by objects in a scene.
Two shadow passes are available by default: the shadow pass and the selective shadow pass.
Basic Selective Shadow Pass Settings
Selective Shadow creates a shadow pass only for selected shadow receiving objects. It includes the following settings:
Background Objects Partition — contains all of a scene's objects. These objects do not have the Shadow shader applied to them. Instead, shadow is applied via the shadow receivers partition.
Background Lights Partition — automatically includes all lights for the scene.
Partition Shadow Receivers — contains all of a scene's objects that have the Shadow shader applied to them via the partition. This shader only renders the shadows of every object in the partition.
To set up a shadow pass or selective shadow pass preset
Before you start, remember that if you're creating a selective shadow pass, you must first select the shadow-receiving objects that you want to include in the Shadow Receivers partition.
Load a shadow-pass preset from the Render toolbar by choosing Pass Edit New Pass Shadow or Selective Shadow.
A shadow pass for the entire scene is created and the Shadow Pass property editor appears.
If not already set, change the 3D view camera to view the render pass by selecting Cameras Render Pass in the view's Views menu.
You can further customize the shadow preset by renaming the pass and adding more partitions. See Creating Custom Render Passes.
When you are satisfied with the settings, preview the fully rendered frame by choosing Render Preview All Layers from the toolbar.
Render the pass. For more information on how to do this, see Rendering Methods.
Matte passes are often used to create a "cut-out" of one object over another. For example, if you wish to render a car driving along a street, you must create a matte pass of the lamp posts; otherwise, the car render will overlap the lamp posts. The lamp posts' matte is used to obscure the render of the car so it appears to be behind the posts.
RGB Matte — Creates a matte pass of selected objects. Matted objects are rendered with their RGB values and unselected objects are not rendered.
This matte is regularly used to composite overlapping objects. Background objects and lights are not rendered, but matte objects are rendered with their original RGB settings.
White Matte — Creates a matte pass with a constant white RGBA channel of selected objects. Selected objects are rendered white and unselected objects are rendered in black.
This matte is regularly used to composite overlapping objects. The matte pass renders matte objects in white; background objects and lights are not rendered.
Isolate Matte — Isolates matte information for selected objects. Each matte object is isolated from non–matte objects, meaning that a matte is generated for areas of matte objects that are overlapped by non–matte objects.
All three matte passes include the following settings:
Background Objects Partition — automatically includes all objects that are not explicitly assigned to the Matte Objects partition.
Visibility is turned off for primary and secondary rays for these objects so that they are rendered as black.
Background Lights Partition — automatically includes all lights for the scene.
Partition Matte — these objects are rendered in white, including their shadows and any motion blur defined for them.
The Constant material shader is usually applied to objects in a matte pass partition.
Select the object or objects for which you want to create a matte.
Load a matte–pass preset from the Render toolbar by choosing Pass Edit New Pass RGBA Matte, White Matte, or Isolate Matte.
All other objects are contained in the Background Objects Partition and are rendered as black.
When the Render Pass property editor opens, rename the new pass and, if you wish, set an active camera and render options.
When you are satisfied with the settings, preview a fully rendered frame by choosing Render Preview All Layers from the Render toolbar.
Render the pass. For more information on how to do this, see Rendering Methods.
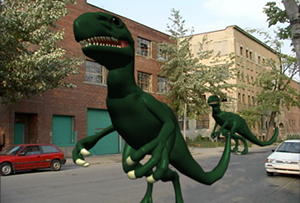
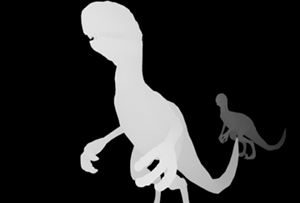
The depth pass isolates depth information. When composited with the rest of the scene, it applies a fog or depth fading to objects that are farther from the camera. The depth pass creates a black and white gradient based on depth information using a volume shader. White represents a distance close to the camera, and black is very far. A depth map's color and unit scaling can be customized.
|
|
The smaller dinosaur is farther back in the scene, hence darker in the depth pass. If you were to composite this scene without a depth pass, the dinosaur in the background would not be faded or dimmed and look like a baby dinosaur at its mother's feet.
Load the depth–pass preset from the Render toolbar by choosing Pass Edit New Pass Depth. A depth pass for the entire scene is created and the Pass property editor appears.
Rename the depth pass and, if you wish, set the active camera and rendering options. For general information about choosing rendering options, see Managing Rendering Options.
To edit the depth–pass parameters, click the Volume Shader tab in the depth–pass property editor.
Select the Constant Density shader from the shader stack and press Inspect to open its property editor. You can define the unit scaling of the depth pass.
Scaling determines the depth used to display Density. Use 1:100 to create a detailed depth pass of a scene that extends far from the camera and 1:1 for a scene that is relatively flat.
If not already set, change the 3D view to view the render pass by selecting Cameras Render Pass.
When you are satisfied with the settings, preview a fully rendered frame by choosing Render Preview All Layers from the Render toolbar.
Render the pass. For more information on how to do this, see Rendering Methods.
Some target formats, such as the ones used in games development, require that depth information be "flat". That means that the depth is constant for each object, rather than falling off smoothly. You can flatten a depth pass using the Flatten Depth output shader.
Edit the depth–pass parameters, click the Output Shader tab in the depth–pass property editor.
Click the Add button next to the Output shader stack and select the Flatten Depth shader from the browser. The shader is added to the pass' Output shader stack.
Select the Flatten Depth shader in the shader stack and click the Inspect button to open its property editor.
From the Flatten Depth property editor, set the Depth Mode option to flatten each object's depth according to one of the following criteria:
Average: flattens each object's depth using its average depth value.
Maximum: flattens each object's depth using its maximum depth value.
Minimum: flattens each object's depth using its minimum depth value.
Enable the Camera Space Depth option to convert the depth data from raster space to camera space.


