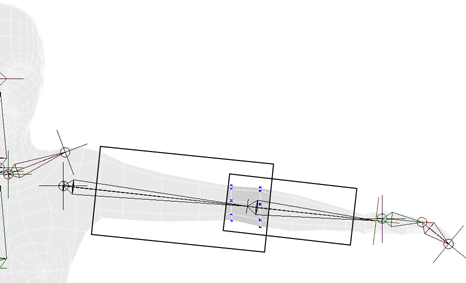
You can use bounding volumes to modify the assignment of envelope weights. Points can be included or excluded from a deformer's influence based on whether they are inside or outside a specified volume. Bounding volumes must be implicit objects.
Bounding volumes are not intended to be used to set the final envelope weights. They are an optional way to set up a rough weighting, and can provide more control over the assignment of deformers than the default initial assignment. One advantage of bounding volumes during the early stages of weighting is that, if you modify the initial weighting by changing the assignment method or adding deformers, the effect of the bounding volumes is preserved. Once you are satisfied with the rough weighting, you can freeze it and then tweak it further as described in Modifying Envelope Weights.
Bounding volumes are always considered in relation to the reference pose; that is, it doesn't matter whether envelope points are currently inside or outside bounding volumes; what matters is whether they would be inside or outside if the envelope was in its undeformed reference pose.
Bounding volumes affect the weighting of envelope points until you freeze the weights as described in Freezing Envelope Weights.
Every deformer has three groups in its Bounding Volumes property. To display these groups, make sure that both Properties and Groups are checked in an explorer's Filters menu.
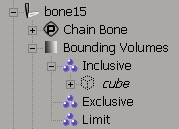
You define bounding volumes for a deformer by adding and removing implicit objects from these groups, either by using commands
on the Deform  Envelope menu or by modifying the groups directly. These groups are similar to other groups except that they cannot be copied.
For more information about groups in general see Grouping Objects [Scene Elements].
There are three types of bounding volumes:
Inclusive — all envelope points within the bounding volume are assigned 100% to the deformer. They are not influenced by any other deformer (unless they are also inside an inclusive bounding volume of another deformer).
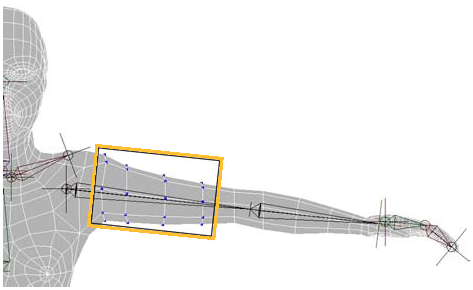
Exclusive — all points within the bounding volume are prevented from being assigned to the deformer.
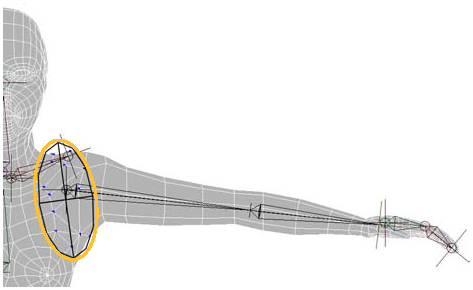
Limit — points outside the bounding volume cannot be assigned to the deformer; points inside the volume may be assigned to the deformer as well as to other deformers as applicable.
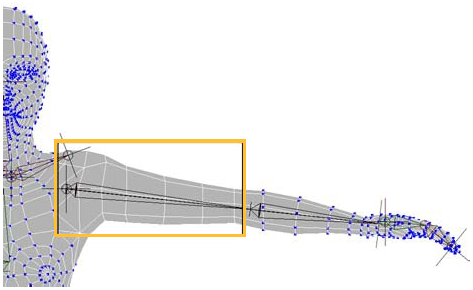
Bounding volumes can be either implicit spheres or cubes.
Choose one of the commands on the Deform  Envelope
  Create Bounding Volume submenu of the Animate toolbar: Box or Sphere.
Choose Get  Primitive
  Implicit
  Cube or Get
  Primitive
  Implicit
  Sphere from any toolbar.
The commands on the Deform  Envelope
  Create menu do exactly the same thing as the ones on the Get
  Primitive
  Implicit menu.
However, the commands on the Deform  Envelope
  Create menu make it clear which implicit shapes are supported as bounding volumes.
Once you have a bounding volume object, you can scale, rotate, and translate it into place before associating it to a deformer.
Associating and Dissociating Bounding Volumes
You can associate or dissociate bounding volumes and envelope deformers by picking interactively using the Deform  Envelope
  Associate Bounding Volume commands or manually by adding and removing implicit objects from the deformers' bounding groups.
After you have associated bounding volumes, you can adjust the scaling, rotation, and translation of the bounding volumes to change the way points are assigned to deformers.
Before You Associate Bounding Volumes
Before you associate bounding volumes to deformers, make sure to start with the envelope and deformers in the reference pose
— if necessary, use Deform  Envelope
  Reset Actor. This allows you to see which points fall inside and outside the volumes in the reference pose.
It doesn't matter whether envelope points are currently inside or outside bounding volumes when a character is in a particular pose or at a particular frame; what matters is whether the points would be inside or outside a bounding volume if the envelope was in its undeformed reference pose.
It's not a good idea to parent or pose-constrain the volume objects to the deformers. In such cases, when the deformers move, the bounding volumes move as well, and points become reweighted as they fall inside and outside the new positions of the volumes with respect to the reference pose.
Associating and Dissociating Bounding Volumes Interactively
The commands on the Deform  Envelope
  Associate Bounding Volume submenu let you associate and dissociate bounding volumes interactively by picking.
To associate and dissociate bounding volumes interactively
Choose one of the commands on the Deform  Envelope
  Associate Bounding Volume submenu: Inclusive, Exclusive, or Limit. For a description of the different types of bounding volume, see Types of Bounding Volumes.
If you initially selected a bounding volume, pick one or more deformers. Use the left mouse button to associate, and the middle mouse button to dissociate.
If you initially selected a deformer, pick one or more bounding volumes. Use the left mouse button to associate, and the middle mouse button to dissociate. Note that you can pick any type of implicit, but only cubes and spheres work as bounding volumes.
When you have finished picking, right-click or press Esc to terminate the picking session.
Associating and Dissociating Bounding Volumes Manually
You can associate and dissociate bounding volumes and deformers manually by adding and removing the bounding volumes from the deformers' bounding groups.
To see the bounding groups in the explorer, make sure that both Properties and Groups are checked in on the Filters menu and expand the deformer's Bounding Volumes node.

To dissociate bounding volumes manually
Right-click the bounding volume object within the group, and choose Remove from Group.
Select the bounding volume object, and click Ungroup on the Edit panel. If the object is a member of multiple groups, you must multi-select both the object and the group first.
If you no longer need the bounding volume object in your scene, you can just delete it.
You can combine objects in these bounding groups in various ways. Two examples are given here.
Overlapping Different Bounding Volumes
To achieve a progressively diminishing influence of a deformer, use an inclusive bounding volume around it, which is surrounded by a larger limit bounding volume.
Points inside the inclusive volume are assigned 100% to the deformer.
Points in the spillover area (outside the smaller inclusive volume but within the larger limit volume) are probably assigned to the deformer at something less than 100%, as they are farther away.
All points outside the limit volume are prevented from being assigned to the deformer at all.
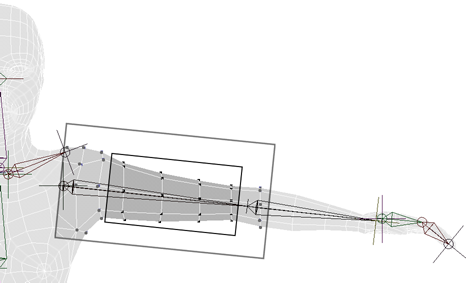
Overlapping Inclusive Bounding Volumes
Sometimes you may want to force some points to be assigned to certain deformers, but not so much that they move and deform in an unnatural manner.
To achieve this, create two or more inclusive bounding volumes that overlap near the joint of two bones. The points within the bounding volumes are assigned as follows:
Points are assigned only to the specified deformers, regardless of the Number of Skeleton Objects value in the Initial Envelope Assignment property editor.
Points in the overlapping region are weighted according to their relative proximity to the two deformers.
Points that fall within only one volume are assigned with the usual 100% weighting to the associated deformer.
