Spawning generates new particles (points) from existing particles. These new particles are often referred to as particle trails. Spawning makes it easy to create effects such as fireworks, laser shots, streams of falling rain, or smoke trails.
To spawn particles, you can use several different Spawn compounds. You can use these Spawn compounds on their own or as part of a more extensive effect via a State system:
Spawn Trails is the basic spawning compound that creates particle trails — see Spawning Particle Trails for information.
Spawn on Collision spawns new particles upon collision with an object — see Spawning Particles Upon Collision for information.
Spawn on Trigger spawns new particles when a defined trigger value is reached — see Spawning Particles Upon Trigger for information.
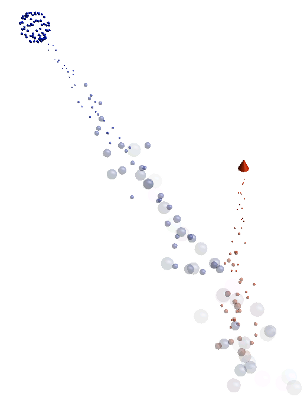
Blue particles are spawned in this state system when the particle reaches its age limit. The red particle trails are also spawned particles.
Each of the Spawn compounds is based on the Clone Point node. This node is responsible for creating new particles which are an exact replica of the original particles. The points, including all of their attributes (except ID, which is unique), are copied from a point cloud and then added to either the same point cloud or to another point cloud, as you choose.
One attribute that is changed, however, is the Age attribute. The Spawn compounds reset the Age attribute of the spawned particles so that they start at 1 instead of whatever Age value the original particles had. This way, it's like a new simulation for the spawned particles.
Of course, you can change the spawned particles attributes so that they are different from those of the original particles — see Setting and Adding Attributes for Spawned Particles for more information.
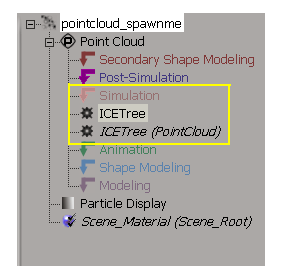
Spawning into the Same Point Cloud or a Different One
You can spawn new particles into the same point cloud or into a different point cloud, depending on how much control you want over the spawned particles:
If you spawn particles into the same point cloud, the shaders and forces on the spawned particles are the same as for the original point cloud. You can, however, add new attributes to the spawned particles to change their color, size, shape, and so on (see Setting and Adding Attributes for Spawned Particles). Also, be aware that when you spawn into the same point cloud, its size could grow exponentially and quickly use up all the memory.
Spawning into a different point cloud is similar to creating a new particle emission. Because the point cloud has a separate ICE tree, you can add nodes to it as you like to create a completely different particle simulation. You can also use different shaders for that point cloud, giving you control over the look of the spawned particles.
For more information, see Spawning Particles into a Different Point Cloud.
Using the Spawn Trail compound, you can emit new particles as trails from existing particles by cloning them.
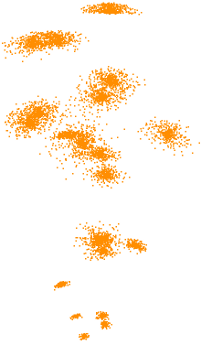
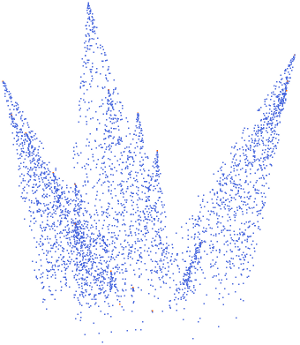
Below on the left, particles are spawned in little clumps; on the right, particles are spawned as fireworks trails.
Create a particle emission — see Creating a Basic Particle Emission.
Choose the Particles  After Emission Spawn Trails command from the ICE toolbar.
This command adds the Spawn Trails compound to the ICE tree, plugging it into the Execute port of the Simulation Root compound.
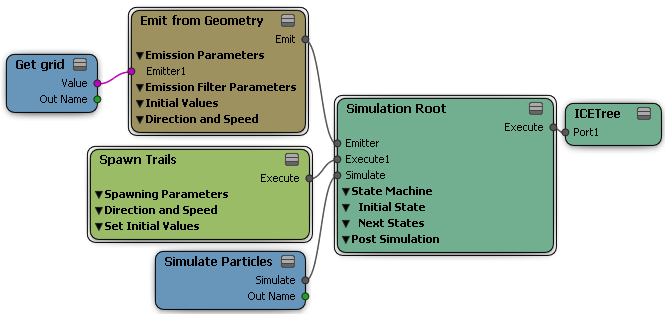
You can also plug it into one of the Execute ports of a State compound, if you're using a state system — see Defining the Effect That Is Triggered for more information.
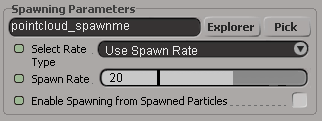
In the Spawn Trails property editor, you can set the particle rate type, spawn rate, inherit particle speed, and set the emission direction angles.
In the Target Cloud Name text box, you can enter Self to spawn new particles into the same point cloud.
To spawn into a different cloud, specify another point cloud — see Spawning Particles into a Different Point Cloud for more information.
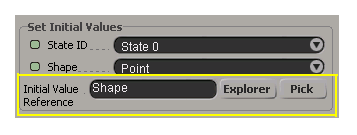
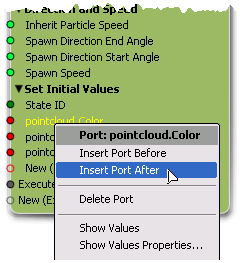
You can choose which attribute of the spawned particles to change by using the Set Initial Value Reference parameter. By default, Color is the attribute that is displayed for the spawned particle, but you can change this to another attribute such as Size, Mass, Shape, Orientation, and so on.
See Setting and Adding Attributes for Spawned Particles for more information.
Spawning Particles Upon Collision
The Spawn on Collision command emits new particles from existing particles upon collision with an object. The spawned particles are emitted at the location of the collision.
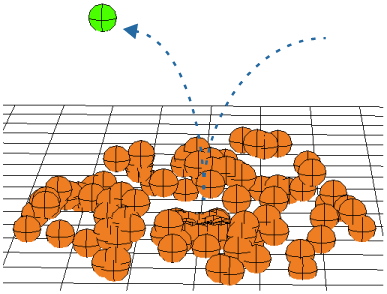
Particles are spawned when the original particle (in green) collides with and bounces off an obstacle (grid). The spawned particles have a different Color attribute.
To spawn particles upon collision
Create one or more objects that you want to use as obstacles for the particles. These objects need to have geometric surfaces, such as polygon meshes or NURBS surface objects. Make sure that the particles will reach these obstacles at some point in the simulation.
Create a particle emission — see Creating a Basic Particle Emission.
Choose the Particles Collision Spawn on Collision command from the ICE toolbar.
Pick one or more objects to use as the obstacles for collision. Each object's Get data node is then plugged into the Surface port of the Bounce Off Surface compound.
You can also add more obstacles objects to the ICE tree later — drag each obstacle's name into the ICE Tree view to create a Get Data node for it, then plug it in as the other obstacles.
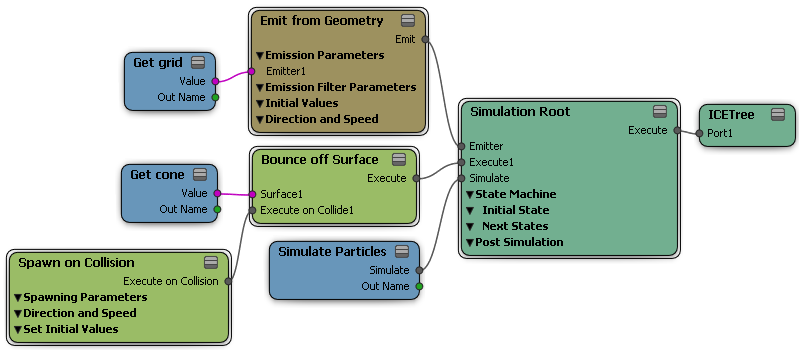
In the Bounce Off Surface property editor, set the parameters as you like for the collision. This affects the interaction of the particles with all obstacles that are plugged into this compound.
In the Spawn on Collision property editor, you can set the method and number of spawned particles emitted, their speed, and their direction.
In the Target Cloud Name, you can enter Self to spawn new particles into the same point cloud.
To spawn into a different cloud, enter the name of another point cloud you have created or use the Pick button to select another point cloud. See Spawning Particles into a Different Point Cloud for more information.
You can choose which attribute of the spawned particles to change by using the Set Initial Value Reference parameter. By default, Color is the attribute that is displayed for the spawned particle, but you can change this to another attribute such as Size, Mass, Shape, Orientation, and so on.
See Setting and Adding Attributes for Spawned Particles for more information.
Spawning Particles Upon Trigger
The Spawn on Trigger compound emits an explosion of new particles when a Trigger value is reached for the existing particles. You can set up this trigger system to be within a state system, or you can simply use an If node to determine the trigger value being reached.
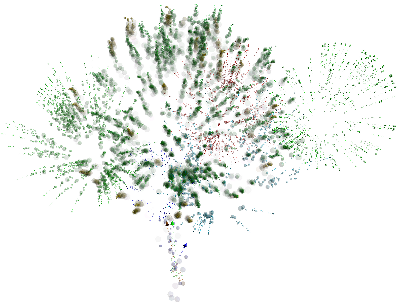
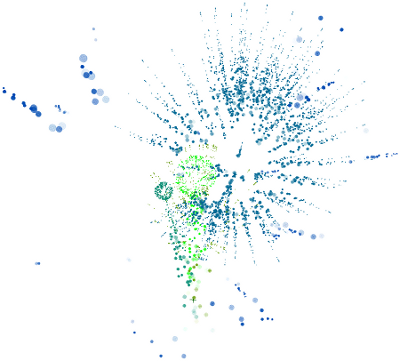
Different sets of spawned particles are used for creating fireworks in a state system.
To spawn particles upon trigger in a state system
Create a particle emission — see Setting Up Any Type of ICE Particle Emission for information.
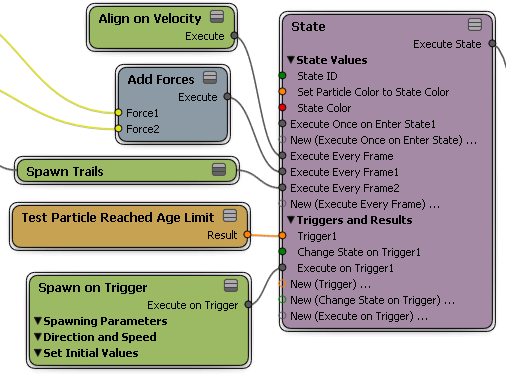
In the ICE Tree, set up a State Machine and State compounds as you like, as described in Overview of Creating a Particle State Setup.
Select a trigger compound (Conditionals group) and plug it into a Trigger port of a State compound. The trigger is the condition upon which the spawning happens.
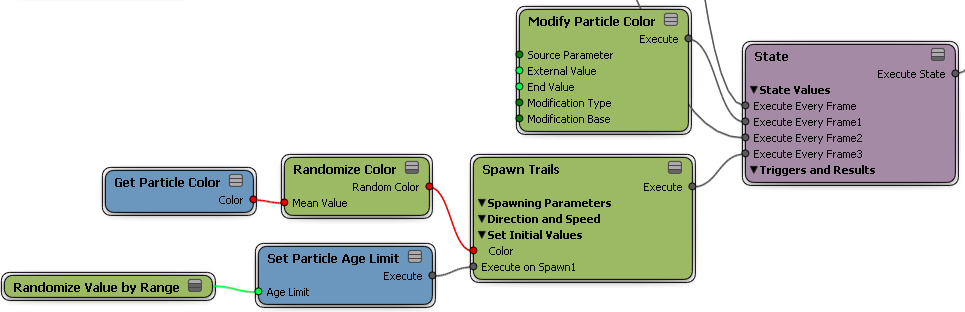
For example, you could use the particles reaching their age limit as the trigger for new particles to be spawned (as is shown in the following tree), creating what's often referred to as a death event.
Drag the Spawn on Trigger compound from the Spawning group into the ICE view.
Plug its Execute on Trigger output into an Execute on Trigger port of a State compound.
In the Spawn on Trigger property editor, you can set the method and number of spawned particles to be emitted, their speed, and their direction. You can also choose to delete the original particle from which the spawned particles were created.
For more information on the parameters, see Spawn on Trigger [ICE Reference].
In the Target Cloud Name, you can enter Self to spawn new particles into the same point cloud when the trigger's value is reached.
To spawn into a different cloud, enter the name of another point cloud you have created or use the Pick button to select another point cloud. See Spawning Particles into a Different Point Cloud for more information.
You can choose which attribute of the spawned particles to change by using the Set Initial Value Reference parameter. By default, Color is the attribute that is displayed for the spawned particle, but you can change this to another attribute such as Size, Mass, Shape, Orientation, and so on.
See Setting and Adding Attributes for Spawned Particles for more information.
Continue with creating the effect you want with the State compound.
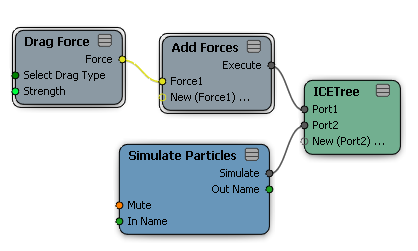
Spawning Particles into a Different Point Cloud
Spawning new particles into a different point cloud is similar to creating a new particle emission. Because the point cloud has a separate ICE tree, you can add nodes to it as you like to create a whole different particle simulation. For example, you can apply different Force compounds to the spawned particles to control their movement.
You can also use different shaders for the spawned particles' point cloud, giving you control over the look of the spawned particles.
To spawn new particles into another point cloud
Create a particle emission and set up its ICE tree for particle spawning using any of the Spawn compounds as described in this section:
Make sure that another point cloud exists in the scene, or choose Get Primitive Point Cloud Empty Cloud from any toolbar to create an empty point cloud.
This is the point cloud that will be used for the spawned particles. Give it a name to distinguish it from the original point cloud.
In the original point cloud's ICE tree, do one of the following to specify the other point cloud as the target point cloud for the spawned particles:
In the appropriate Spawn compound's property editor, enter this point cloud's name in the Target Point Cloud text box.
Click the Pick button beside this text box and select the point cloud in the scene.
Click the Explorer button beside this text box and select the point cloud from the explorer that appears.
Drag the point cloud's name from an explorer into the ICE Tree work area to create a Get Data node for it, then plug its Out Name output into the Target Cloud Name port on the appropriate Spawn compound.
Select the target point cloud and click the Update icon in the ICE Tree view to update the tree to this cloud. It currently references the original point cloud's ICE tree.
Choose Create Simulated ICE Tree from the ICE Tree's command bar to create a separate ICETree node for this point cloud. As soon as you do this, a new ICETree
operator appears in the Simulation region of the operating stack.
Keep the ICETree operator in the Simulation region if you want the spawned particles to be simulated, or drag it to another region if you don't want the particles to be simulated (see ICE Simulation Regions and Nodes [ICE Fundamentals] for information).
Select this new ICETree operator in the operating stack and click the Update icon in the ICE Tree view to display only the ICETree node in the work area.
Get a Simulate Particles node from the Simulation group on the Tool tab in the preset manager and plug it into a port at the bottom of the ICETree node.
You can now treat the spawned particles as a different point cloud, allowing you to add any other nodes (such as forces) to its tree to make them act differently from the original particles.
Remember that the spawned particles have inherited all attributes from the original particles, including velocity.
Change the attributes of the particles as you like, such as their color, size, shape, and so on — see Setting and Adding Attributes for Spawned Particles below for adding new attributes.
Setting and Adding Attributes for Spawned Particles
Spawned particles are an exact replica (clones) of the existing particles. Cloning copies the points, including all of their attributes (except ID, which is unique), from a point cloud and then adds them to either the same point cloud or to another point cloud, as you choose.
You can choose which attribute of the spawned particles to change by using the Set Initial Value Reference parameter in any of the Spawn compounds. By default, Color is the attribute that is displayed for the spawned particle, but you can change this to another attribute such as Size, Mass, Shape, Orientation, and so on.
For information on particle attributes, see Using ICE Particle Attributes.
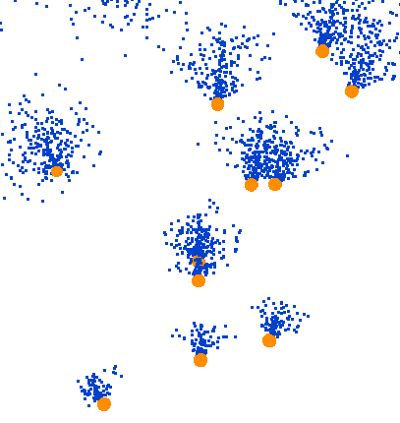
Original particles are orange spheres that spawn particles that are blue points. In this case, the spawned particles have different Color and Shape attributes.
To change the attributes for the spawned particles
If you know the attribute you want to use, enter its name in the Initial Value Reference text box in any of the Spawn compounds.
Click the Explorer button to select the attribute name you want from the explorer that pops up.
For example, if the original particle is an instanced object, but you want the spawned particle shape to be points, select the point cloud's Shape attribute and set the shape to Points.