There are different ways of emitting particles depending on the type of emitter you have (or no emitter at all) and the type of Emit compound you want to use:
When you emit particles from an element using the Emit compounds, the selected point cloud is emitted from the element you have used to be the emitter. Each point cloud has its own ICE tree associated with it. You can have any number of point clouds in a scene, each with its own ICE tree.
Executing at Emission versus Executing at Every Frame
Emit compounds have a port called Execute on Emit: whatever node is connected to that port modifies only the particles that have been emitted at that frame (new particles), never on particles that existed at a previous frame.
However, if you want a node to be executed every frame, you need to plug it into the ICETree node, either directly or via the Simulation Root node.
Using Commands on the ICE Toolbar
The commands on the ICE toolbar are set up to use the Simulation Root node as a base node into which the other nodes are plugged. As a result, you cannot use these commands on ICE trees that don't have this compound plugged into the ICETree node.
To quickly add the Simulation Root node to your ICE tree, right-click the ICETree node and select Insert Simulation Root. This replugs all the existing nodes to the correct ports on the Simulation Root node, then plugs this node into the ICETree node. This is similar to selecting the Insert Execute Node when building compounds.
Setting Up Any Particle Emission from Scratch
You can create any type of particle emission from scratch by creating and connecting nodes manually in the ICE Tree.
To set up a particle emission manually:
Get a point cloud by choosing Get  Primitive Point Cloud Empty Cloud (or any of the shapes) from any toolbar.
With the point cloud selected, open the ICE tree by pressing Alt+9. There is no tree yet, so you must create one.
From the menu bar of the ICE Tree, choose Create Simulated ICE Tree. This creates an ICE Tree node that processes all nodes and compounds connected to it as a simulation. See ICE Simulation Regions and Nodes for more information.
Create one or more objects that will be the particle emitters. The type of Emit compound you choose later depends on the type of object that the emitter is.
From an explorer, drag the emitter's name into the ICE Tree view to create a Get Data node for it. This node simply represents that object in the ICE tree and gets data from it.
From the preset manager on the left side of the ICE Tree, click the Task tab and select Particles from the drop-down list.
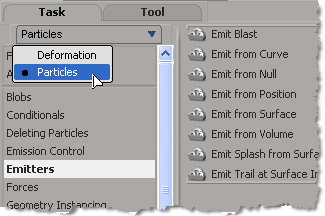
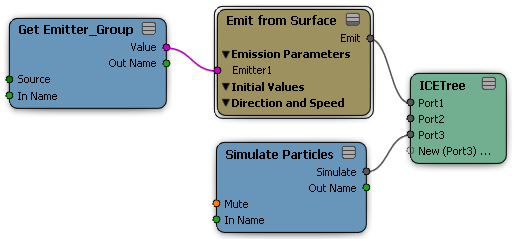
Select the Emitters group label and drag one of the Emit compounds into the ICE tree view. Don't worry that the compound appears red — it's because it's not connected to anything yet.
Plug the emitter object's Value output into the Emit compound's Emitter1 port. Using the Emitter ports below this one, you can keep plugging in the Value outputs from several objects that you want as particle emitters.
Plug the Emit compound's Emit output into the ICETree node's Port1. The nodes plugged into the ICETree node are evaluated in order from the top down at every frame, and you want the particle emission to be the first thing that is evaluated.
In the preset manager, click the Tool tab, then drag the Simulation Simulate Particles compound into the ICE view. This node updates the position and velocity of each particle at each frame based on their previous
velocity and position, mass, and force attributes.
Plug the Simulate Particles node's Simulate output into the bottom of the ICETree node (Port2 for now). Later on, you should add more ports to the ICETree node above this one so that you can add nodes after the particle emission but before the particles are actually simulated.
Double-click the Emit compound to open its property editor and set up the options to define the particle emission.
ICE Particle Emission Attributes
There are several particle attributes that are used to define particle emissions. Many of these attributes are used within the Emit compounds, but you can also use these attributes in their own Get Data and Set Data nodes in the ICE tree — see Using ICE Particle Attributes for information on how to do this.
For more information on attributes in general, see ICE Attributes.
Emitting Particles from Surfaces
You can emit particles from polygon mesh and NURBS surface objects using the Emit from Geometry compound. With this compound, you can to choose to have particles originate from the entire surface of the emitter object, from only its points, or from within its volume.
You can also use the Emit Evenly from Geometry and Emit From Horizontal Polygons compounds to emit particles from a surface. These compounds are designed to be used for CrowdFX, but can be used for regular ICE particles as well.
To create a particle emission from the surface of an object:
Select one or more polygon mesh or NURBS surface object that will be the particle emitters.
Choose the Particles Create Basic Emission command from the ICE toolbar. This command uses the Emit from Geometry compound.
You can also follow the steps in Setting Up Any Particle Emission from Scratch using one or more polygon meshes or NURBS surface objects as the particle emitters and using the Emit from Geometry compound in the ICE tree.
Emitting Particles from Points on a Surface
If you're using a surface emitter, you can emit one particle per point with the Emit from Geometry compound.
Make sure that the emitter object has an appropriate resolution level.
In the Generate Sample Set node inside this compound, change the Rate Type to All Points if you want particles to be emitted from all the points on the emitter at once.
For example, if you set the emit rate to be one particle per second, one particle will be emitted from each point on the emitter per second.
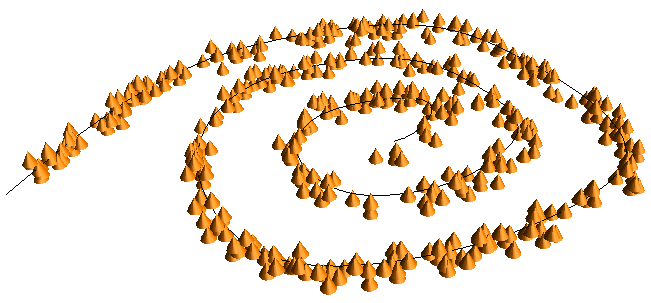
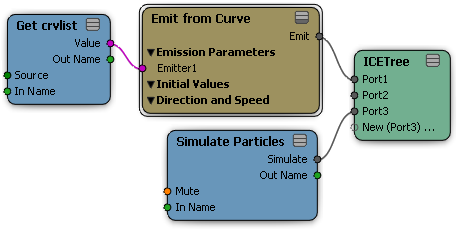
Emitting Particles from Curves
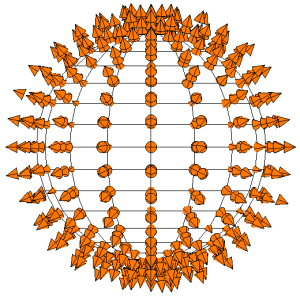
You can emit particles from NURBS curves using the Emit from Curve compound. Particles can be emitted in all directions from the curve or just along the curve's U direction.
Follow the steps in Setting Up Any Particle Emission from Scratch with these requirements:
Use the Emit from Curve compound in the ICE tree.
Connect the curve emitter's Get Data node Value output into the Emitter port on the Emit from Curve compound.
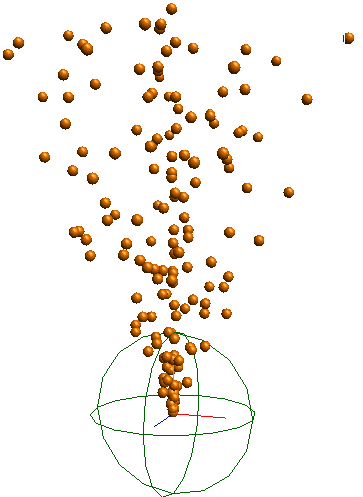
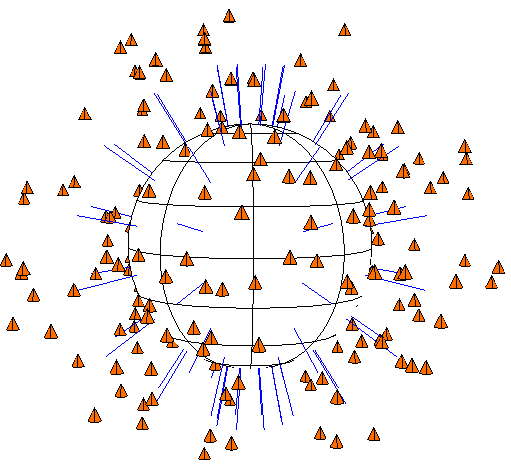
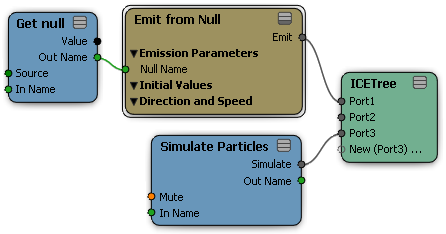
You can emit particles from a null using the Emit from Null compound. This is useful for emitting particles from a specific spot anywhere in a scene without having the emitter rendered or having to hide it so that it isn't rendered. The particles are emitted from the null's center, regardless of the null's icon shape. Here, particles are emitted from a null that is sphere-shaped.
If you are emitting particles from multi-selected null objects, a separate Emit from Null compound is created for each null emitter instead of multiple nulls being connected to one Emit from Null compound (see Emitting Particles from Multiple Objects or Groups). This allows you to define each emission separately.
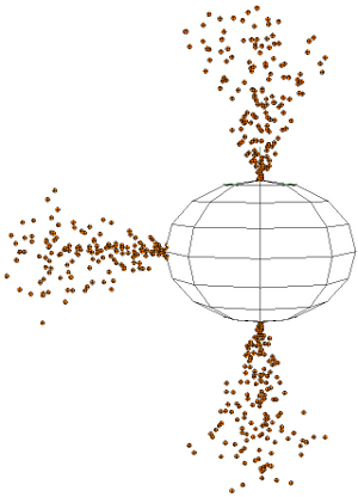
If you want to emit particles from a cluster, you can constrain a null to a cluster on an object, then emit particles from that null. A separate Emit from Null compound is created for each null emitter. Here, particles are emitted from nulls that are constrained to clusters of points on this sphere.
Follow the steps in Setting Up Any Particle Emission from Scratch with these requirements:
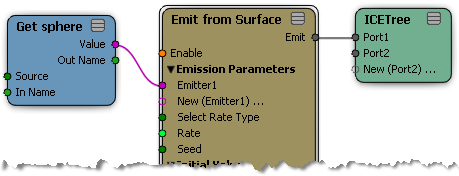
Use the Emit from Null compound in the ICE tree.
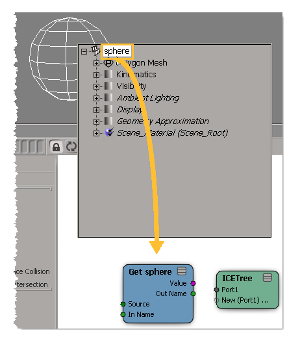
Connect the null emitter's Get Data node Out Name output into the Null Name port on the Emit from Null compound.
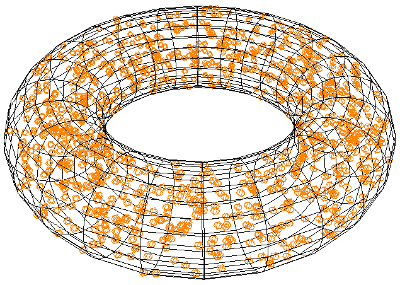
Emitting Particles from Volumes
You can emit particles from within the volumetric boundaries of polygon mesh or NURBS surface objects using the Emit from Geometry compound. The particles fill the emitter object's volume with an evenly distributed set of particles. This compound is useful for creating clouds, dust, or filling up a room with objects.
For the best results, you should select an object that is closed, meaning that there are no holes in it.
To emit particles from within a volume:
Select one or more polygon mesh or NURBS surface object that will be the particle emitters. They must be objects with volume.
Choose the Particles Create Basic Emission command from the ICE toolbar. This command uses the Emit from Geometry compound.
You can also follow the steps in Setting Up Any Particle Emission from Scratch using one or more polygon meshes or NURBS surface objects with volume as the particle emitters and using the Emit from Geometry compound in the ICE tree.
Emitting Particles from a Position in Space
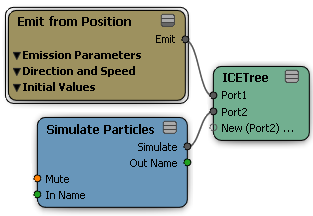
You can emit particles from a specific location (position) in global space using the Emit from Position compound. You specify the XYZ coordinates in this compound's property editor and the particles are emitted from there.
This is useful for emitting from anywhere in a scene without needing to have an emitter object, such as with fireworks or star fields.
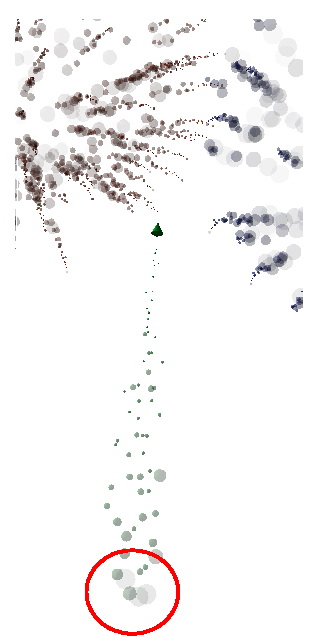
Particles emitted from a position in space - no emitter object necessary.
To emit particles from a position in space
Follow the steps in Setting Up Any Particle Emission from Scratch with these requirements:
Use the Emit from Position compound in the ICE tree.
In the Emit from Position compound property editor, specify the global XYZ position for the particle emission.
Emitting Particles from Multiple Objects or Groups
You can emit particles from multiple scene elements or from a group of objects. When there are multiple objects selected, the same point cloud is emitted from all the objects.
The amount of particles that are emitted (see ICE Particle Rate (Amount)) are distributed among all the emitters: it's the total number of particles that are emitted from the point cloud, not the number of particles that are emitted per emitter object.
You can also use multiple Emit compounds (of the same or different type) plugged into the ICETree node to emit the same point cloud from the emitters. If you're doing this, see Emitting the Total Number of Particles from Multiple Emit Compounds for a special issue.
Select multiple polygon mesh or NURBS surfaces objects to be emitters.
Choose the Particles Create Basic Emission command from the ICE toolbar. See Creating a Basic Particle Emission for more information.
A point cloud is created, and only one Emit from Geometry compound is created with all emitter objects plugged into it.

Follow the steps in Setting Up Any Particle Emission from Scratch.
From an explorer, drag each emitter object's name into the ICE tree to create a Get Data node for it.
Plug the Value output from each emitter's node into consecutive Emitter ports on the same Emit compound or other Emit compounds.
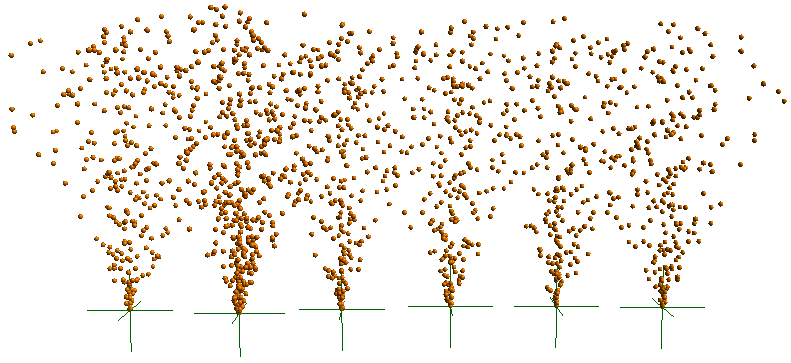
The same point cloud particles are emitted from each of the multiple objects.
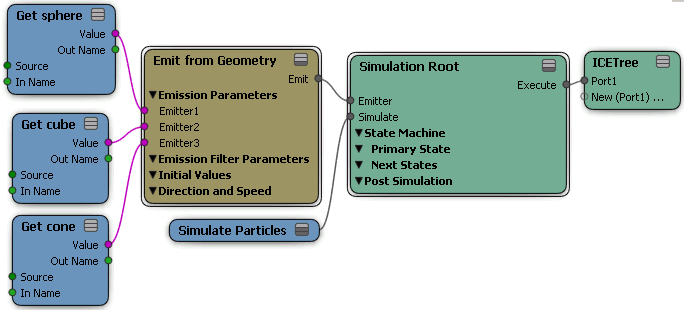
In the ICE Tree view, click the Tool tab in the preset manager and drag the Geometry Queries Group Geometry node into the ICE tree.
From an explorer, drag each emitter object's name into the ICE view to create a Get Data node for it.
Plug the Value output from each emitter's node into consecutive Geometry ports on the Group Geometry node.
Plug the Result output from the Group Geometry node into consecutive Emitter ports on the same Emit compound or other Emit compounds.
Emitting Particles from a Group
Emitting particles from a group of objects yields the same results as emitting from multiple objects. The advantage of groups is that you can add objects to the group and have the particles automatically emitted from them without having to bring them directly into the ICE tree and connecting them.
To emit particles from a group:
Create a group (press Ctrl+G) with the emitter objects in it.
From the explorer, drag the group name into the ICE Tree to create a Get Data node for the group.
Plug the Result output from the Group node into consecutive Emitter ports on the same Emit compound or other Emit compounds.
The same point cloud particles are emitted from each of the objects in the group.
Emitting the Total Number of Particles from Multiple Emit Compounds
While it is possible to emit the same point cloud from many emitters, there is an issue to consider when emitting a static number of particles (Total Number of Particles as the Rate type — see ICE Particle Rate (Amount)).
Each emitter has a Seed value which helps uniquely identify emitters in the ICE tree. Once an emitter with the Total Number of Particles option has emitted particles, the Seed value is stored so that the emitter does not emit again.
If two emitters use the same Seed value and also use the Total Number of Particles option, then only the first emitter will emit particles. By default, the different Emit compounds have different default Seed values, but if you use two Emit compounds of the same type emitting the same point cloud, they will have the same Seed value.
To fix this, simply change the Seed value in each Emit compound to any random number that is different from the other Emit compounds, then all emitters will emit correctly.