Rotation changes the orientation of an object. All possible orientations can be set with a combination of three angles of rotation: X axis, Y axis, and Z axis. There are several different rotation modes that control the axis and center of rotation.
Activate the Rotate tool by doing one of the following:
If necessary, change any options:
The rotation modes control the axis of rotation. The last-used mode is automatically activated. For a description of each mode, see Rotation Modes.
You can restrict the rotation to specific axes. See Specifying Axes.
You can activate COG to rotate about the center of geometry.
Alternatively, set the pivot manually as described in Setting the Pivot.
Rotate the objects using the mouse in the 3D views:
If you are using the SRT manipulators, click and drag on different parts (handles) of the displayed transformation axes to rotate the objects in different ways.
For general information about the SRT manipulators, see Transforming Interactively with the SRT Manipulators. For specific information about the Rotate manipulator, see Using the Rotate Manipulator.
If you are not using the SRT manipulators, click and drag the mouse anywhere in the 3D views.
The function of the left, middle, and right mouse buttons depends on the tool, mode, and other options — check the mouse/status line at the bottom of the main window for details. You can also drag while pressing multiple mouse buttons simultaneously.
The rotation modes control the axis and center of rotation. When the Rotate tool is active, you can set the mode using the buttons below the SRT boxes on the Transform panel. You can also change the center of rotation by setting the pivot as described in Setting the Pivot.

View rotations use an axis perpendicular to the viewing plane of the 3D view in which you are manipulating the object.
Add, or additive, mode lets you directly control the object's local X, Y, and Z rotations as stored relative to its parent. This mode is especially useful when animating bones and other objects in hierarchies.
This is the only mode where the axes of interaction correspond exactly to the coordinates of the object's local orientation for the purpose of animation. When you activate individual axes on the Transform panel, the corresponding local position parameters are automatically marked.
Par, or parent, mode uses one of the object's parent's axes. To use Par mode, activate Add and press the Ctrl key while rotating.
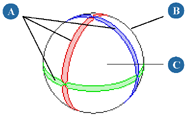
Ref, or reference, mode lets you rotate an object using the X, Y, or Z axis of another element or an arbitrary reference plane. For more information, see About Reference Planes.
Plane mode lets you rotate an object using an axis (by default, Y) of another element or an arbitrary reference plane. For more information, see About Reference Planes.
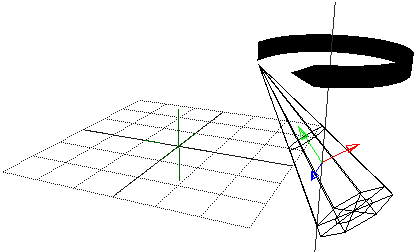
When using SRT manipulators to rotate, there are five handles that you can click and drag:
In addition to dragging the handles, you can:
Middle-click and drag anywhere in the 3D views to rotate about the axis that most closely matches the drag direction.
Click and drag anywhere in the 3D views (except on the manipulator) to perform different actions, depending on the setting
for Click Outside Manipulator in the Tools  Transform preferences. See To choose the behavior when clicking outside of the manipulators.
Right-click to open a context menu, where you can set the manipulation mode and other options. If Click Outside Manipulator is set to either Select Tool or SI|3D-style Transform in your Transform Preferences, then you must right-click directly on the manipulator because those options use the right mouse button for other actions; otherwise, you can right-click anywhere for the context menu. Right-click again to dismiss the menu without choosing an item.
For information about using the SRT manipulators in general, see Transforming Interactively with the SRT Manipulators.
Setting the Center of Rotation
There are several possibilities for the center of rotation of an object:
By default, the object pivot is the center of rotation. The object pivot is normally the same as the object's center, but you can change it and even animate it as described in Working with Object Pivots.
If Pivot Control - Active is off on the Pivot tab of the object's Local Transform property editor, then rotations are performed about the object's center rather than the object pivot. Usually, an object's center is located in the middle of its geometry. However, this is not always the case, particularly if you freeze the transformations or manipulate the center directly. This has an effect on how the object rotates.

|
|
In Ref mode, the object rotates about the origin of the reference frame. Ref mode takes precedence over the object center and object pivot. For more information, see About Reference Planes.
When COG is on in the Transform panel, objects rotate about the center of geometry (the average position of all points). You can also use COG to rotate multiple objects about their common center of geometry. The COG option takes precedence over Ref mode, the object center, and the object pivot.
In COG mode, multiple objects are transformed with respect to their center of geometry. For example, you can select multiple objects and rotate them about a common center.
You can temporarily change the center used for rotating interactively as described in Setting the Pivot. The tool pivot takes precedence over all other centers of rotation.
You can set maximum and minimum limits to an object's rotation in local space. You can, for example, specify that a sphere used in a model of a head can rotate no more than 45 degrees to either side of its current position. By setting limits to its rotation, the sphere is prevented from exhibiting awkward or unnatural movement.
Open the object's Kinematics property editor. For details, see Kinematics Property Editor.
Toggle the minimum and maximum rotation box for the object's X, Y, or Z axis.
For each check box you toggle, a corresponding control appears, allowing you to set the minimum rotational angle and maximum rotational angle for that axis.
You can set the order in which an object is rotated about its parent's X, Y, and Z axes. For example, this is useful for helping to control gimbal lock when setting up character rigs. If you align the root with the first bone and set the bone's rotation order to ZXY or YXZ, then the middle rotation which causes gimbal lock is on the least used rotation, that is, twisting along the length of the bone.
Setting the rotation order is also useful in other situations. For example, suppose you wanted to implement your own camera setup that behaves more like a traditional cinematic camera. In this case, a rotation order of ZXY corresponds to the correct order of Pan/Tilt/Roll. This camera setup will gimbal-lock in the mechanically correct position: when you tilt 90 degrees up or down, panning and rolling mean the same thing.
Open the object's Kinematics property editor. For details, see Kinematics Property Editor.
On the SRT tab of the Local Transform page, set the Rotation Order.
Here are a couple of things to keep in mind when animating the rotation values of an object:
For best results, use Add mode while manipulating an object. Add mode directly reflects the local Euler rotations that are stored, and gives you a better sense of potential problems like gimbal lock that may occur during playback.
If desired, you can use quaternion keys instead of keying the Euler values. Quaternions solve problems like gimbal lock, and also provide smoother and more direct interpolation from one pose to the next.
For more information, see Animating Rotations [Animation].