There are several ways to apply a texture:
Using the Get  Texture menu on the Render toolbar. See Texturing Using the Texture Menu.
Using the render tree. See Texturing Using the Render Tree.
Using a shader's property editor. See Texturing Using a Shader's Property Editor.
These texturing methods all accomplish the same results. Some methods may be better suited for advanced users while others let you quickly accomplish basic texturing with a few mouse clicks.
After you have applied a texture, you must create a texture projection or specify an existing one. See Specifying a Texture Projection.
Texturing Using the Texture Menu
Select one or more objects, groups, hierarchies, polygons, or polygon clusters.
If you select polygons or a polygon cluster, a local material will be applied if necessary and the texture will be applied to the local material. Local textures are sometimes called " face mapping" in other software. For more information about local materials, see Assigning Materials to Selected Polygons and Polygon Clusters.
If you select multiple objects, each receives its own projection but the projections must share the same name.
From the Render toolbar, choose Get Texture to display the Texture menu.
At the bottom of the menu, make sure that the illumination shader inputs to which you want to apply the texture are enabled (checked). You can enable any combination of the Ambient, Diffuse, Transparency, and Reflection inputs. By default, Ambient and Diffuse are enabled.
Click any input in the list to enable or disable it. Press the Shift key to keep the menu open while you click multiple items.
With the menu still open, choose one of the following items:
If an object shares a material, a new material is created automatically. If an object is already textured, the existing texture is replaced. The selected texture is connected to the specified surface shader parameters and the texture's property editor opens.
From the texture's property editor, specify a projection for the texture. See Specifying a Texture Projection.
If you open a render tree at this point, it should look something like this:
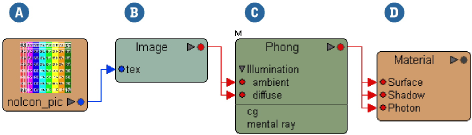
Depending on which surface shader inputs you enable, the texture may be connected to any combination of the surface shader inputs (ambient, diffuse, transparency, and reflectivity).
The shader nodes in the above render tree do the following:
| Shader |
Function |
|---|---|
| A |
The image clip. For information, see Managing Image Sources & Clips. |
| B |
The Image shader that holds the image clip and specifies a texture projection for it. |
| C |
The default surface shader Phong. |
| D |
The Material node that accepts almost any shader to define an object's look. |
When you use the Get Texture menu to connect a texture to an object's surface shader Transparency input, the Use Alpha and Invert options are activated in the surface shader's Transparency options.
The Use Alpha option is activated because the image's alpha channel, or internal matte, is used more often than the color channels to control transparency.
The Invert option is activated because in a typical matte, the black areas are transparent and the white areas are opaque. For surface shaders, on the other hand, the reverse is true: black areas are opaque and white areas are transparent. Inverting the transparency gives you the correct transparency defined by the matte.
When you use the Get Texture menu to connect a texture to an object's surface shader Reflection input, the Use Alpha option is automatically activated
in the surface shader's Reflection options.
The option is activated because the image's alpha channel, or internal matte, is used more often than the color channels to control reflection.
For more information about transparency and reflection options, see Transparency and Reflectivity [Materials and Shaders].
Texturing Using the Render Tree
When you apply a texture to an object using the render tree, you are creating everything from scratch. While the Texture menu commands on the Render toolbar automatically connect a series of mixing shaders between a material and texture, working in the render tree requires that you construct the tree manually.
Add a texture node to the render tree. See Connecting Shader Nodes [Materials and Shaders].
In the texture node's property editor, specify a projection. See Specifying a Texture Projection.
Connect the texture shader Ôs output to drive shader parameters as desired. See Connecting Nodes [Materials and Shaders].
Texturing Using a Shader's Property Editor
You can also texture an object using the connection icons for individual parameters within each shader's property editor. Every parameter has its own connection icon that opens a menu listing common shaders available for that parameter.
In the property editor of a shader, click or right-click the connection icon at the end of the parameter to which you would like to attach a shader.
From the menu that appears, choose one of the options below to apply a texture shader.
(Various shaders): Lists shaders that are commonly associated with the parameter. Selecting one of these shaders connects it to the parameter.If a shader is already connected to the parameter, it is disconnected and replaced with the new shader.
Clips: Opens a sub-menu listing all of the scene's image clips. Choosing a clip connects it to the parameter via an Image shader.
Sources: Opens a sub-menu listing all of the scene's image sources. Choosing a source creates a clip from it and then connects the clip to the parameter via an image shader.
More: Opens a browser so you can select any shader from the shader library. The selected shader is connected to the parameter. If a shader is already connected to the parameter, it is disconnected and replaced with the new shader.
For a description of the other options available, see Connection Icon Status [Materials and Shaders].
Click the connection icon to open the property editor of the texture shader that you connected to the parameter, and specify a texture projection. See Specifying a Texture Projection.
Specifying a Texture Projection
Texture shaders and certain other properties require you to select a projection. You can specify an existing projection or create a new one using the texture projection control in a property editor. This control is also available at the top of the render tree view (for the selected texture nodes) as well as in the texture layer editor and material panel (for the selected texture layers).
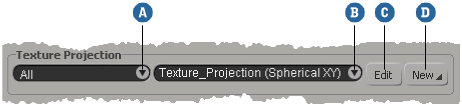
| A |
If multiple objects use the same material, you can select the one(s) to affect: All or a specific object. This box appears only if a material is shared by multiple objects. It updates automatically as you select objects in the scene, as long as the property editor or view is not locked. |
| B |
Select an existing projection to use. If an object already has one or more projections when you apply a texture, the texture will automatically use the first projection. However, this box will remain blank until you explicitly select a specific projection. If multiple objects with the same material use different projections, (multiple values) appears instead of a projection name. You can select a projection by name only if all objects have a projection with the same name. However if you are using a naming convention for projections on different objects, you can enter a string with a * wildcard pattern. If an object has custom 3D-vector ICE attributes set on it, you can choose them to use as UVW coordinates. See Applying Texture Projections in ICE. |
| C |
Click to modify the properties of the selected projection, as well as the support if applicable. In the case of multiple texture projections, a multi-selection property editor opens. Changes that you make from the property editor affect all projections. |
| D |
Click to create a new projection. See Creating Texture Projections. |
You can quickly access the property editor of any texture applied to an object directly from the Render toolbar.
Select an object, group, or hierarchy that uses the texture you wish to edit.
Choose Modify Texture (name of texture) to select the texture shader and its property editor.
The submenu lists every shader (texture and non-texture) applied to the object, group, or hierarchy. At the bottom of the submenu, every image clip used is also listed.


