When defining what your object will "look" like, the most basic and fundamental step is to assign it a material and surface shader. There are several ways to assign a material to one or more objects. You can:
Create and assign a new material to a selection of objects — see Creating and Assigning New Materials to Objects.
Create new materials without assigning them — see Creating New Materials without Assigning Them
Assign an existing material to a selection of objects — see Assigning Existing Materials to Objects.
Assign a new or existing material to hierarchies — see Assigning Materials to Hierarchies.
Assign a new or existing material to a polygon cluster or a selection of polygons — see Assigning Materials to Selected Polygons and Polygon Clusters.
Duplicate materials or copy one object's material to another object — see Duplicating Materials.
Creating and Assigning New Materials to Objects
You can create a new material with attached surface shader, and immediately assign it to an object. When you create materials this way, they replace any existing materials on the objects to which they're assigned (the objects' existing materials are removed from the object, but not deleted).
To create and assign a new material to an object
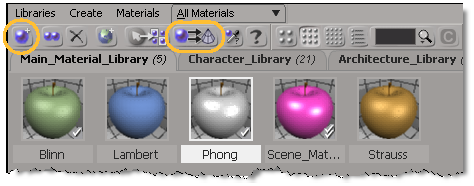
Open the material manager by pressing Ctrl+7 or choosing Modify  Materials from the Render toolbar.
In the material manager's command bar, do either of the following:
Choose Materials Create New Material or click its icon to create a new material based on the default Phong shader.

Choose a material from the Create menu to create a new material based on the shader type that you select (such as Lambert, Blinn, Strauss, Toon, or Phong).
By default, new materials have the surface shader (such as the default Phong) connected to their Surface, Shadow, and Photon ports.
Choose Materials Assign Material to Selected Objects or click its icon in the material manager's command bar.

To create and assign a new material to an object using Get > Material
From the menu that appears, choose one of the surface shaders to attach it to the new material. Two things happen:
A new material, with the selected surface shader attached, is created and assigned to the selected object(s).
The surface shader's property editor opens. You can now edit its parameters.
For more information about surface shader properties in general, see Working with Surface Shaders.
Creating New Materials without Assigning Them
You can create a new material in any material library without assigning it to any objects. You can then assign those materials to objects later, as described in Assigning Existing Materials to Objects.
You can use either the material manager or the explorer to create a new material.
Open the material manager by pressing Ctrl+7 or choosing Modify Materials from the Render toolbar.
Select the material library you want by clicking on its tab in the shelf displaying shaderballs.
In the material manager's command bar, do either of the following:
Choose Materials Create New Material or click its icon to create a new material based on the default Phong shader.
Choose a material from the Create menu to create a new material based on the shader type that you select (such as Lambert, Blinn, Strauss, Toon, or Phong).
By default, new materials have the surface shader (such as the default Phong) connected to their Surface, Shadow, and Photon ports.
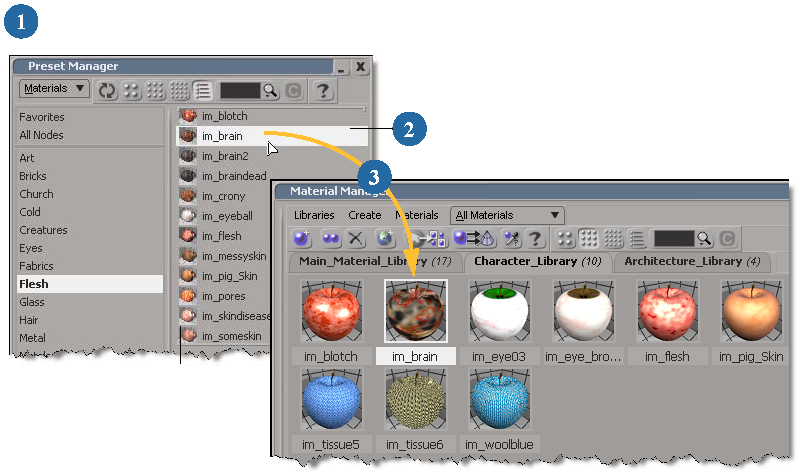
To use the Preset Manager to create new materials
To make it easy to add new materials in your library, you can use the material Preset Manager.
Choose Materials Open Preset Materials Browser or click its icon to open the Preset Manager.

By default, the preset manager opens to the current Data\DSPresets\Materials folder in your user path.
Drag a material preset from the manager into the desired library in the material manager. A new material is created in your library.
Assigning Existing Materials to Objects
Once there are materials in your library, you can assign them to different elements in your scene. You can assign a material to objects, clusters, hierarchies, groups, partitions ... anything that can accept a material.
You can assign a material in several ways:
Using the material manager — see Assigning Materials Using the Material Manager.
Using the render tree — see Assigning Materials from the Render Tree.
Using the explorer — see Assigning Materials Using the Explorer.
Using the Get Material Assign Material command in the Render toolbar — see Using the Assign Material Command.
Assigning Materials Using the Material Manager
The material manager makes it easy to access material libraries and then assign a material from a library to an element in your scene. You can assign a material in a number of different ways using the material manager.
To assign a material to an object
Open the material manager by pressing Ctrl+7 or choosing Modify Materials from the Render toolbar. Then select the library you want by clicking its tab in the shelf displaying shaderballs.
Select the objects to which you want to assign the material.
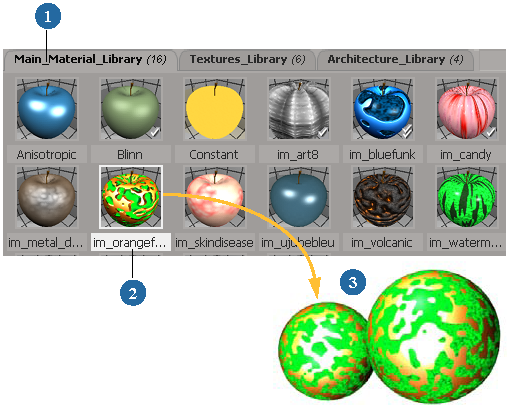
Click and drag the shaderball whose material you want to assign, then drop it on one of the selected objects.
You can also drag a shaderball and drop it on an unselected object to apply it, one object at a time.
Select the objects to which you want to assign the material.
Right-click the material's shaderball that you want to assign and choose Assign to Selection.
Select the objects to which you want to assign the material.
In the material manager's command bar, choose MaterialsAssign Material to Selected Objects or click its icon.
Assigning Materials from the Render Tree
You can use the render tree to easily assign materials from an existing object to others.
Assigning Materials Using the Explorer
To assign a material from the explorer, locate the material that you want to assign, then drag and drop it onto any target. This is useful when you want to assign a material to a single object.
Using the Assign Material Command
The Assign Material command behaves differently depending on what's selected when you apply it.
Pick a material or an object whose material you wish to assign to other objects.
Then pick the object(s) to which you want to assign the material.
Right-click to end the pick session. The material is assigned to the objects
If one or more objects are selected:
Pick a material or an object whose material you wish to assign to the selected objects.
Right-click to end the pick session. The material is assigned to the selected objects.
Pick one or more objects to which you want to assign the material.
Right-click to end the pick session. The material is assigned to the objects you picked.
If components are selected (subsurfaces, a selection of polygons, polygon clusters, and so on):
Pick a material or an object (or cluster or subsurface, and so on) whose material you wish to assign to the selected components.
The Cluster selection filter remains active during the pick session, allowing you to pick components and assign their materials to the selection.
Right-click to end the pick session. The material is assigned to the selected components.
If the selection was a selection of components rather than a cluster, a cluster is created automatically.
If one material and one or more objects are selected:
Assigning Materials to Hierarchies
You can assign a material to a hierarchy by using any of the techniques described at the beginning of this section (Creating and Assigning Materials) to assign the material to the hierarchy's parent object. Children in the hierarchy that don't have a locally assigned material inherit the parent's material.
For example, if you have an object such as a table, you may want the legs and top to be the same color. If you assign a material to color the parent (table top), the material definition is transmitted (propagated) to its children (table legs).
Materials assigned to hierarchies are subject to the same rules of propagation as any other properties. For a complete description of the rules of propagation, see How Properties Are Propagated.
To assign a material to a hierarchy, use any of the methods described for assigning a material to an object with one variation: when you need to select or pick an object, middle-click to branch-select it.
Making Materials Local to Hierarchies
You can make all of a hierarchy's materials local to that hierarchy using the Make Local Material command. The Make Local Material command processes any selection as if it was branch selected, copying materials as necessary in order to ensure that all materials are local to the branch's hierarchy. The copies are assigned to objects within the hierarchy, while the original materials remain assigned to the objects external to the hierarchy.
To make materials local to a hierarchy
Select, or branch select the parent object of the hierarchy whose materials you wish to make local.
From the Render toolbar, choose Get Material MakeLocal Material.
Materials shared by members of the hierarchy will still be shared within the hierarchy, but none of the hierarchy members' materials will be shared with objects outside of the hierarchy.
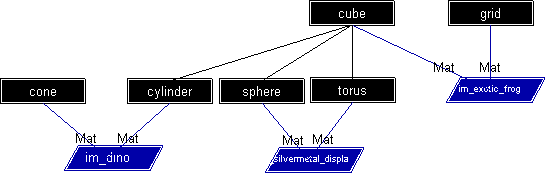
The schematic view above shows a cube whose hierarchy includes a cylinder, a sphere, and a torus. The cube shares its material with a grid, and the cylinder shares its material with a cone. The sphere and the torus share a material.
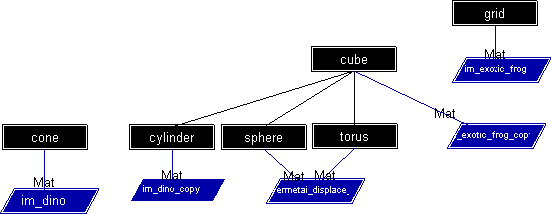
Selecting the cube and applying the Make Local Material command copies the materials shared between objects within the cube's hierarchy and objects external to it. The copies are assigned the objects in the hierarchy — thus a copy of the "im_exotic_frog" material is assigned to the cube and a copy of the "im_dino" material is assigned to the cylinder. Note that the material shared by the sphere and torus, but not used by objects external to the hierarchy, remains untouched.
The result is that all materials used by objects in the cube's hierarchy are now local to the hierarchy.
Assigning Materials to Selected Polygons and Polygon Clusters
You can assign a material locally to selections of polygons and/or polygon clusters on a polygon mesh object. If you choose the latter, a cluster is created from the selection. The cluster's local material always overrides the one assigned to the entire object.
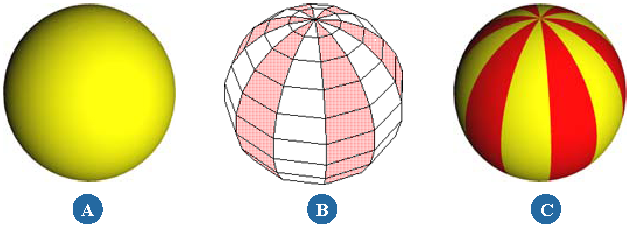
| A |
Polygon mesh object with global material assigned. |
| B |
Object with specific polygons selected. |
| C |
Local material assigned to selected polygons. |
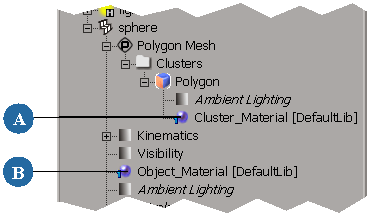
In the explorer, a cluster's material appears under the cluster's node, rather than directly under the object's node. To access
it, expand the object's Polygon Mesh Clusters (name of cluster) node.
If you remove a material from a cluster, the material inherits the material either assigned to or inherited by the object.
To assign a material to polygons or polygon clusters
Use any of the other methods listed in Creating and Assigning Materials, such as using the material manager.
If you selected polygons rather than a cluster, a cluster is automatically created from the selection.
Managing Materials on Overlapping Polygon Clusters
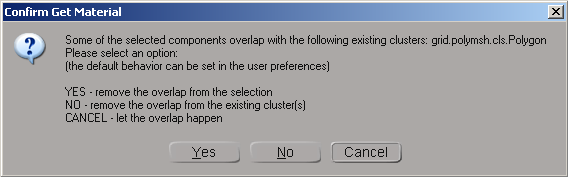
Although assigning materials to polygon clusters is a simple task, it can get tricky when clusters overlap. Fortunately, Softimage has a mechanism for dealing with materials on overlapping polygon clusters. When you assign a material to a cluster or polygon selection that overlaps another cluster, the dialog box shown below appears.
Each option results in a different outcome. For example, if you start with the grid shown below and apply a surface shader to the selected cluster:

The grid shown left has two clusters. The unselected cluster has a local material (red) applied to it, while the selected cluster does not.
Choosing Yes removes the area of overlap from the selected cluster.
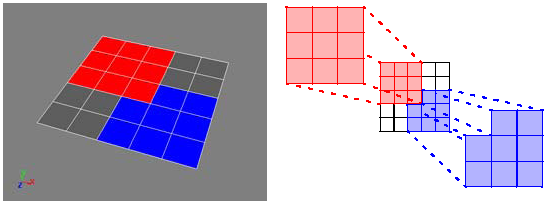
When you apply a local material to the selected cluster, specifying that the overlap be removed from the selected cluster produces the results shown here. Polygons where the clusters overlap are removed from the selected cluster.
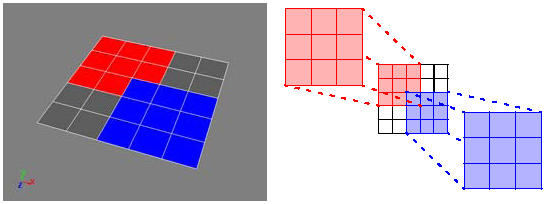
Choosing No removes the area of overlap from the existing cluster.

When you apply a local material to the selected cluster, specifying that the overlap be removed from the existing cluster produces the results shown here. Polygons where the clusters overlap are removed from the existing cluster.
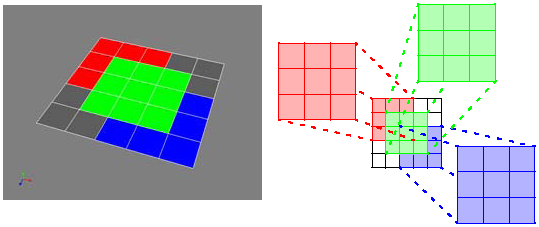
Choosing Cancel allows the clusters to overlap.
When you apply a local material to the selected cluster, specifying that the overlap be allowed produces the results shown here. The last material applied (blue in this case) is displayed.
Setting the Default Cluster Overlap Behavior
If you prefer not to be prompted each time you apply a material to an overlapping cluster, you can set any one of the behaviors described in the previous section as the default.
Changing the Display Order for Overlapping Clusters
Each cluster that you create is assigned a sort_order value. When clusters with local materials overlap, this value controls the order in which they're drawn. The lower a cluster's sort_order value, the earlier it's drawn. Thus the cluster with the highest sort_order value is always drawn on top of any other overlapping clusters.
Since each newly created cluster is automatically given the highest sort_order value in the scene, the last cluster created is drawn on top by default. However, you can change any cluster's sort_order value to control where it is drawn relative to the clusters that it overlaps and those that overlap it.
The grid shown here has three overlapping polygon clusters, each with its own material. Each one of the clusters also has a unique sort_order value: 100 for the red cluster, 102 for the blue cluster, and 104 for the green cluster.
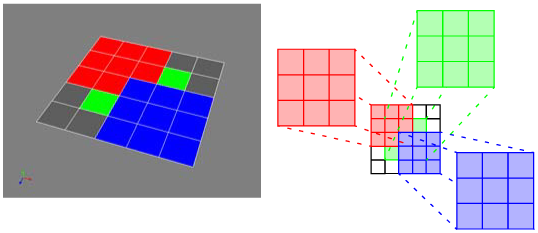
When you change the green cluster's sort_order value to 99, it is drawn below both the red and blue clusters. However, the blue cluster is still drawn on top of the red one because it has a higher sort_order value.


