You can deform and transform surface meshes, as well as subsurfaces and subsurface clusters, just like other objects and components. In addition, some procedures the are specific to assembled surface meshes are described below.
There are two ways to move the points on a junction between subsurfaces, depending on whether the Allow Modification of Boundary Points option in the SCM Fixer Op2 property editor is on:
If it is off, select the two "ghost" points on either side of the boundary point and translate those instead.
Excluding Points from Continuity Management
All assembled surface meshes have a special cluster called NonFixingPointsCluster. If a point on a subsurface boundary is in this cluster, its continuity is not managed by SCM when Don't Fix the Tagged Points is on. The other points on the same junction are not affected.
This lets you create holes in the surface mesh for mouths, eyes, and so on.
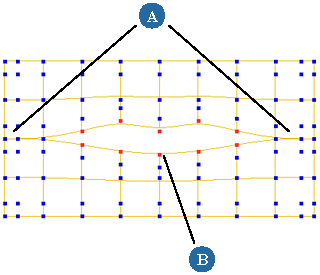
Maintain smooth continuity at either end (A) but not for the tagged points in the middle (B).
You can add, remove, and modify these holes by adding or removing points from this cluster. You can also toggle the holes on or off for the entire surface mesh.
To add or remove points to or from NonFixingPointsCluster
To toggle holes on or off for the entire assembled surface mesh, display the SCM Fixer Op2 property editor as described in Displaying SCM Options and change the Don't Fix the Tagged Points option.
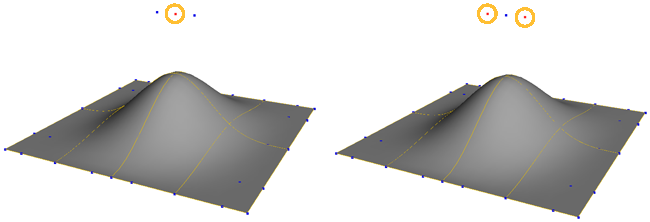
After you freeze an assembled surface mesh, you need to reapply the surface continuity manager manually. When you apply the SCM Fixer Op to a surface mesh, it maintains the continuity across the assembled boundaries so that the surface mesh appears seamless as it is deformed.
Choose Create  Surf Mesh Continuity Manager from the Model toolbar.
If desired, pick additional surface meshes. A separate SCM Fixer Op2 property will be applied to each object.
When you have selected all the additional surface meshes, right-click the mouse button.
Set the options as you did when you originally assembled the mesh. For more information, see Assembling Surface Meshes.
Inserting and Removing Knot Curves on Surface Meshes
When you insert or remove a knot curve on a a subsurface of an assembled surface mesh, it is automatically propagated across any junctions to maintain the alignment of control points on subsurfaces. For detailed procedures, see Adding Knot Curves and Removing Knot Curves.
Extracting Curves on Surface Meshes
When you extract a curve on a subsurface of an assembled surface mesh, there is an option to extend it across the whole mesh including any junctions it encounters. For more information, see Extracting Curves from Surfaces.
Applying Local Materials and Textures
You can apply materials and textures locally to selected subsurfaces on a surface-mesh object. This allows you to put different materials and textures on different subsurfaces. Remember that in order to apply a local texture, you must first apply a local material. Local UV texture projections are not supported.
For more information, see Creating and Assigning Materials [Materials and Shaders] and Creating Texture Projections.