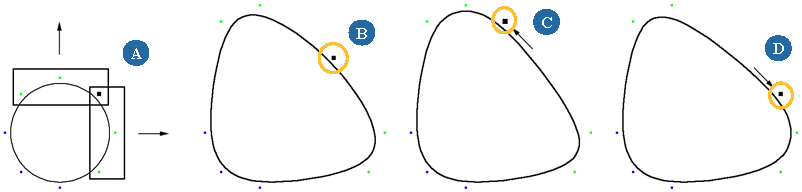
Shape clips don't contain any animation — they are simply static poses. As a result, the way to create animation with shapes is to animate the weight of each shape. Weighting is always done in relation to another shape key. This means that shape keys have to be overlapping in time with at least one other shape key to be weighted.
The higher the weight value, the more strongly a clip contributes to the combined animation. For example, if you set the weight's value to 1, the clip's contribution to the animation is 100% of its weight.
Once a cluster has shape animation, you can control its weight in two ways:
If you want to weight shapes against each other, you can use the shape manager (see Animating the Shapes) or the animation mixer (see Animating the Shape Weights Against Each Other). This also includes using the power of compound clips, as described in Weighting with Compound Clips.
If you want to weight clusters individually, including overlapping clusters, you can use the Cluster Shape Combiner. It controls how strongly deformations and transformations applied to the different clusters "pull" the points in the cluster. See Mixing between Clusters for more information.
This section describes weighting issues that are specific to shape animation, but for an overall description of mixing weights in the animation mixer, see Mixing and Weighting Clips [Nonlinear Animation in the Animation Mixer].
Normalized or Additive Weighting
One of the most important things to understand about weighting is to know whether weights are normalized (averaged) or additive. You'll know that shapes are normalized if they seem to average or "smooth" each other out, or different clusters on the same object affect each other when they shouldn't (such as an eyebrow affecting the mouth shape).
When shape weights are normalized, the weight is divided by the sum of the weights of all clips at the current frame (weighted average) so that the sum is always equal to 1. This averaging results in a shape that is between the sources of the clips that affect the object at the current frame.
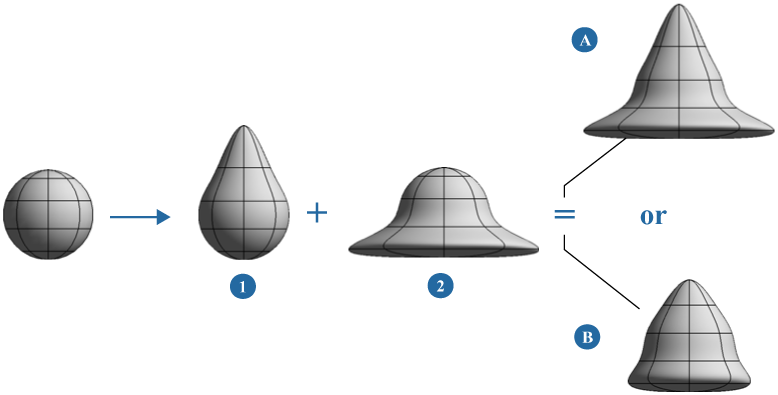
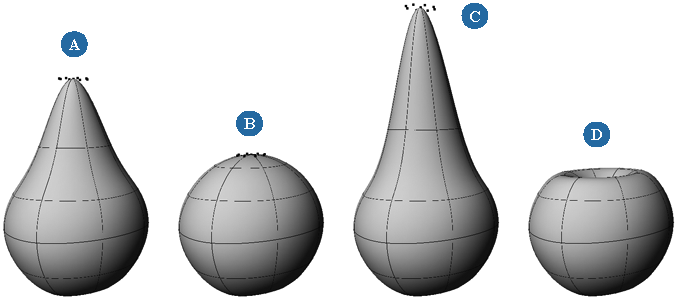
The (A) shape is an Additive mix of Shapes 1 and 2. The shapes are literally added together to create a composite result. You can also exaggerate shapes by setting weight values higher than 1.
The (B) shape is a Normalized mix of Shapes 1 and 2. The shapes are averaged resulting in a combination of the shapes. The total weight value of the two shapes equals 1.
In many cases, you probably want the weight to be additive instead of normalized, such as if you're mixing different clusters on a face over the same frames. With additive mixing, the shapes are literally added together to create a composite result. With additive mixing, you can exaggerate shapes by setting values higher than 1.
In Softimage, you can easily create different sets of shape animation (each set in a compound clip) and use different types of weighting. You could have the shapes within each set be normalized, and then use additive weighting between the sets. For example, if you're lip-syncing a character, you can create one compound of normalized phoneme shapes and another compound of normalized facial expression shapes. Then using additive weighting between these two compounds, you can have the character speak with the facial expressions added "on top" of the lip-syncing.
You can set additive or normalized at two different levels: for the whole mixer using the Shape Mixer property editor, or for a compound clip using the Cluster Shape Combiner property editor (see Mixing between Clusters).
Animating the Shape Weights Against Each Other
Unlike action clips, shape clips are static; that is, rather than actually containing animation, they simply contain a static pose. To prevent blocky, jerky movements, you need to blend the animation between different shapes with weighting. Weighting is always done in relation to another shape clip. This means that if you want to weight a shape, it has to be overlapping in time with another shape.
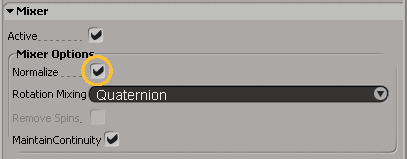
Weighting is usually easiest using the default range of 0 to 1, where 0 is no weight and 1 is full weight (this makes it easier to figure out percentages). However, you can also set mix weights outside this range: use negative values to move points in the opposite direction, or use a value above 1 for more extreme movements. If you deselect the Normalize option in the mixer's property editor, as shown above, you can "overshoot" the data in the clip.
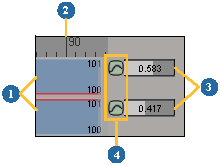
By default, mix weights are normalized using a weighted average: for example, if Clip A has a weight of 1 and Clip B has a weight of 1.5 at a given frame, then A's influence is 40% (1 Ö (1 + 1.5)) and B's influence is 60%. See the previous section, Mixing the Shapes' Weights, for more information.
Overview of the Shape Weighting Tools and Process
You can mix shape key weights in different ways, depending on how you created the shape keys and how you like to work.
You can mix shape key weights by:
Using the animation mixer (see Mixing Shape Weights in the Animation Mixer).
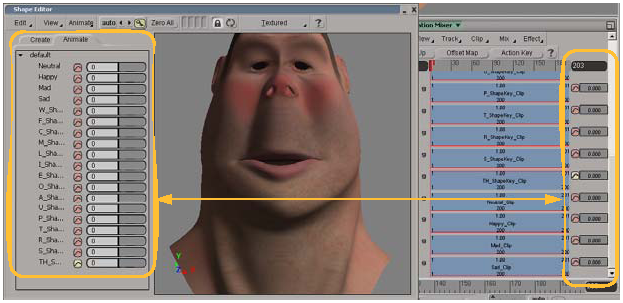
Using the shape manager (see Animating the Shapes). The advantage of having the shape sliders in the shape manager is that you can key all the sliders' values at once by clicking the keyframe icon in the shape manager. As well, when you change the sliders' values, you can immediately see the results on the shape-animated object in the shape viewer.
Using a custom parameter set, either the Shape Weights one that is automatically created for you, or a custom parameter set that you create yourself (see Mixing Shape Weights in a Custom Parameter Set). The advantage of having a custom control panel is that you can key all the sliders' values at once by clicking the property set's keyframe icon.
No matter which tool you use, the basic process is the same, as shown here:
| 1 |
Put shape clips on different tracks and overlap them where you want to mix them. In many cases, this is for the whole duration of the scene. |
| 2 |
Move to the frame at which you want to set a key. |
| 3 |
Set a weight value for each clip at this frame. The slider's range is [0, 1] but you can set values higher than 1 or lower than 0 (negative weights) by right-clicking on the slider and entering them in the box. The higher the mix weight, the more strongly a clip contributes to the combined animation. For example, if you set the value to 4, the clip's contribution is 4 times greater than its original weight. |
| 4 |
Click each weight's animation icon to set a key for this value at this frame. Go to the next frame, change the value, and click the animation icon again. |
| 5 |
Right-click the animation icon and choose Animation Editor to edit the resulting weight function curve in the animation editor as you would any other fcurve — see Editing Weight Fcurves. |
Setting and keying the shape's weight in the shape manager or a custom parameter set is the same thing as setting and keying the shape's weight in the animation mixer.
In the mixer, you use the weight slider at the end of each shape clip's track. The shape sliders in the shape manager and the custom parameter set are simply proxy parameters for the shape weights in the animation mixer.
Mixing Shape Weights in the Animation Mixer
To animate the weights of shape clips in the animation mixer
Select the shape-animated object and open the animation mixer.
Place the shape clips on different tracks so that they overlap each other at some point.
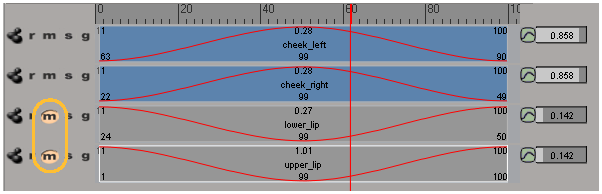
Make sure that View  Weight Mixer Panel is on (press W). A Weight Mixer Panel is displayed at the right end of each track, showing a weight slider and an animation
icon for keying the weight.
Weight Mixer Panel is on (press W). A Weight Mixer Panel is displayed at the right end of each track, showing a weight slider and an animation
icon for keying the weight.
The Weight Mixer Panel affects the clip at the current frame. If the playback cursor is not on a clip, the weight mixer for the corresponding track is unavailable.

Make sure that View Weight Curves is selected. This displays the weight curve as a red line running across a clip.
If a clip's weight is 0, it does not contribute to the animation.
If there is a transition between clips that are part of the mix, the transition is calculated first, then mixed with the other clips.
If there is a non-overlapping transition, the contribution for each clip is also governed by the weight of the two clips (the end weight of the "from" clip and the start weight of the "to" clip).
To set and key the clip's weight, see the process in Overview of the Shape Weighting Tools and Process.
Right-click a clip and choose Preset Weights to use a number of ready-made weights, such as ease-in, ease-out, Gaussian, or oscillation.
If you want to control the shape's weight by a parameter, move the playback cursor over the shape clip you want to use and
right-click its weight slider animation icon. Choose one of the Link With commands and use the parameter connection editor to find the parameters you want to control the weight, such as any of the
Kinematics Local Transform Pos parameters of the object.
To view the shape weight keys in the dopesheet, see Displaying Phoneme Shape Weight Keys in the Dopesheet
Mixing Shape Weights in a Custom Parameter Set
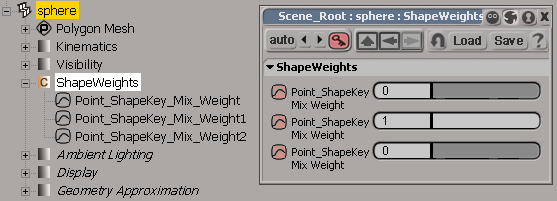
When you store and apply shape keys in mixed weight mode or select shape keys with Apply Selected Shape Keys active in mixed weight mode, a custom parameter set, called Shape Weights, is created for the shape-animated object. This set contains proxies of each shape clip's weight parameters that are in the mixer.
The advantage of having a custom control panel is that you can have all the sliders in one property editor that you can easily move around in the Softimage workspace. As well, you can key all the sliders' values at once by clicking the property set's keyframe icon. Because these sliders are proxy parameters, you can add and delete them as you would any other proxy parameter.
See Custom and Proxy Parameters [Customization] for more information.
To edit the shape weights from its custom parameter set
Click the icon for the Shape Weights custom parameter set in the explorer.
In the custom parameter set, use the sliders to set and key the clip's weight, as shown in Overview of the Shape Weighting Tools and Process.
To create your own custom parameter set
Create a custom parameter set by choosing Create Parameter New Custom Parameter Set from the Animate toolbar. Give it a name.
In the explorer, click the custom parameter set's icon to open it.
Drag the animation icon for each shape weight slider from the animation mixer into the custom parameter set (just below the light gray bar) to make a proxy of it.
In the custom parameter set, use the sliders to set and key the clip's weight, as shown in Overview of the Shape Weighting Tools and Process.
Because the slider in the custom parameter set is a proxy of the original slider in the mixer, anything you do to it (change value and key) acts as if you did it to the original slider.
Compound clips allow you to put all of a cluster's shape clips into one container. This lets you have multiple clusters on the same object and then weight the clusters against each other. To use facial animation as an example, you can mix between upper and lower lip clusters to create a myriad of shape combinations, or mix between the whole face and the eyebrows.
For information in general about compounds, see Combining Clips into Compound Clips.
At any point, you can open the compound clip and adjust each of its individual shape clips to tweak the animation.
Another handy thing about having a cluster's animation in a compound is that you can mute the track (click its m button on the left) for each compound clip so that you can work with selected clusters at a time. For example, if you want to check just the animation of the cheeks, you can mute the lower and upper lip compound clips so that their clusters aren't used in the shape animation.
Each compound clip contains all the shape keys for each cluster. When the track is muted, the clips appear gray.
On the right in the weight panel, you can see that each compound clip here is weighted differently over time.
Compound clips also let you easily manipulate the entire shape animation of a cluster at once; for example, you can scale it or offset it using the compound clip. You can even copy a compound shape from one model to another (see Copying Shape Presets between Models or Scenes).
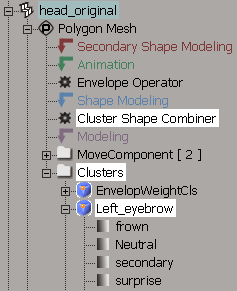
The way to mix between clusters, overlapping (the same points belonging to two or more clusters) or not, is by using the Cluster Shape Combiner operator, which is created as soon as one shape clip is created in the mixer. This operator provides you with two weights you can control for each cluster on an object that has shape animation.
The weight determines how strongly the different shapes "pull" the points in the cluster. You can modify the weight so that the points are pulled only half as strongly by the target shape or even produce exaggerated shapes that overshoot the target.
To set a cluster's weights using the Cluster Shape Combiner
Create an object with shape animation. You can apply shape keys or load shape keys in the animation mixer.
With the object selected, click Selection on the Select panel. Expand the object's operator stack and display the Cluster Shape Combiner property editor by clicking on its icon.
The Cluster Shape Combiner property editor contains an option for using either normalized (averaged) or additive mixing (see Mixing the Shapes' Weights), as well as Weight and Overlap Weight parameters for each animated cluster.
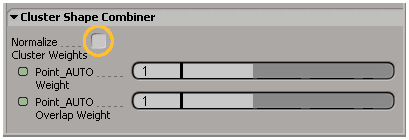
Normalize Cluster Weights controls how the Weight values are combined (it has no effect on Overlap Weights). When this option is off, clusters are mixed in additive mode. You can exaggerate shapes by setting Weight values higher than 1.
When this option is on, the weights are averaged (normalized). The weight is divided by the sum of the weights of all clips at the current frame (averaged) so that the sum is always equal to 1.
Weight controls how strongly the corresponding cluster is pulled by its shape keys. The default is 1, meaning that the actual shape of the current shape key is used.
Overlap Weight controls how strongly the corresponding cluster affects points that are shared with other animated clusters. These values are always normalized.
For example, if you set the overlap weight of the complete head cluster to 0 and the overlap weight of the eyebrow cluster to 1, the shape animation of the eyebrow cluster has full control over the points it shares with the head cluster. If the weights are set to head=1 and eyebrow=4, the eyebrow cluster has 4 times more influence than the head.