The Tweak Component tool allows you to translate, rotate, and scale points, polygons, and edges. You can use it in two ways:
Click-and-drag components for a fast, uninterrupted interaction.
Select one or more components and then use the manipulator for a more controlled interaction.
Tweak Component is the only tool that allows you to slide components. It also supports welding (see Welding Points with the Tweak Tool), snapping (see Snapping with the Tweak Tool), COG (see COG), proportional manipulation (see Manipulating Components Symmetrically).
To use the Tweak Component tool
Activate the Tweak Component tool by pressing M or choosing Modify  Component Tweak Component Tool from the Model toolbar.
Note that if a curve is selected, then pressing M activates the Direct Manipulation tool instead. However, you can still use Tweak Component with curves by choosing it from the toolbar menu.
Move the mouse pointer over the object in any geometry view. As the pointer moves, the component under the pointer is highlighted.
The Tweak Component tool will not highlight backfacing components, or components that are occluded by parts of the same object. When there are multiple types of components within the picking radius, priority is given first to points, then to edges, and finally to polygons.
Click+drag to perform a simple transformation on the highlighted component. If all axes are active on the Transform panel, translation occurs in the viewing plane and scaling is uniform in local space. If one or more axes have been toggled off, translation and scaling use the current manipulation mode and active axes set on the Transform panel. For example, to translate along a point's normal, activate Local and the Y axis only. Rotation uses the current manipulation mode and the Y axis by default, but you can select a different axis by deactivating the others.
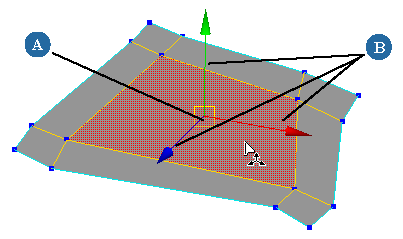
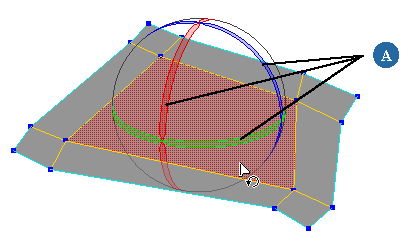
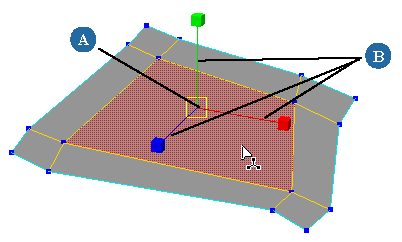
Click and release the mouse button to select the highlighted component. A manipulator appears (unless you've toggled it off). You can use the manipulator to transform the selection, or if you prefer you can first modify the selection, change the pivot, and set other options.
The Tweak Component tool uses the Ctrl, Shift, and Alt modifier keys with the left and middle mouse buttons to perform different functions — look at the mouse/status line at the bottom of the Softimage window for brief descriptions, or read the rest of this section for the full details. The right mouse button opens a context menu.
If you are using the Tweak tool with proportional modeling (Prop), see Using the Tweak Tool with Proportional Modeling.
The Tweak Component tool remains active, so you can repeat steps 3 and 4 to manipulate other components.
When you have finished, deactivate the tool by pressing Esc, or activating a different tool.
Switching Between Translation, Rotation, and Scaling
The Tweak Component tool lets you translate, rotate, or scale components. Select the desired transformation using the V, C, and X keys — press and release a key to change the transformation (sticky mode) or press and hold a key to temporarily override the current transformation (supra mode).
To translate, press V or choose Translate from the context menu.
To rotate, press C or choose Rotate from the context menu.
To scale, press X or choose Scale from the context menu.
The mouse pointer updates to reflect the current action. You can also press Tab to cycle through the three actions, or Shift+Tab to cycle in reverse order.
To activate the standard Translate, Rotate, or Scale tools, you must either deactivate the Tweak Component tool before pressing V, C, or X, or use the t, r, or s buttons on the Transform panel.
The Tweak Component tool uses the same manipulation modes as the other transform and drawing tools: Global, Local, View, Object, Ref, and Plane. You can switch between these modes using the context menu or the Transform panel. For a description of these modes, see Component Manipulation Modes.
You can activate or deactivate axes on the Transform panel — see Specifying Axes. Note that the Tweak Component tool always uses the axes control for translation on the Transform panel, even when scaling and rotating.
Alternatively if the Tweak manipulator is displayed, you can activate a single axis by double-clicking it on the manipulator. Double-click on the same axis again to re-activate all axes, or on a different one to activate it instead.
The Tweak Component tool lets you select components in a similar way to the standard selection tools, but there are some differences.
Note that selection in the Tweak Component tool is not affected by the SI|3D Selection Model or Extended Component Selection settings.
Selecting, Deselecting, and Extending the Selection
Use the following keyboard and mouse combinations for selection:
To quickly deselect all components, click outside the object. By default, you need to click 200 pixels away from the object, but you can control this with Boundary Pick Size in your Tools > Tweak preferences (see Tweak Preferences).
Note that you can only multi-select components of the same type. You cannot select a heterogeneous collection of points, edges, and polygons.
Use the Alt key to select loops or ranges of components.
To select loops or ranges of components
To select additional loop or ranges, use Shift+click to specify a new anchor and then Alt+Shift+click for a new range or Alt+Shift+middle-click for a new loop.
Note that for edge loops, the direction is implied so you can simply Alt+middle-click on an edge to select the loop and then Alt+Shift+middle-click to select additional loops. However, to select parallel edge loops, you still need to specify two components as described above.
The Tweak Component tool allows you to manipulate points, edges, and polygons, but you can limit it to a particular type of component if you desire. Use the context menu to activate Tweak All, Points, Edges, Polygons, or Points + Edges.
The Tweak Component tool uses a preference for determining how far away a component can be to be considered "under" the mouse pointer. You can change the size in pixels by adjusting Pick Size in your Tools > Tweak preferences. See Tweak Preferences.
You can quickly set the pivot by middle-clicking on a component. For example, to rotate a polygon about one of its edges, simply click to select the polygon and then middle-click to specify the edge as the reference. The manipulator does not react to middle-clicks, so you can pick a component even if the manipulator is covering it in a view.
Middle-clicking temporarily switches to Ref manipulation mode. As soon as you select a new component, the previous manipulation mode is restored. If you want to transform several components about the same reference one after another, you should manually switch to Ref mode and then middle-click to specify the reference. In this way, the reference frame does not revert to the previous mode when you select a new component to manipulate.
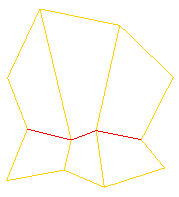
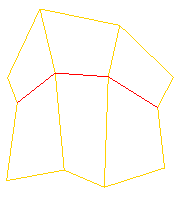
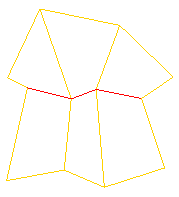
You can slide components with the Tweak Component tool. This helps to preserve the contours of objects as you tweak them.
Sliding an edge moves its endpoints along the adjacent edges by an equal percentage. Sliding a point or a polygon clamps the associated points to the nearest location on the surface of the mesh, as if they had been shrinkwrapped to the original untweaked object. Sliding works only on polygon mesh components.
You can use the Ctrl key to snap while using the Tweak Component tool:
Press Ctrl to toggle snapping to targets on or off (depending on its current setting on the Snap panel) while translating.
For more information about snapping options, see Snapping.
Welding Points with the Tweak Tool
You can interactively weld pairs of points on polygon meshes while using the Tweak Component tool. Welding merges points into a single vertex. For other ways of welding, see Welding Vertices.
While the Tweak Component tool is active, toggle Weld Points on by doing one of the following:
Click and drag a point. As you move the mouse pointer, the point snaps to points within the snap region.
The Move Component tool also uses the Snap Region Size to find a point to snap to and weld. You can modify the region size using the Snap menu. Alternatively you can also change the region size using Ctrl+mouse-wheel, but this works only if you are not using the mouse wheel to zoom — see Mouse Wheel in Camera Preferences.
Release the mouse button over the point you want to weld to.
Repeat steps 2 and 3 to weld more points, if desired. When you have finished welding, toggle Weld Points off.
Using the Tweak Tool with Proportional Modeling
This section describes some special features for using proportional modeling with the Tweak tool. For information about proportional modeling in general, see Using Proportional Modeling.
Adjusting Distance Limit and Bias During Interaction
When you are using the Tweak tool with proportional modeling, you can adjust the Distance Limit and Falloff (Bias) of the current operation before you release the mouse button.
The R key and the up and down arrow keys control the Distance Limit, while Shift+R, Shift+up-arrow, and Shift+down-arrow control the Falloff (Bias).
To change the Distance Limit by increments during interaction
Before you release the mouse button, do one of the following:
Press the up arrow key to increase the Distance Limit by 10%.
Press the down arrow key to decrease the Distance Limit by 10%.
You can also roll the mouse wheel up or down to increase or decrease the Distance Limit by increments of 10%. This works only if you are not using the mouse wheel to zoom — see Mouse Wheel in Camera Preferences.
To change the Falloff (Bias) by increments during interaction
Before you release the mouse button, do one of the following:
Press Shift+down-arrow to decrease the Falloff (Bias) by 10%.
You can also press Shift while rolling the mouse wheel up or down to increase or decrease the Falloff (Bias) by increments of 10%. This works only if you are not using the mouse wheel to zoom — see Mouse Wheel in Camera Preferences.
Adjusting Other Proportional Settings
The Tweak Component tool provides quick access to the MoveProportional property editor from its context menu:
Right-click and choose Last Proportional Operator to modify the settings of the last proportional tweak operation you performed. If the last proportional tweak operation applied multiple operators (for example, if you used Shift to select multiple components or if you were working in Sym mode), then this affects all of them.
Right-click and choose Proportional Settings to modify the settings used by future operations in the current session.
If you don't like working with the manipulator, you can hide or unhide it by clicking the on-screen button at the bottom of the view or by choosing Toggle Manipulator from the context menu.

When the manipulator is off, the Tweak Component tool is always in click-and-drag mode:
If all axes are active on the Transform panel, translation occurs in the viewing plane and scaling is uniform in local space. If one or more axes have been toggled off, translation and scaling use the current manipulation mode and active axes set on the Transform panel.
Rotation uses the current manipulation mode and the Y axis by default, but you can select a different axis by deactivating the others.
You can also assign a hotkey to Toggle Manipulator in the Tweak Tool and Tweak Tool Proportional groups (see Key Maps). It acts like a supra key — press and release quickly to turn the manipulator on or off, or press and hold to temporarily toggle the current state.