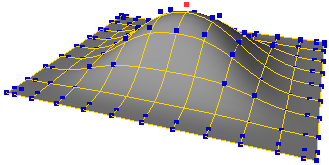
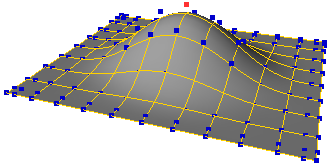
When you manipulate points, edges, and polygons, you can use proportional modeling. When this option is on, neighboring components are affected as well, with a falloff that depends on distance. Components that will be affected are highlighted in the 3D views. You can set the proportional options for future edits, as well as modify them for previous edits.
Proportional modeling is sometimes known as "magnet" or "soft selection".
To activate proportional modeling
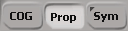
Click the Prop button on the Transform panel.
Choose Modify  Component Proportional from the Model toolbar.
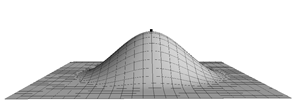
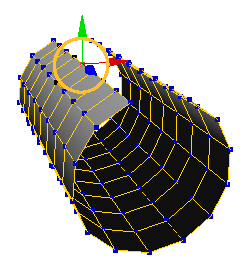
Components that are affected by the proportional falloff are highlighted, and the Distance Limit is displayed as a circle. Note that you can turn off the highlighting of components in your Display preferences.
Proportional Modeling Settings
The proportional modeling settings control things such as the distance limit for affected components and the shape of the falloff profile. You can modify all of these settings in the MoveProportional property editor, and in addition, you can change the distance limit interactively as you work.
Modifying Proportional Modeling Settings
You can modify the proportional settings before activating proportional modeling and the settings will be used for future proportional operations. You can also go back and adjust the settings used for previous operations in the operator stack.
To change proportional settings for future operations
To adjust the distance, falloff profile, and other proportional settings, do one of the following:
The MoveProportional property editor opens. The new settings will be used for future actions.
To adjust proportional settings for previous operations
Adjust the parameters. See Move Proportional Property Editor [Properties Reference] for details.
Changing Proportional Settings Interactively
You can change the Distance Limit and Falloff (Bias) interactively when proportional modeling is active. This works when a tool that supports proportional modeling is active, such as the Tweak tool, the Move Point tool or one of the transform tools in Point, Edge, or Polygon mode.
The R key and the up and down arrow keys control the Distance Limit, while Shift+R, Shift+up-arrow, and Shift+down-arrow control the Falloff (Bias).
To change the Distance Limit by increments
Press the up arrow key to increase the Distance Limit by 10%.
Press the down arrow key to decrease the Distance Limit by 10%.
You can also roll the mouse wheel up or down to increase or decrease the Distance Limit by increments of 10%. You may need to click first to make sure that the 3D view has focus. This works only if you are not using the mouse wheel to zoom — see Mouse Wheel in Camera Preferences.
To change the Falloff (Bias) by increments
Press Shift+down-arrow to decrease the Falloff (Bias) by 10%.
You can also press Shift while rolling the mouse wheel up or down to increase or decrease the Falloff (Bias) by increments of 10%. You may need to click first to make sure that the 3D view has focus. This works only if you are not using the mouse wheel to zoom — see Mouse Wheel in Camera Preferences.
The distance limit controls the size of the virtual sphere that determines which nearby components will be affected by the proportional operation. The points that are within the distance limit are highlighted in the 3D views. You can adjust the distance limit interactively or by increments as you work — these affect the value used for future operations.
Reference specifies the coordinate system used to determine the distance of nearby components:
Global uses the scene's coordinate system. With this option, the Distance Limit is in Softimage units.
Local uses the object's local coordinate system. In particular, the Distance Limit is affected by the object's scaling, and if the object has been scaled non-uniformly, then the limit of the effect will be different in different axes.
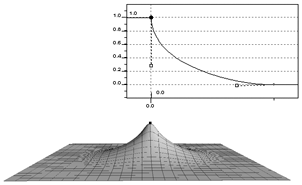
Falloff (Bias) biases the profile curve to change the rate of falloff. It provides a quick way to change the amount by which neighboring points are affected without modifying the profile curve itself.
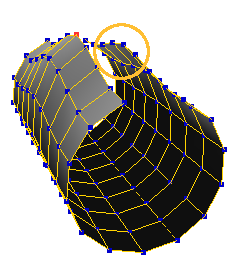
Consider Neighborhood provides further control over which components are affected by considering the adjacency of affected points, in addition to the distance from the components that are being directly manipulated:
If it is off, all components within the Distance Limit are affected.
If it is on, a component within the Distance Limit is not affected if it is not adjacent to components that are being directly manipulated, nor adjacent to other affected components.
This option is particularly useful when working on objects that curve back on themselves. However, you should turn it off to use proportional modeling with particles and point clouds.
Calculate Distance Using Neighboring Edges
Calculate Distance Using Neighboring Edges uses edge length to calculate the distance when Consider Neighborhood is on. This is useful when working on protuberances like fingers, because a large number of components do not suddenly become affected when the radius increases to encompass the base of a finger.
Tagged Points Only (on the Move Point Tool tab) limits the points that are affected by the Proportional operator to those that are currently selected. This option works only when using the Move Point tool to manipulate individual points with Proportional on; it has no effect when transforming selected points or using the Tweak Component tool.
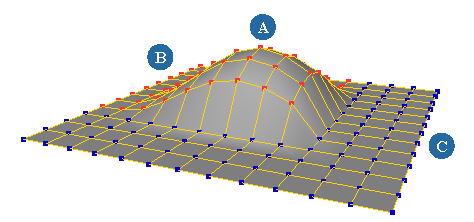
Tagged Points Only = on: Point (A) was moved. Selected points (B) are affected by the Proportional operator. Unselected points (C) are not affected.
To use Tagged Points Only, you must activate it using Component Proportional Setup before moving a point. When you modify a previous operator, this option will not appear in the MoveProportional property
editor if it was not already on when the operator was originally applied.
The Surface Options apply only to NURBS surfaces. They use the NURBS parameterization instead of distance to determine which nearby points to affect.
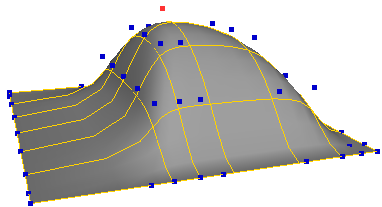
Use U/V Limits for Surfaces = on: Point (A) was moved. All immediately adjacent points are affected by the same amount, even though they are different distances away from the moved points. Similarly, all neighbors two points away are moved by the same amount as each other.
When Use U/V Limits for Surfaces is on, the Surface Options are used when manipulating points on NURBS surfaces. Other types of geometry (polygon meshes, lattices, curves, hair, particles, and so on) continue to use the settings in the Proportional Options area.
The U and V Limit options set the number of points to affect in the positive and negative directions along each parameter.
Shape controls the outline of the affected area:
Rectangular produces a box shape the size of the U and V Limits.
Elliptical modulates the falloff at the corners of the box. resulting in an oval area of effect.
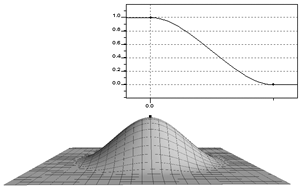
The Falloff Profile controls the shape of the Proportional effect by determining the amplitude of the displacement over the length of the Distance Limit or U and V Limits. A value of 1 means that components at the corresponding distance move the same amount as the manipulated components; a value of 0 means that they do not move at all.
You can select the curve and then edit it using the mouse and the same keyboard commands as the animation editor, or right-click to display a menu.
Make Default Profile copies the falloff profile to the scene defaults used in the current session. This is useful if you have modified an existing proportional operator's profile and want to use it for future operations.