You can scale, rotate, and translate selected components and clusters using the tools on the Transform panel.
For information about transforming objects instead of components, see Transformations [Working in 3D Space].
You may not get the desired results if you try to control the center of transformation by moving the object center multiple times while transforming components.
Instead of moving the object center, you can control the center of transformation in different ways: by activating COG, by transforming in Ref mode, or by setting the pivot.
Transforming Components Interactively
The Scale, Rotate, and Translate tools let you transform components and clusters interactively by dragging the mouse in the 3D views.
To transform components and clusters interactively
Select the components and clusters to transform, and activate a transformation tool:
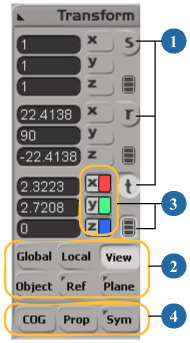
To translate, press V or click the t button on the Transform panel.
To rotate, press C or click the r button on the Transform panel.
To scale, press X or click the s button on the Transform panel.
Once a transformation tool is active, you can press Tab to cycle through them or Shift+Tab to cycle backwards.
If desired, change the manipulation mode. The manipulation mode controls the reference frame used when you scale, rotate, and translate elements. Each tool remembers the last mode used.
For a description of each mode, see Component Manipulation Modes.
If desired, you can restrict the interaction to specific axes. See Specifying Axes.
If desired, activate any other options:
COG (center of geometry) changes the reference frame used to manipulate the components and clusters. See COG.
Prop (proportional modeling) affects nearby components with a falloff based on distance. See Using Proportional Modeling.
Sym (symmetry) affects symmetrical points if a symmetry map has been applied. See Manipulating Components Symmetrically.
If desired, you can set the tool pivot. The pivot defines the position around which elements are rotated or scaled. When translating with snapping, the pivot is the position that snaps to the target. See Setting the Tool Pivot.
Manipulate the components using the mouse in the 3D views:
If you are using the SRT manipulators, click and drag on different parts (handles) of the displayed transformation axes to transform the objects in different ways.
For more information about the SRT manipulators, including the various handles and other options, see Transforming Interactively with the SRT Manipulators.
If you are not using the SRT manipulators, click and drag the mouse anywhere in the 3D views. The function of the left, middle, and right mouse buttons depends on the tool, mode, and other options — check the mouse/status line at the bottom of the main window for details. You can also drag while pressing multiple mouse buttons simultaneously.
When transforming elements interactively, you can set the tool pivot using the Alt key. The pivot defines the position around which elements are rotated or scaled. When translating with snapping, the pivot is the position that snaps to the target.
Note that when components are selected for transformation, setting the pivot always affects the temporary tool pivot. The
object pivot is not affected, whether or not Transform  Modify Object Pivot is on.
The same pivot is used for all selected elements. The pivot is normally reset when you change the selection. However, you can lock and reset the pivot position manually.
With a transformation tool active, do any of the following:
Alt+drag the manipulator's center, or one of its axes, to change the position of the pivot manually. You can use snapping, as well as change manipulation modes on the Transform panel.
Alt+click in a geometry view. The pivot snaps to the closest point, edge midpoint, polygon midpoint, or object center among the selected objects. This lets you easily rotate or scale an object about one of its components.
If Ref or Plane manipulation mode is active, the current reference plane is automatically updated. For information about reference planes, see Reference Planes [Working in 3D Space].
With a transformation tool active, press and hold Alt. The pivot's icon appears.

The tool pivot remains at its current location, even if you change the selection or activate another tool. You can also reset the pivot to its default from the same menu, but it's easier to simply Alt+middle-click while a transform tool is active.
Transforming Interactively with the SRT Manipulators
The SRT manipulators let you transform elements interactively by clicking and dragging on different parts (handles) of the displayed transformation axes. You can also use gestural manipulation or perform a default transformation.
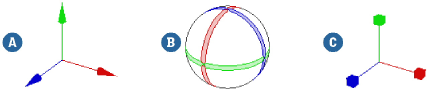
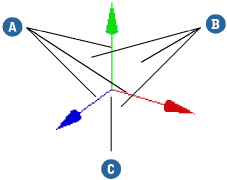
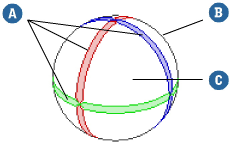
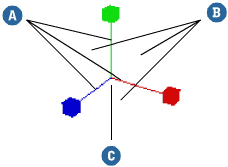
Transformation manipulators: Translate (A), Rotate (B), and Scale (C).
To use the manipulator handles directly
Move the mouse pointer over the manipulator handle you want. Different tools have different handles:
The Translate manipulator has seven handles:
The Rotate manipulator has five handles:
The Scale manipulator has seven handles:
The pointer updates to reflect the axes or plane of manipulation.
Middle-click and drag anywhere in a 3D view.
The axis that most closely matches the mouse movement over the first few pixels is used for the transformation.
Gestural manipulation works only if Click Outside Manipulator is set to No Interaction or Simple Transform in the Transform preferences. See the next section, To choose the behavior when clicking outside of the manipulators, for more information about these options.
To choose the behavior when clicking outside of the manipulators
You can choose how the transform tools behave when you click outside of the manipulators.
Set Click Outside Manipulator to one of the following options:
No Interaction: There is no effect when you click outside the manipulator.
Select Tool: Clicking outside the manipulator performs a selection using the current selection filter and the last-used selection tool.
Simple Transform: Clicking outside the manipulator performs a transformation using a default manipulation mode: View for the Translate and Rotate tools, or Uni for the Scale tool.
SI3D-style Transform: Clicking outside the manipulator performs a transformation as if Enable Transform Manipulators is off. The left, middle, and right mouse buttons transform the selected elements differently, depending on the current manipulation mode set on the Transform panel.
Transforming Interactively without the SRT Manipulators
When you are transforming elements interactively without using the SRT manipulators (that is, when Transform Enable Transform Manipulators is off), the different mouse buttons manipulate the object in different ways.
The exact way depends on the manipulation mode as well as other options, but you can always look at the mouse/status line at the bottom of the Softimage window to see what each button will do. Usually the different mouse buttons transform the object along different axes or planes, but if a single axis is active they transform at a slow, medium, or fast rate.
Component Translation and Snapping
When snapping, you can specify which relative location snaps to the target. For points, you can also control whether they snap as a group or all collapse onto the same target.
For more information about snapping in general, see Snapping [Working in 3D Space].
Specifying the Location that Snaps to the Target
When translating, the position that snaps to the target is the pivot. When components are selected, this is normally the center of geometry. However, you can set the pivot manually as described in Setting the Pivot [Working in 3D Space] — this is particularly useful when you are translating several selected points and want one point to snap to the target while the other points maintain their relative offsets.
Collapsing Multiple Points to the Same Target
When snapping multiple selected points, they normally maintain their relative positions, whether or not COG is on. However, you can force all selected points to snap individually to the same target if COG is off and Transform Collapse Points For Snapping/Absolute Translation is on.
As an alternative to transforming objects interactively, you can enter numerical values in the boxes on the Transform panel.
In Ref mode, values are relative to the active reference plane.
In all other modes, values are relative to the object's center.
Like other input boxes, you can enter specific or relative values for one or more selected elements. See Entering Values in a Text Box [Interface and Tools]. Note that when multiple components are selected, the linear, random, and Gaussian (normal) distributions set the same value for all selected components.
When you set values, selected components are transformed based on their center of geometry, keeping their relative positions
to each other. The exception is when entering translation values for points when COG is off and Transform Collapse Points For Snapping/Absolute Translation is on: in this case, all the points are set individually to the specified values.


