The render tree workspace is where you can connect shader nodes together to build trees. The nodes in the tree can be shader nodes or shader compound nodes. Shader compounds are built from shader nodes and possibly other shader compounds.
You extend shaders by using the outputs from one shader as the inputs for one or more shader parameters. Since each node can have multiple outputs and inputs, you can connect a nearly endless number of nodes together. For example, you can use a 2D or 3D texture to control a material shader's reflectivity and another texture to control its specularity.
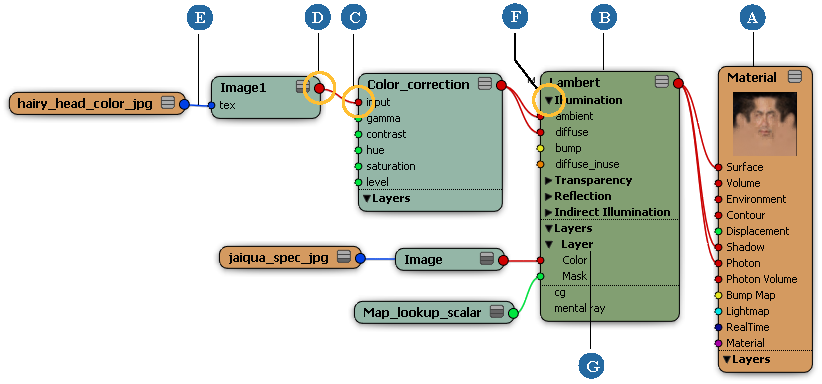
| A |
Material node — see The Material Node. |
| B |
Shader node — see The Material Node. |
| C |
Shader input port — see Ports for Parameters: The Ins and Outs. |
| D |
Shader output port — see Ports for Parameters: The Ins and Outs. |
| E |
Connection arrow — see Connecting Nodes. |
| F |
Port group — see Dynamic Input Ports and Port Groups. |
| G |
Texture Layer — see About Render Tree Nodes. |
Follow these basic steps for creating a render tree and see the corresponding sections for information on each step:
Select an object and open a render tree — see Texture Layers in the Render Tree below.
Bring shaders into the render tree workspace — see Connecting Shader Nodes.
Connect the shaders together the way you want. Certain restrictions apply to what you can connect together — see The Material Node and then Connecting Nodes.
Manipulate the shader nodes in different ways while you're working in the render tree — see Assigning Texture Projections to Nodes.
Navigate around and view the nodes in the render tree workspace as you're working — see Working in the Render Tree Workspace.
If you like, you can make shader compounds, which are groups of shaders contained within a single node — see Shader Compounds.
There are several ways to display the render tree view:
You should see the selected element's material node, and any connected nodes, displayed as a render tree.
Realtime Shaders and the Render Tree
Realtime shaders are designed to take full advantage of the render tree. In fact, the render tree is the only place where you can connect them to one another.

In most ways, realtime shaders look and behave like mental ray shaders in the render tree, but there are some differences. As such, there are a few things you should keep in mind when building realtime shader trees. For details, see Realtime Shaders vs. Mental Ray Shaders [Realtime Shaders].
Texture Layers in the Render Tree
When a shader has one or more texture layers, a new section called Layers is added to its node in the render tree. The Layers section contains a port group for each of the shader's layers. Expanding the Layers section reveals all of the individual layer port groups. Expanding an individual texture layer's port group reveals the ports for its Color and Mask parameters.
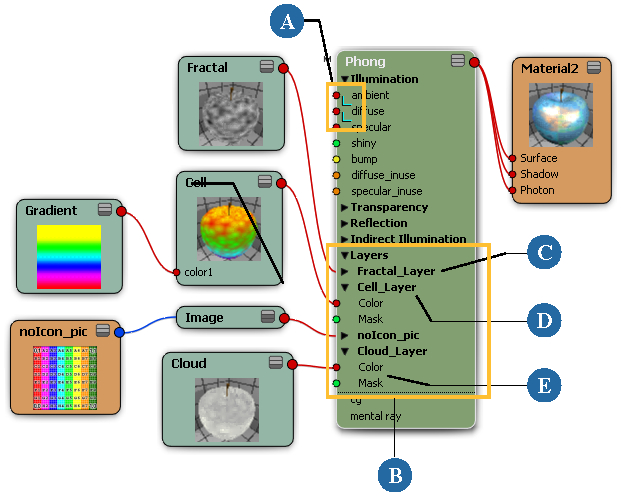
| A |
Ports that have been added to layers are marked with a small blue "L". |
| B |
Layers section of node |
| C |
Collapsed layer port group |
| D |
Expanded layer port group. |
| E |
Layer Color and Mask ports. |
Layers behave exactly like any other port group in the render tree, meaning that you can connect shaders to texture layer parameters as you would to any other shader parameters. This allows you to control each texture layer with its own branch of the render tree!
For more information about layering textures, including how to work with texture layers in the render tree, see Blending Textures with Texture Layers [Texturing].
For more information about collapsing and expanding texture layers in shader nodes, see Collapsing and Expanding Port Groups and Texture Layers.


 Rendering/Texturing