The render tree lets you connect shaders together into a tree structure to build a visual effect. You can have one render tree per object. Shaders in the render tree are called nodes or shader nodes as a way of describing their representation as a container. This is the same concept as object data being represented as nodes in the ICE tree.
Each node exposes a set of properties that can be dynamically linked by connecting one or more outputs from one shader to one or more inputs of another. This is called dynamic property assignment and is as simple as dragging a connection line (arrow) between the inputs and outputs of the shader node.
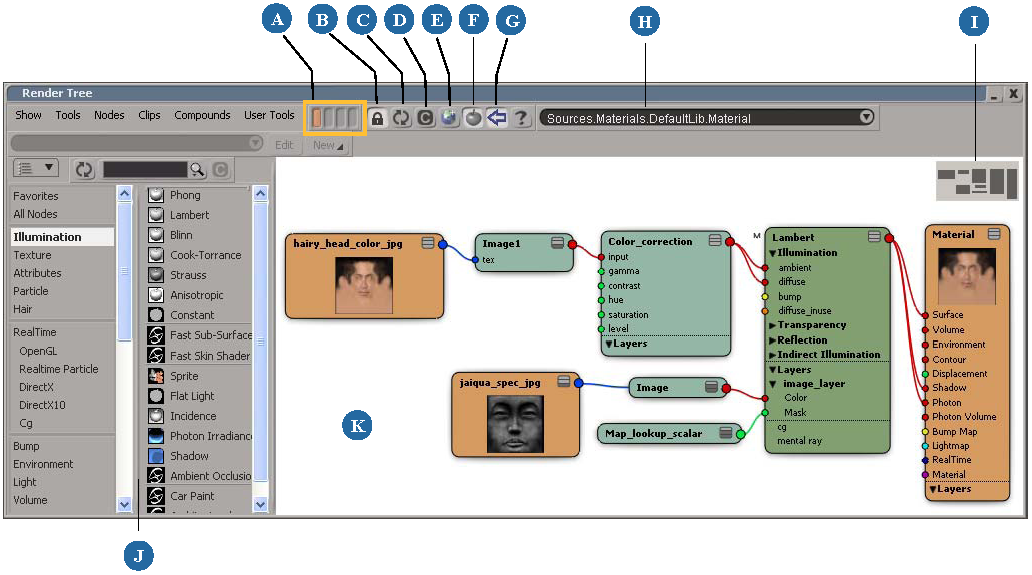
| A |
Memo cams: Store up to 4 views for quick recall. Left click to recall, middle-click to save, Ctrl+middle-click to overwrite, and right-click to clear. |
| B |
Lock. Prevents the view from updating when you select other objects in the scene. |
| C |
Refresh. Updates the view with the object selected in the scene when the view is locked. |
| D |
Clear. Clears the view, but does not remove or undo any of the connections that were made in the render tree. Unconnected nodes are not deleted. |
| E |
Opens the preset manager in a floating window. See The Preset Manager [Interface and Tools]. |
| F |
Displays or hides shaderballs on the shader nodes. |
| G |
Displays or hides the preset manager embedded in the left panel (J). |
| H |
Name and path of current Material node. |
| I |
Bird's Eye View. Click to view a specific area of the workspace, or drag to scroll. Toggle it on or off with Show |
| J |
Embedded preset manager. See The Preset Manager [Interface and Tools]. |
| K |
The render tree workspace. This is where you can connect shader nodes together to build trees. See Opening the Render Tree below for an overview. |
Each type of render tree node performs specific operations; for example, some nodes can be used as pattern generators (to create noise, for example), mathematical functions (such as multiplication), converters (to convert a scalar value to a color RGB value), mixers, blends, and so on.
A shader provides a number of properties that you can control. You can set constant values for these properties or you can attach other shaders to these properties to procedurally control their values.
A render tree makes it possible to use a texture (as a texture shader) to control a component of the shading calculation. For example, you can use a 2D or 3D texture as the color, specularity, or reflectivity of a material. This means that the inputs to the shading model can be manipulated procedurally. Color and transparency textures, reflection mapping, bump mapping, displacement mapping, and solid texturing can all be implemented using the render tree.
Making Shader Compounds or Creating Your Own Shader
You cannot change a shader node's internal contents using the render tree, but you can extend it by connecting other nodes to augment its effect. You can also create shader compounds, which are multiple shaders grouped together in one container. Compounds make it easy to use shaders in the render tree, and you can export them to use in other scenes or to share with other users. See Shader Compounds for more information.
You cannot build your own shader from scratch in the render tree, but you can create your own shaders using the Softimage SDK. For more information about creating and integrating custom shaders, see Custom Shaders [SDK Guide].
If you like to work with highly portable and flexible realtime effects files, you will find it very easy to integrate your own existing effects files into Softimage for use in the render tree. In fact, you can author new effects files directly within Softimage using the realtime shader wizard. For more information, see Loading Existing Effects Files in the Preset Manager and Authoring Effects Files with the Realtime Shader Wizard [Realtime Shaders].


 Bird's Eye View