The dopesheet is part of the animation editor, so it shares the same animation explorer and a similar timeline. However, the dopesheet has its own command bar which contains tools that manipulate the keys of the selected element's parameters.
To display the dopesheet, you can use any of these methods:
Choose Dopesheet from a viewport's view menu. This opens up the animation editor with the dopesheet as the active editor.
Open the animation editor in any way (such as pressing the 0 (zero) key), then choose Editor  Dopesheet from its toolbar.
To display the dopesheet in a floating window, choose View Animation Dopesheet from the main menu bar. You can move and resize this like any other window.
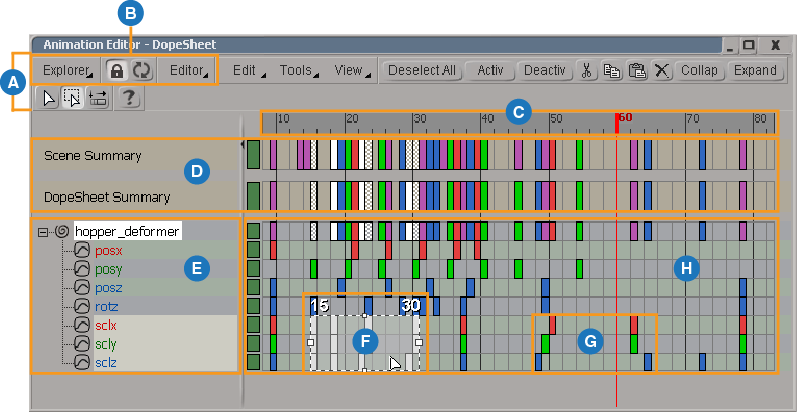
| A |
Toolbar contains commands and icons that let you manipulate the keys on the tracks of animated parameters. |
| B |
The Explorer, Lock, Update, and Editor buttons apply only to the animation explorer in the left panel of the dopesheet (E). See Using the Animation Explorer for more information. |
| C |
Timeline displays the same timeline as is used for the fcurve editor. Click and drag the red playback cursor in it to "scrub" through the animation. See Setting Up the Fcurve Editor Graph and Timeline for more information. |
| D |
Summary tracks display keys for all objects in the scene or all objects currently displayed in the dopesheet. See The Summary Tracks for more information. |
| E |
Animation explorer displays the parameters of objects that you select. See Using the Animation Explorer and Controlling What's Displayed in the Dopesheet for more information. |
| F |
Regions let you edit multiple keys, including moving them, scaling them, copying and pasting them, and deactivating animation. See Editing Multiple Keys Using Regions for more information. |
| G |
The keys represent the keyframes of the selected parameter's animation. Each colored block is one frame long. See Working with Keys for more information. |
| H |
The tracks display and let you manipulate the animation keys. You can expand and collapse tracks to view exactly what you want. See Working with Tracks for more information. |
Mini Dopesheet in the Timeline
Similar to the dopesheet, you can display and edit keys in the timeline for the selected object. This can be handy for viewing and editing keys when you are working in a full-size viewport and can't have a full dopesheet open.

A region of keys displayed for selected object in timeline
You can edit regions of keys in the timeline as you do in the dopesheet. For more information, see Editing Keys in the Timeline.
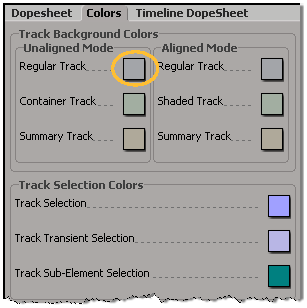
Setting the Default Colors for the Dopesheet
You can change the default colors used for many of the elements in the dopesheet, such as for the different types of tracks and their selection color.
To set the dopesheet colors, do either of the following:
Click the color chip for the element you want to change and select a color from the mini color editor that appears.
For more information on setting colors, see Defining Colors with the Color Editors [Interface and Tools].