Unlike the fcurve editor, where time is displayed as a continuous curve (graph), the dopesheet shows time in discrete chunks (frame by frame). Even though the keys do not really have a duration, they are displayed in the dopesheet as if they do.
Keys are represented in the dopesheet as colored frames on the tracks. Keys can be in these colors:
Red, green, and blue for XYZ transformation parameters and RGB color parameters.
Purple for overlapping keys displayed on the summary tracks or when tracks are collapsed.
You can also change the default colors for the keys as you like with the options on the Colors page in the Dopesheet Preferences — see Setting the Default Colors for the Dopesheet.
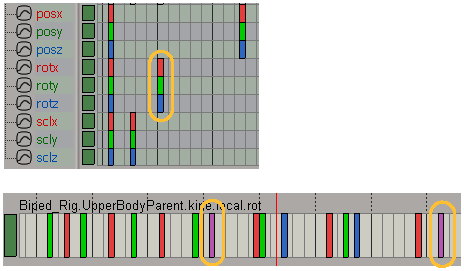
On the top, X, Y, and Z parameters are shown with red, green, and blue keys, respectively.
On the bottom, overlapping keys on a collapsed track are shown in purple.
Selecting and Deselecting Keys
You can quickly and easily edit single or multiple keys on tracks.
To select a key, activate the Select tool by pressing the space bar or clicking the icon in the toolbar, then click a key (it turns white).
Once the keys are selected, you can do any of these options:
Move them (see Moving Keys).
Copy, cut, and paste them (see Cutting, Copying, and Pasting Keys in the Timeline).
Delete them (see Deleting Keys).
To deselect keys, do either of the following:
Editing Multiple Keys Using Regions
To edit multiple keys, it's best to create regions that contain them. Once you have drawn a region with the keys in it, you can do any of the following:
Move them (see Moving Keys).
Scale them (see Scaling Regions of Keys).
Copy, cut, and paste them (see Cutting, Copying, and Pasting Keys in the Timeline).
Delete them (see Deleting Keys).
To draw regions, activate the region tool by pressing the Q key, clicking the region icon in the toolbar, or choosing Tools  Region Tool.

Drag the mouse pointer in either direction over the frames and tracks you want to edit.
To draw multiple regions (on the same or different tracks), press Shift and draw the regions, one at a time.
To draw a region that spans multiple tracks (collapsed or not), drag over the whole area over any number of tracks.
These regions can also overlap other regions: the region creation order is the order in which they are processed. If you have keys in multiple regions, they could be offset one or more times depending on how many regions they are in.
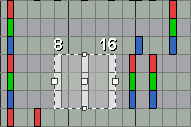
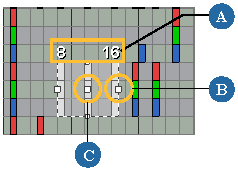
The region is displayed as a white rectangle on the track with a position handle (in the center) and four scale handles (left, right, top, and bottom). The region also shows the start and end frame numbers.
Resizing a region changes the size of the region itself, but does not affect the keys within it. If you want to change the keys within a region, you can move the keys or scale the keys in a region.
You can use the rippling to control whether keys on the track are pushed along the track or not when you move, scale, cut, or paste regions.
When rippling is on and you perform any of these operations, the keys are pushed "down" the track, to the right. For example, if a region of 10 frames is scaled to 15 frames to the right, the keys on the right are pushed in that direction by 5 frames. Any offset between the region and the other keys is preserved. Keys that are to the left of the rippled keys are not affected by rippling.
To activate Ripple, click the Ripple icon in the toolbar before you move, scale, cut, or paste a region.

You can set the Ripple mode to be active by default in the dopesheet preferences property editor (see Dopesheet Preferences ).
Deleting keys removes that key from the animation or deletes the animation from the frames that are contained in the region. Deleting does not put the keys in the clipboard buffer, as does cutting, but you can undo this action like anything else in Softimage by pressing Ctrl+Z.
To delete a single key, click the key to select it, then do one of the following: