Position objects relative to the floor


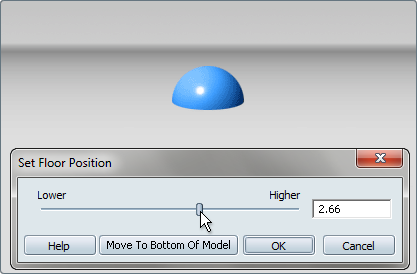
When you import models into Autodesk Showcase, they might not all sit on top of the floor. Fix this by either moving them onto the floor, or moving the floor closer to the objects.

To move multiple objects to rest on the floor:

  1. Select the objects you want to move to the floor.
  2. If the objects are drastically apart from each other, press H and rotate them manually until they are more or less aligned parallel to the floor.
  3. Select Edit > Position on Floor.

    The selected objects are “dropped” to the floor. They are moved as a group, and end up resting naturally on the ground. If you select multiple objects, they are moved and rotated as one rigid body with the bottom three objects resting on the floor.

To move the floor to the objects:

  1. Select Edit > Set Environment Floor Position.

    The Set Floor Position window appears.

  2. Move the floor up and down by adjusting the slider or by typing the vertical (z) coordinate in the box. If the coordinate box does not accept decimal input, change the Precision amount in File > Scene Settings.
  3. To align the floor to the bottom of the lowest visible object, click Move to Bottom Of Model.