Before you start ...
NoteThe
input images used for custom environments are High Dynamic Range (sometimes
called 32-bit or HDR images) panoramic images which store more brightness
than can be displayed on a conventional computer monitor. They can
be created by many different devices, cameras, and software with
a wide range of capabilities. The quality of the HDR input image
will greatly influence the quality of the custom environment in
Showcase.
You must acquire or create
the necessary image files before you can proceed to create your
own image-based lighting environment, including:
- HDR panoramic image, used to create lighting
maps. Lighting maps add lighting to materials, providing specular
and diffuse highlights and reflections.
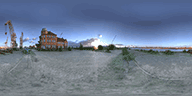
The source panorama image used to create the
IBL Lighting maps must be an HDR image that shows 360 degrees of
a scene around a central point, and 180 degrees vertically (from
straight up to straight down). This panorama can be in any of 3
“projections” for a panorama of this coverage:
- Latitude/ Longitude:
similar to a world map, where the sphere is mapped to a 2:1 ratio
with the poles at the top and bottom edges.
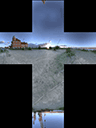
- Vertical Cross:
similar to an unfolded cube, where each face is a rectilinear view
of the cardinal directions (up, down, front, back, etc.).
- Spherical:
similar to the reflection in a mirrored ball, where the entire scene
is warped to fit into a circle within a square image.
- You may also start with an existing environment
and add a different backdrop or backplate image, depending on the
type of environment you are creating.
A backdrop is a panoramic image of the environment
(typically derived from the same file as the lighting maps, but
not HDR) which is mapped to the visible environment geometry. The
panoramic backdrop image must be in a latitude/longitude (equirectangular
"map") format and have an aspect ratio of 2:1. Ideally, it should
be at resolution 4096 x 2048. The best file format for this file
is PNG (Portable Network Graphics) non-interlaced.
A backplate image is
a regular 2D image, typically showing the location where the lighting
maps are centered. The objects in your scene can then be viewed
against the backplate with matching reflections and lighting.
Define a custom environment
library
Before creating custom
environments, a custom library must be defined. This can be a folder
on your local machine, or a shared location on a network drive.
The user running Showcase must have write permissions to this library
location to save a custom environment.
For detailed instructions,
see
Add a custom environment library.
Create environment maps
After you obtain the
environment image file, follow these instructions to generate the
IBL maps needed for your own environment in Autodesk Showcase:
NoteThese
steps are the same whether you choose to create a Geometry Environment (with
an image mapped to it) or a Backplate Environment (where the image
is infinitely far away).
- If the Environments interface is not
already visible, press the E key
(or select Scene > Environments).
- Press the Create button
at the top of the Environment interface, or choose the menu item Scene
> Create Environment...or right-click on
an editable environment like Generic or BP Generic, and from the
menu that appears, choose Create New Environment.
- Browse your files and choose an HDR panoramic
image meeting the criteria listed in the Before you start...section
above.
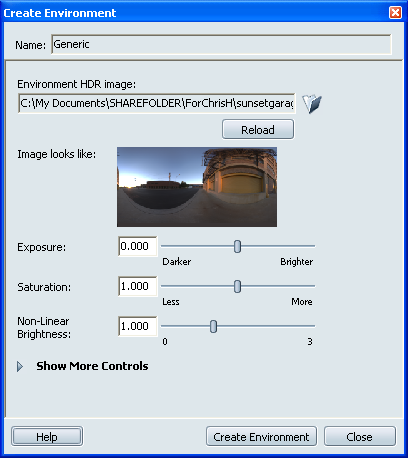
After
a few moments, the Create Environment dialog will appear and a preview
of your environment image will be displayed
- Make adjust the image so that it looks
good in the preview using the following tools:
- Exposure:
adjusts the overall brightness of the input HDR scene when creating
IBL maps and the background image. The slider has a range of -3
to +3, but values beyond these can be entered numerically. This
is useful when the IBL effect is either too dark or too bright.
- Saturation:
sets the overall saturation of the scene. More saturation will result
in a more “colored” environment lighting, while less will result
in a more “neutral” lighting.
- Non-Linear Brightness:
adjusts both the brightness and saturation of the image at the same
time, in a non-linear amount. Useful if the image is extremely dark
and contrasted, or light and lacking contrast.
- Press the Create Environment button
to begin the process of creation.
After the process completes, the newenvironment
will be shown in the scene and automatically saved to a temporary
directory. The Create Environment dialog remains open for adjustments
and recreating the environment with new settings.
More controls and recreating
the maps
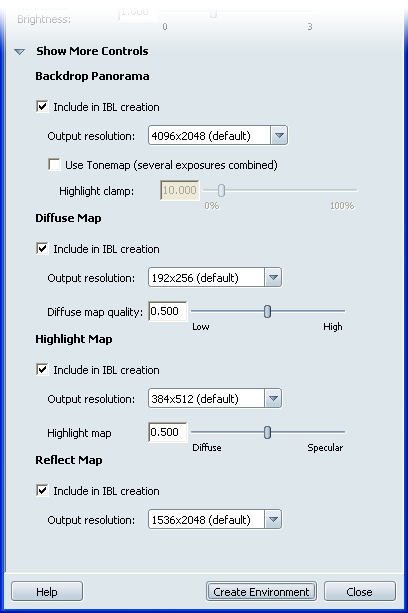
Press the Show More Controls
folder to expose the advanced and individual map controls for the
current environment.
NoteThe
environment shown in the scene can be adjusted by changing any of
the values in the Create Environment dialog and pressing the Create
Environment button again. This will recreate the environment,
excluding any maps not “checked” as Include in IBL creation.
- Include in IBL creation.:
include this part of the environment map list when creating, or
recreating, the environment.
- Output resolution:
adjusts the size of each map. The resolution should be chosen by how
much detail there is to preserve in the input map.
- Use Tonemap:
for the Backdrop (visible) Panorama, combines multiple exposures
of the HDR original to create a visually recognizable image.
NoteTonemapping
can produce unusual effects with some very extreme range HDR images.
In these cases, simply use the single exposure image automatically
generated without this option, or tonemap the image in a separate
application.
- Highlight clamp:
limits the brightness of highlight pixels by clamping a percentage of
them from 0% (no clamping) to 100% (all highlight pixels). This
is useful when the scene appears "blown out" or the highlights are
not discernable.
- Diffuse Map Quality:
changes the convolution of the diffuse map, where higher takes more
time to calculate but is more accurate.
- Highlight Map :
controls blurriness, where Diffuse is very blurred and Specular
is less blurred.