This section describes the options found in the Story window’s context menu that are available when you right-click one or more selected clips. See Story context menu and Story track context menus for information on additional menu options.
You can also access some of these options from the Story Controls. See Story controls.
Depending on where you right-click and what is selected, the options in the context menu may change. For example, right-clicking in the Edit Track list shows different options than right-clicking in the Action Track list. The options that appear also change depending on which tracks or clips are selected and apply to the selection.
The options described in the rest of this topic are listed according to the order in which they appear in the context menu. The options that are listed appear regardless of which Track list you right-click, unless otherwise indicated.
The following context menu items may appear when one or more clips are selected in the Story window:
Select Camera lets you select a shot clip’s camera. This option appears when a shot is selected in the Edit Track list.
Make Camera Current switches the camera view in the Viewer window to a camera that can be used by a camera shot. The Make Camera Current option is available when a shot is selected in the Edit Track list.
Active when an audio, video, or character clip is selected, the Change Media File option lets you select a different media file for the clip.
The .fbx files you use as animation, character and camera animation clips can contain more than one take. The clip uses only one of the takes by default. The Change Take option opens a dialog box, which lets you select a different take for the clip.

Select Take dialog box
The Make Clip Writable option lets you make read-only clips writable. When a clip is writable, its keyframes display, letting you edit them and set new keyframes. A writable clip’s keyframes display and can be edited only when the clip’s track content is selected and the track’s Animate option is active.
The Make Clip Writable option appears when you right-click a read-only animation clip, camera animation clip, or character clip. However, this option does not appear if the clip’s animation is retargeted.
For example, a character clip’s animation is automatically retargeted when the skeleton it was plotted to is different than the skeleton of the character selected in the track’s Character field.
The Solving Mode menu, which displays in the Asset Settings window, lets you see which solving mode a character clip is using. If Retarget From Skeleton is selected, the clip can only be made writable if you plot the animation to the current skeleton. When Skeleton or Control Rig is selected in the menu, the clip can be made read-only.

Asset Settings window A. Solving Mode menu
The Make Clip Read-Only option appears when you right-click a writable animation clip, character clip, or camera animation clip. This option lets you save the contents of a clip and make them read-only.
The clip is saved as an .fbx file the you can reuse by dragging it from the Asset browser to the Story window. See Creating animation clips, or Creating camera animation clips for more information.
When a clip is read-only, its keyframes do not display and you cannot set keyframes on it.
The Export Clip option appears when you right-click on a writable animation clip, character clip, or camera animation clip.
The Export Clip option lets you save a clip as an .fbx file without making it read-only as well. You can reuse the .fbx file by dragging it from the Asset browser to the Story window.
A clip can exist without keyframes. A clip without keyframes is created when a track’s Animate button is active and you translate, rotate, or scale the track’s selected asset. Such a clip displays the letter “c” in parentheses.
This clip contains certain initial values, even though it does not have keyframes. These values are the transform values of the track’s selected asset.
For example, if you rotate an object 90 degrees, the clip that is created contains that value and the object remains rotated 90 degrees. If you create a second similar clip, where you rotate the object again, the object rotates between the two clips.
You can change the values of a clip by placing the Timeline indicator on the clip and transforming the object again.
The Clear Values Without Keys option lets you erase the transform values of a selected clip. When a clip is empty, it contains no values and does not animate the object in any way. The “c” in parentheses does not display on an empty clip.
The selected assets in a track and the track’s clips are linked automatically. The Assign Sources To Destinations option opens a dialog box which lets you view and change these links.
The Assign Sources To Destinations option is active when you right-click animation, camera animation, and character clips.
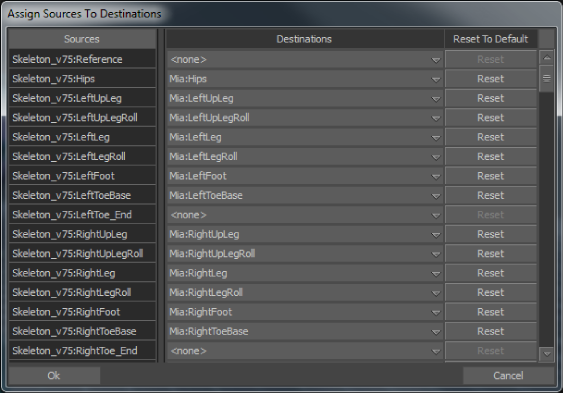
Assign Sources To Destinations dialog box
 Except where otherwise noted, this work is licensed under a Creative Commons Attribution-NonCommercial-ShareAlike 3.0 Unported License


